Asus is a manufacturer of high-quality electronics, including routers for accessing the Internet.
The Asus modem RT-G32 is recognized as a classic budget model.
This device is sold at any electronics store. It is inexpensive, which is why it is one of the best-selling modems. For a professional, setting up an Asus RT router takes about 10 minutes. For beginners, a convenient instruction has been compiled, thanks to which Asus is easily and quickly prepared for work on its own.
Technical characteristics of the Asus RT wireless router:
 The G32 has a stylish, modern look and can be mounted on a wall or flat surface. RT-G32 is available only in white. On the front of the Asus are power indicators, as well as "lights" for wireless and wide area networks. On the rear panel of the G32 are the reset buttons, start the WiFi connection, connectors for connecting network devices, power supply. The RT-G32 router is equipped with one external non-removable antenna. The dimensions of the Asus device are 110 x 33 x 167 mm.
The G32 modem comes with all the elements necessary for connection: a network cable for connecting to a computer, a power source, the router itself, connection instructions and an installation disk. 
To install the RT-G32 router, you need to complete several steps:
Using these points, the path is implemented: “Internet - Asus Router - Computer”.
To work with the Asus modem, you need to configure the computer card. For this:

The G32 is configured via a Russian-language web interface. First of all, enter the IP address in the browser: 192.168.1.1, then press Enter. The windows that appear require you to specify a username and password. By default, in both cases, the word admin is entered for Asus devices, if the login / password has not been changed. In the latter case, the changed data is indicated. 
A window will appear on the monitor where the interface language is set at the top of the page.
 The Internet connection is the main part that allows the modem to receive and send traffic. For correct adjustment, you need to carefully read the general information. Each of the existing providers uses one of several types of connection:
This data is indicated in WAN (first menu item). After authorization, the next steps are identical. General operating algorithm – WAN; Internet connection (here you must indicate the type of connection). Next you need to follow the instructions. If any information to fill out is unknown, you should call the provider.
 Dom.Ru, Rostelecom
To configure these providers in the WAN, you need to specify the following parameters:
 "Beeline"
The Beeline provider uses an L2TP Internet connection. To connect G32, fill in the following items:
The Asus router model RT-G32 is connected to NetByNet via PPTP (VPN). There are two connection options: with automatic local IP and with static local IP.
 For automatic IP:
 With static IP:
 To configure WiFi, you need to open the “Wireless Network” tab and set the following arguments in it:
When the adjustment is done, you need to reboot Asus and check the connection of the router to the network.
A repeater is a device required to increase the range of a network. Many modern modems are capable of operating in repeater mode. You can configure it for Asus by following the algorithm:
It is important to note that in repeater mode it is impossible to change the values at 192.168.1.1. This is due to the fact that the G32 router assigns a certain IP address to the repeater. There are three ways to access the Asus control panel:
To return the repeater to normal operation, you need to go to the "Administration" tab, select the "Wireless Router" item and click "Save". The window indicates the new network name and password, after which the Asus RT-G32 will reboot.
In the additional settings of the G32, access to IP television is established. In the WAN menu, select the port to which the TV is connected, set a dynamic IP address. These changes must be saved by clicking the "Apply" button. 
Then turn on the TV and check its functionality. If the image is not visible, it means:
This technology does not require any additional data, the only point is to indicate the connection. To do this, go to the WAN and select the “Dynamic IP” connection type. 
The Asus RT router has additional security features:

This data allows you to safely work on the Internet and implement parental control.
There is no direct printer connection for the G32, only network printers with IP are allowed to connect.
DLNA provides access to audio, video, and photo files for a TV that supports this server. If the model has a USB connector, then you need to connect a drive to the USB connector that will be accessed from the TV. Then you need to go to the settings of the Asus G32 router at 192.168.1.1, specify the username and login. In the “General” menu, select “USB Application” and then “File/Media Server”. 
In the “Media server” item, the On switch is set next to the Enable DLNA Media Server item. After that, click the “Apply” button. 
To enable access from a computer, smartphone or other device, go to the "Network Neighborhood" tab, set On opposite "Allow sharing a resource". After these steps, the drive connected to the Asus G32 will appear in the Explorer in the "Network" window.
If the RT-G32 does not work after setting the settings, the following problems may be the causes:

If the problem cannot be solved by the indicated methods, you should contact the technical support of the Internet service provider.
Firmware is a program downloaded from the official website that is responsible for the functionality of the device. Older Asus routers do not correspond to the latest version of the program, this should be taken into account when downloading.
To flash the Asus device, you need to download the file with the program, install and run it. Then go to the router menu in "Administration" - "Firmware update". In the field that appears, the address with the downloaded firmware is indicated. Then click the “Submit” button and the device will begin flashing. The Asus router will update itself and reboot. If the Asus RT does not reboot, you should do it yourself. Setting up the G32 after the update will require repeated steps. 
When buying a new G32 router or having problems, it is recommended to perform a factory reset. To do this, the Asus router has a “recessed” Reset button, which must be pressed with a pin or wire and held for 10 seconds. 
You can also reset the settings through the Control Panel. To do this, enter: 192.168.1.1 in the address bar of the browser, go to the “Administration” tab - “Manage settings”, click the “Restore” button and Ok. The factory reset will begin, you need to wait until the recovery process is complete. 
Sometimes the installed settings may fail. This happens accidentally or due to a bug in the G32 router firmware. In order not to re-enter the configuration data, you must use the recovery function. To do this you need:

"Asus" is a simple and inexpensive device for connecting to the Internet. Setting up the Asus RT-G32 router according to the instructions and connecting to the “global network” is quite simple. The web interface is made in Russian and has an easy, intuitive menu. Asus RT is a good option for home use with average Internet speeds. For high speeds, it is better to choose a more professional device. Compatible with many existing Internet providers.
The G32 device has the following advantages:
The main disadvantages of the RT-G32:
The asus rt g32 router is a “classic” representative of the budget “line” of routers: the cost of the device does not exceed $25 - $30, and the model is available almost everywhere.
Despite its rather “respectable” age (the model first appeared on the international market more than six years ago), the asus rt g32 router is still very popular with such well-known providers as Rostelecom, Ukrtelecom, Dom ru and TTK, as well as cellular operators communications (Beeline, MTS, etc.). Which is quite natural: the cheaper the model, the easier it is to sell it to a trusting client.
However, any network equipment in this price category has its own “baggage” of shortcomings. And the asus rt g32 router, despite the “renown” of the manufacturer, was no exception here: many reviews note the poor design of the model, frequent crashes and “freezing” of the modem during operation, as well. Therefore, when choosing, you should pay attention to more modern models.
However, router rt g32 may well support a small home network with limited functionality. And this article provides a brief overview of the router, as well as step-by-step instructions on how to install and configure the rt g32 wifi router yourself.
WiFi access point rt g32 operates at a standard frequency of 2.4 GHz, and it is recommended for stable operation of the wireless network.
The security of information exchange here is ensured by the use of modern technologies: WEP, WPA and WPA2. At the same time, the nominal speed of receiving information via wi fi is only 150 Mbit/s - this is a fairly low figure compared to the same, where the maximum reaches 300 Mbit/s.

As usual, the indicator block of the asus rt g32 router is located on the front panel of the device and is limited to the “standard” set:
On the back of the Wi-Fi router asus rt g32 there are:
Authentication method - here feel free to choose WPA2-Personal (this is the most modern method of protecting data on a wireless network).
A WPA preshared key is a Wi-Fi password that protects your network from “free” WiFi lovers. It is recommended to set a complex unique password on the WiFi router asus rt g32, which will protect your router when someone tries to hack the network.
By the way, you can later change the password - this is also done in this section of the menu.
Setting up IP television on the asus rt g32 router is also carried out in “Advanced settings” in the WAN section, where you need to select the port to which the TV set-top box is connected and set a dynamic IP address for it


First, you need to connect all cables to the appropriate connectors:
For Windows XP:
Go to the menu ![]() , .
, .
In the network connections window (Figure 1), right-click on “ " and select " Properties».

Figure 1. Network connections window in Windows XP.
In the window " Local Area Connection Properties"(Figure 2) select " Internet Protocol tcp/ipProperties».

Figure 2. Local network connection properties.
In the window " Properties of the Internet Protocol TCP/IP» (Figure 3) select:
and click the button OK»

Figure 3. TCP/IP protocol
For Windows 7:
Go to the menu
, ![]() ,
,  , .
, .
In the window " » (Figure 4) click ![]() .
.

Figure 4. Network and Sharing Center window in Windows 7.
In the window " "(Figure 5) find " LAN connection", right-click on it and select " Properties».

Figure 5. Network Connections window in Windows 7
In the window " Local Area Connection Properties" (Fig. 6)) select the item " Internet Protocol Version 4 (TCP/IPv4)"(WITHOUT unchecking the checkbox) and click on the " Properties».

Figure 6. Local network connection properties in Window 7.
In the window " Properties: Internet Protocol Version 4 (TCP/IPv4)"(Figure 7) select:
and click the button OK»
Figure 7. TCP/IP protocol
To get to the router’s web interface, open your browser, enter the router’s IP address in the address bar (default http://192.168.1.1) and go to this address (Figure 8).
Figure 8. Browser address bar


Figure 10. Installation Wizard

Figure 11. Determining the connection type

Figure 12. Selecting the connection type manually
Click " Apply all settings».

Figure 13. Account setup

Figure 14. Performing saving parameters

Figure 15. Checking Internet connection
Click the button Complete».

Figure 16. Wireless network setup

Figure 17. Saving parameters

Figure 18. Completing setup
Your Asus Internet router is configured for a pleasant experience on the Smile network!
To manually configure Internet access:

Figure 19. Manually setting up an Internet connection – Connection type
Click " Apply».

Figure 20. Manually setting up an Internet connection - Authentication
To manually configure a wireless network:
1. Log into the router’s web interface.
2. In the section " Additional settings» select the item « Wireless network"(Figure 21).
3. In the field " SSID"Indicate the name of the wireless network (you need to come up with it yourself; it will later help you distinguish your network from strangers).
4. For the parameter " Authentication Method» select value « WPA-Auto-Personal».
5. For the parameter " WPA encryption» select value « TKIP+AES».
6. In the field " WPA Preshared Key» Specify the key to access the wireless network.
7. Click " Apply».

Figure 21 Manually configuring the wireless network
To configure the IPTV port:

Figure 22 IPTV port setting
To increase the security of your Internet use, we recommend changing the password for accessing the router’s web interface. For this:
1. In the section " Additional settings» select the item « Administration", tab " System"(Figure 23).
2. In the window that opens, you will need to specify " New Password"(password that you will subsequently use to access the router's web interface) and " Re-enter your new password"(Accordingly, there you will need to re-enter a new password to access the router’s web interface).

Figure 23. Changing the password to access the router web interface
You may also need data from the router log. To obtain this information, go to the section " Additional settings", paragraph " System log", tab " General Journal"(Figure 24).

Figure 24. Router system log
ASUS is a well-established manufacturer of electronics with good performance, including modems for Internet access. But any device of this type must be configured to the parameters of the provider with whom the contract for the provision of communication services has been concluded.
This instruction will give you the answer to the question of how to configure the asus rt g32 router, while it is worth remembering that the configuration algorithm and interface of devices from the same supplier are very similar, so the article will be useful to all buyers of ASUS modems with Wi-Fi support.
Technical preparation of the router for configuration is carried out in several stages:
Often the characteristics of a computer's network card are manually configured for other connections. To work with the Asus RT g32 Wi-Fi router, you need to configure the card:
1. Open the OS network settings section. For example, for Windows 7 you need to open the settings window shown in the following figure (located in the control panel), where you click on the highlighted link.
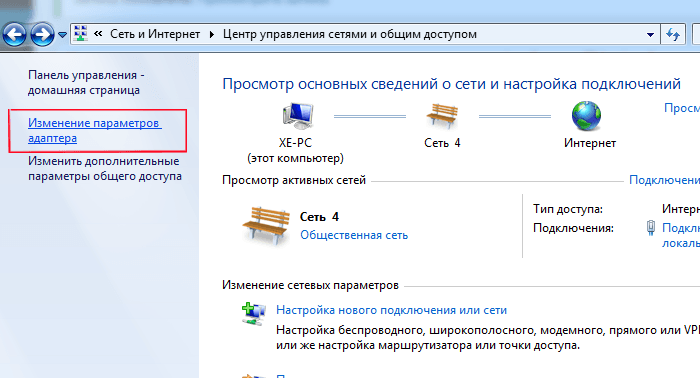
2. Go to the connection properties by right-clicking on its icon and selecting the appropriate item in the menu that appears.

3. Open the "Properties" of the item indicated in the following figure:

4. Set the values of the protocol characteristics, as shown in the figure:

Repeat the procedure for other connections, if any.
To configure the Asus RT-g32 according to the settings of your provider, follow the steps of the following instructions:
1. Launch any browser, enter the address 192.168.1.1 and go to it.
2. In the loading authorization dialog, enter “admin” in both fields and click on “Submit”

3. Click on the button "Go to the main page"

4. The software shell of the Asus RT g32 Wi-Fi router supports Russian, select it in the “Language” field.

5. To configure access options for the global network, click on the “WAN” main menu item.
6. Check with your carrier for connection type.

7. If the provider provides the Internet using dynamic IP technology, then nothing needs to be changed on the “WAN” page. Click on the "Accept" button.
8. If the Internet is provided using static IP technology, then in the “WAN connection type” item, select the appropriate type and fill in all the form fields with the data received from the provider and click on “Accept”.

9. When selecting the PPPoE connection type, specify receiving an IP address automatically or fill in the address field if it was provided by your Internet provider. Z Fill in the fields in the “Account and connection settings” section with the data specified in the contract for the provision of communication services, and in the MTU field enter the value 1472 and click on “Accept”.


11. Apply the changes and configure the wifi module for wireless connection. If this option is not needed, restart the modem and use the Internet.
To configure the characteristics of wireless access to the global network, open the “Wireless Network” tab of the main menu. Where you set the following options:

This completes the setup of the Asus RT g32, all that remains is to reboot it and use the Internet, both via a wired interface and via Wi-Fi.
Found a typo? Select the text and press Ctrl + Enter
So, dear friend, since you came to this page, it means that you bought or are going to buy an ASUS router and want to learn more about setting it up or are just wondering “ how to set up asus rt g32 router" This is the place for you. Setting up an asus router is very simple; by following all the steps in this article in sequence, you can easily set up and use the router.
The Asus company has been in the electronics market for a very long time and has established itself as a reliable, high-quality supplier of goods. The ASUS campaign is capturing the router market with different models, but at the moment the most popular of them are: “ Router ASUS RT-G32, ASUS WL-520gC, ASUS RT-N10" Also the setup of these models is the same.
We will look at the setup using a router as an example. Asus RT-G32. But if you have another router that is not included in this list, do not be discouraged, read the article carefully and you will understand how to configure your router model.
Before you start setting up and connecting to the Internet of any router, you need to configure your computer and find out the settings of your provider. You can do this in this article " ». After receiving all the information and setting up the computer, you need to connect the router to the computer.
So, we take the router out of the box, plug it into the network (plug the router's power supply into an outlet). We insert the provider cable into the WAN port located on the back of the router. We take a short patchcourt (the short cable that came with the router), insert it into the LAN port on the router, and the other end of the cable into the network card on the computer. It should look similar to the pictures below.
You can find out more about connecting a router in the article “ ».
Before you start directly setting up the router on your computer, you need to reset the settings. Press the Reset button and hold it for 10 seconds.
After we have connected the router and configured the network card, we will log into the working interface of the router (where the router is configured). To do this, we need to open any of the browsers (Opera, Mozilla, Internet Explorer, Google Chrome) and enter the following address 192.168.1.1 in the address bar. An authorization window will appear, fill in the fields Login-admin password-admin. And click the “Submit” button.
When you first log in, you will be presented with an automatic setup window.
We won’t go through it, it’s better to do everything manually, click “Go to main page”. If you have all the inscriptions in English, select the interface language Russian.
To set up the Internet on the Asus router, you had to clarify or determine for yourself what type of connection your provider has and what settings. After that, select the WAN item in the interface menu
A window for setting up the Internet will appear.
If your provider provides an Internet connection of the Dynamic IP type, then you do not change anything in the settings. Click the Accept button.
Select the connection type Static IP. We enter the settings of your provider: IP address, subnet mask, Default gateway and DNS server and “Accept”.
Enter the connection type PPPoE. We also determine whether the provider provides an IP address automatically or not, and accordingly put a dot in the “Obtain a WAN IP address automatically?” field. Not really.
In “Account and connection settings” enter your username and password - you should have this data in the contract received from your provider. MTU: 1472. Click “Accept”.
Everything is the same as in the PPPoE settings. Another parameter is added to the “Special requirements of the Internet service provider” field. Heart-Beat or PPTP/L2TP(VPN) server: ppp.lan (or 10.10.3.36)
In the main interface menu, select the “Wireless Network” tab. Then we configure the parameters. In the SSID field, enter the network name - this is the name that will be displayed when searching for a Wi-Fi network. You can specify anything, for example: “Moi_Wi_Fi_:)”. There is also a “Hide SSID” option - this means that the name of your router will not be visible in the Wi-Fi network search menu. And only those who know the name and password will be able to access it (it’s better to put “no” so that you don’t get confused). Select “WPA2-Personal” authentication method. WPA encryption select "AES". In the WPA pre-shared key field, enter the password. It must be at least 8 characters long, preferably with numbers and letters (but not required). Now click “Accept”.
.


