A touchpad is a touch panel on a laptop, which is like a replacement for a classic computer mouse. In some situations, the touchpad becomes a hindrance and I would like to turn it off. For example, you are passionate about literary writing, inspiration flows like a fountain, you don’t look at the keyboard. Therefore, every now and then you touch the touchpad and distracting glitches occur in the creative process.
With prolonged use, the touchpad wears out and becomes unsightly. For some categories of users, appearance is everything. Once you are finally convinced that the task will actually have to be completed, you can begin to develop an optimal algorithm for achieving the goal. Wise people say that it is not enough to achieve success; you also need to do it with minimal effort. Otherwise, what kind of success is it if you have to work like Papa Carlo? This is some kind of Pyrrhic victory. So, here are detailed instructions on how to disable the touchpad on a laptop.
In some laptop models, on the surface of the touchpad itself, or on the body near it, there is a small button, by clicking on which you can turn the touch panel on or off. This button usually has internal backlighting and is indicated by an icon in the shape of a crossed out touchpad.
Sometimes there is no such button, but a certain area on the surface of the panel itself is used. If you double-tap – double-click – on this area, the touchpad will work as a physical On/Off button. You can find out whether such an area exists on your laptop on the website of your laptop manufacturer or in the instruction manual.
Normal users never read all sorts of instructions and Help - there is simply no time for such nonsense. Let the nerds, whom no one invites on a date, spoil their eyesight by reading all these useless instructions, as a result of which they have plenty of free time to study all sorts of user agreements and licenses.

Now you can turn the touchpad on and off with a simple combination of the function keys Fn + A (the number with the touchpad crossed out).
If the laptop manufacturers forgot to clearly indicate the key to reject the earwax panel, you will have to feel like a nerd for a while, put on glasses (which you hide from everyone except the military commissar) and look in the instructions.
Here, approximately, are the keys you need to use to disable the ear wax bar for different laptop models (together with Fn).
It is strongly not recommended to use the scientific poking method in this case - you can turn off half of the computer. You'll have to invite the notorious nerd to turn it back on. Don't look at the glasses, they drink beer just as well as good ones. It is cheaper to take the laptop to a service center.
The first option is to disable it using the developer software.

The second option is through the Windows Control Panel, “Mouse” tab. Here you can not only “break” the touchpad, but also swap the “Left-handed” or “Right-handed” buttons. And also make other settings.

In some advanced laptops, by default the system is configured so that when an external USB mouse is connected, the touchpad turns off itself. If your device was assembled the morning after the Chinese New Year celebration, most likely the installers forgot to set everything up for you according to the technology.
Then you will have to configure automatic shutdown of the touchpad yourself. It is not difficult. Click the Start button (unless you have older versions of Windows 8). Open Control Panel. Find Mouse and open the Mouse Properties interface.
In the lower half of the settings interface there will be a checkbox that says “Disable when connecting an external USB mouse. Sometimes you need to go to the Device Settings tab and there it will be a little different: “Enable/disable the touchpad.” Check the box.
If you want to permanently disable the touchpad, then you need to go into the CMOS settings and turn off the touchpad in Bios. The algorithm of actions is as follows.
 From now on, you can turn USB on and off as much as you like, check any combination of hot keys - the touch panel will still not respond to gentle finger touches. A very convenient maneuver when you want to screw one of your office mates. Let them sort it out at the system administrator level. And he will report to the boss that someone is ruining our equipment. Goodbye prize!
You can disable the touchpad by making appropriate changes to the system settings.
You can also disable the touchpad through the Windows Control Panel. Select the “Mouse” section or another section created specifically for the touchpad settings by its driver. These sections should contain a “Stop device” button, which, in fact, turns it off. Here, in this menu, you can set flexible settings for the touchpad. Check the box next to the “Disable when connecting an external USB mouse” option, and the touchpad will automatically turn off when connected via the mouse’s USB port. And as soon as the mouse is disconnected, the touchpad will also automatically start working.
You can disable the touchpad in hardware using the corresponding function button on the device. A separate “on/off” switch for activating/deactivating the touchpad on a laptop is very rare; if it exists, it is only in older device models. In new laptop models, hardware function keys are implemented on the keyboard F1-F12 and work together with the Fn key held down. In most cases, the Fn+F9 combination is responsible for turning the touchpad on and off, and on this key you can see a picture in the form of a hand touching the touchpad.

If you cannot identify the hardware function button on your laptop, it is better to check with the manufacturer's instructions.
If the touchpad on your laptop looks ugly due to excessive use, it would be quite rational to seal it with a VISA Gold bank card. In extreme cases, a used Momentum will do.
Touchpad on laptops made using these portable devices easier by allowing you to move the cursor around the graphical interface of a particular OS. There are touchpads of different shapes - round, square and rectangular, but when typing texts and programming, these touchpads interfere, which leads to errors due to the moved cursor. In order to avoid problems, you need to disable it, and in this article we will find out how you can disable the touchpad on a laptop.
Touchpad on a laptop
Touchpad was developed by Synaptics and became a real revolution in the world of portable computers, allowing the user to abandon connected peripherals to control the graphical interface. Since its inception, this element has not changed fundamentally, although additional features have appeared - gesture control. With the advent of the touchpad, it was immediately necessary to disable and enable it using a combination of buttons, which are different for each manufacturer of portable PCs.
The classic combination for turning off the Touchpad is Fn + F9, but today every manufacturer uses other combinations that use Fn + a button from F1 to F12 - any button with an icon with a crossed out touchpad.
Today, the largest manufacturer of laptops is the Chinese company Lenovo, which has several lines of portable PCs, each of them has its own combinations of disabling the touch pad: “Fn + F8” / “Fn + F5” or with just one key, usually F6, other manufacturers' combinations are as follows:
Turning off the tactile panel with just one key is available on many Lenovo, Asus, Acer laptops. For Lenovo this is F6, while other manufacturers may have different buttons: F1-F12, or individual keys on the keyboard and the laptop itself. Top Asus models had a key next to the touchpad or it was moved outside the main keyboard. However, recently all manufacturers have come to a single shutdown standard, assigning the F6 key for this.
The touchpad can be turned off on any laptop, even the oldest versions, using basic software. Thus, licensed Windows 10 comes with special software in the form of a built-in driver utility from Synaptics. You can see this program installed in the taskbar - lower right corner. You can open the utility using the right mouse button by selecting disable/enable in the drop-down menu.


Logging into the program on Windows 10
If there is no icon in the taskbar, you need to go to “Start”, then select “Settings”, open the “Devices” tab, where the “Peripheral Devices Menu” will open. In version 7 of Windows OS, you can open the utility using this principle: Start - Settings - Control Panel - Hardware and Sound - Mouse. There is other software that allows you to disable the touchpad, but nothing is better than the original one.

Logging into the program on Windows 7
Quite often it happens that it is not possible to deactivate the touchpad using any of the above methods due to physical damage to the keys or lack of desire to navigate through long OS menus. The easiest way to call the task manager is to use the combination Ctrl+Alt+Del, after which you need to select “task manager” in the window that appears. Next, you should choose a device with the name Synaptics included; the name ETD is much less common; in pirated versions of Windows 7, the touchpad operation process can be veiled under standard system processes and it is impossible to distinguish the background sound processing process from the touchpad, so it is better not to risk it.

Disable via task manager
If you still find the required process, then click on “complete” at the bottom of the panel and the touchpad turns off.
The device manager will also help you deactivate the touchpad, but it is difficult to understand why such a complex deactivation scheme is used. Such a disabling is usually done on a permanent basis when the owner of a laptop PC under no circumstances wants to use the touchpad again. To disconnect, you need to go through the following steps:

Uninstalling the driver
Important! This method of shutdown is quite risky, as it may lead to the shutdown of all peripherals associated with the mouse, including connected devices. Also, using this method, you can update the mouse driver and configure some parameters.
On Apple laptops, you cannot disable their proprietary Trackpad either with a separate button or with a key combination. To disable it, you need to go to MacOS settings – Accessibility (Interactions) – “Mouse & Trackpad” – “Ignore built – in trackpad when mouse or wireless trackpad is present” (“Disable the built-in trackpad ...”).
Deactivation using BIOS is a super-radical way to turn off the touchpad, since then it is turned off forever and in order to turn it on, you will need to re-do a rather complicated procedure of entering the BIOS and searching for the desired item. Such a radical technique may be necessary for professional system administrators who are better at using key combinations than using a mouse, because No time is wasted moving the cursor.
So, the touchpad can be deactivated via BIOS by following this algorithm:
To enter the BIOS, you need to use one of the following combinations:
Laptop PCs from different companies and different lines have their own combination for entering the BIOS and depend on the manufacturer and version of the motherboard.
To deactivate the touchpad, there are several small programs that forcefully block the operation. Among the great variety of similar programs, TouchPad Blocker is worthy of attention. The utility allows you to perform many different manipulations with the touchpad - set the touchpad to autostart when the computer starts, activate/deactivate and select a keyboard shortcut for a particular action. The program is launched from the system tray at the bottom of the screen.
Knowing all the above methods for disabling the touchpad, you can get rid of it forever, but is it worth it, since the essence of laptops and netbooks lies precisely in the “All-in-one” concept - all in one?
The advantage of laptops is their portability and self-sufficiency. To work with them, no additional input or output devices are required - everything necessary is provided in such computers. In this case, a laptop is often used permanently at home or in the office, and in such conditions an additional monitor, printer, scanner or, which happens much more often, a mouse can be connected to it. When you connect a mouse to a laptop, it becomes necessary to deactivate the touchpad, which can accidentally trigger when using the keyboard. In this article, we will tell you how to disable the touchpad on a laptop from Asus, HP, Samsung, Lenovo, Acer, Sony and others running Windows.
 The Windows operating system works with a particular device on the computer after installing the drivers, and the touchpad in this case is no exception. Most laptops come with Synaptics drivers installed by default, which work with the touchpad touchpad. The graphical interface of this type of driver allows you not only to completely disable the touch input panel, but also to configure it as necessary.
To disable the touchpad on a laptop using the Synaptics driver, do the following:

Important: After reinstalling Windows on a laptop, the Synaptics driver is not installed automatically. It may also not be present on some computers initially. As a result, this method of disabling the touchpad is not suitable for everyone.
If the Synaptics driver is not installed on your laptop, you can try disabling the touchpad through the control center for all computer devices. To do this, do the following:

Note: If you see multiple USB input devices connected and cannot determine which one is the touchpad, you can disconnect them one at a time. After each disconnected device, try interacting with the touchpad, and if it works, then turn the device back on and move on to the next one.
 An easy way to disable the touchpad on a laptop is to download and install the Touchpad Blocker utility, which has several useful options for configuring the touch input device, and also includes the ability to completely deactivate it. You can download the Touchpad Blocker application from the official website of the developers. Once installed, it runs in the background, performing tasks that the user requires of it.
We propose to understand the capabilities of the application, which does not have Russian localization, point by point. 
Disabling the touchpad using this program compares favorably with the options described above. With its help, you can configure the touchpad to be locked only while typing, so that there are no accidental movements and clicks, while the touchpad will be able to work the rest of the time.
Every laptop keyboard has a function key called FN. It allows you to perform actions pre-programmed into the computer if you press it simultaneously with another key. Among such shortcut commands, almost all laptops have the ability to disable the touchpad. At the same time, each manufacturer sets its own keyboard shortcut to disable the touchpad, and below we will look at the most popular commands for deactivating the touchpad on laptops from various companies.
To disable the touchpad on an Asus laptop, you must press the key combination FN+F7 or FN+F9, depending on the computer model. Look for an icon in the lower left corner of the voiced keys that looks like a crossed out touchpad. 
You can turn off the touchpad on HP laptops by double-clicking on the upper left area of the device's touchpad. Most often, the area that needs to be double-clicked is marked with a depression. 
On most laptop models from Acer, you can disable the touchpad using the FN+F7 key combination. This will work if there is a hand drawn in the lower left corner of the F7 button pressing on the touchpad. 
The combination to disable the touchpad on Sony laptops is FN+F1. At the same time, on Sony laptops, the Vaio Control Center application is installed by default, where you can, among other things, turn off the touchpad. 
On laptops from the Chinese company Lenovo, the touchpad is disabled using the FN+F5 or FN+F8 key combination, depending on which button has a crossed out panel. 
In this article, I will tell you how to disable the touchpad on a laptop using several methods available to anyone.
Today, it is almost impossible to do without a mouse, so it is not surprising that the laptop design includes additional controls that could replace it. Previously, you could find a small “pimp” in the center of the keyboard, with which you could move the cursor and even click the mouse.
However, this method turned out to be very inconvenient, so you can hardly find it in current laptops. Most often they resort to using a touchpad, which is much easier to operate. But, as they say, each method has its pros and cons. Therefore, if you have an ordinary normal mouse, the touchpad can only get in the way. They accidentally touched it, pressed a button, and stuff like that. Therefore, next I will look at several methods on how to turn off this touchpad on a laptop.
In terms of its shape and design, the touchpad does not differ much from laptop to laptop, however, to increase comfort and convenience, manufacturers add some additional controls to it. One of these is the button to quickly disable the touchpad.
Most often, the button is located in the upper left corner of the touchpad and is either a small notch or a faintly glowing dot. This is usually found in laptops from HP (Hewlett Packard). The essence of this button is simple. If you double-click on it, the panel will turn off. If you press it two more times, the panel will turn on.
Note: The number of presses may vary.
Convenient functionality, but, unfortunately, it also has its drawbacks, so you can’t find it everywhere. The most commonly supported method is the following.
Since the laptop is intended for use without power sources, as well as for constant movement, many manufacturers support special combinations with the “Fn” key to quickly disable certain features in order to save energy (for example, turning off Bluetooth) and convenience (for example , mute).
Therefore, it is not surprising that a number of manufacturers have also included the ability to quickly disable the touchpad on a laptop. However, the combinations themselves may differ from one manufacturer to another, so if among the F1-12 buttons you haven’t found the one that has a touchpad image, you can try turning them on and off one by one. I advise you to do everything slowly and carefully, as this may also disable other features (for example, turn off Wi-Fi).
Here is a little information about well-known manufacturers:
However, it is always useful to know alternative methods, so move on.
The next fastest thing is to disable the touchpad from the Windows Control Panel. I note that this method is not always immediately available. In some cases, this requires going to the manufacturer’s official website and downloading an additional program to manage the laptop settings.
And here's what you need to do:
1. Open the Start menu and select "Control Panel"
2. Switch to Large Icons view
3. Click on “Mouse” and a settings window will open
4. Switch to the "Touchpad Enable/Disable" tab
5. If there is a slider, then it must be moved to the “Disable” position. In some cases, instead of a slider, there is simply a checkbox to disable the touchpad when connecting an external mouse via a USB port
If all the previously mentioned methods did not work or you want to solve the problem with the touch panel more radically, then you should know that this can be done by turning off the panel in the BIOS. And here's what you need to do.
2. Find the setting "Internal Pointing Device" or "Touch Pad Mouse"
3. Set the state to "Disabled"
4. Save the changes and exit the BIOS
After these steps, the touchpad will no longer be detected by Windows. So it’s worth remembering that as soon as you disconnect the external mouse, the touchpad will not connect back and you will have to go into the BIOS again.
If you have tried everything, but the touchpad still does not turn off or the methods did not work for you, then:
1. Open the official website of the manufacturer or the documentation from the laptop and see if there is any mention there of disabling the touchpad
It will certainly be useful for users of laptop computers to know how to disable the touchpad on a laptop, because there are times when this useful device slightly interferes with work and it is advisable to deactivate it for a while.
Touchpad- This touchscreen device for cursor control was specially created by Synaptics to replace the computer mouse in laptops.
It looks like a rectangular, or less often square, touch panel that senses finger touch to emulate the operation of a mouse.
The touchpad microcontroller is the same one that is responsible for the operation of all connected peripherals - the south bridge. Therefore, if the operating system is reinstalled, it is perceived as a standard HID device, which eliminates the need to install drivers.
For decades, this technology has remained unchanged and, to some extent, even convenient. Surprisingly, some users have become so accustomed to the touchpad that they do not even feel any discomfort, and control it no worse than with a mouse.
Most users still use the touchpad only in rare cases when it is not possible to connect peripherals or in cramped conditions.
It happens that while working at the laptop keyboard, users often encounter the fact that accidental clicks on the touchpad knock the cursor off, which is wildly inconvenient - in such cases, it is useful to know how to disable the touchpad on a laptop with Windows 10 and other versions of the operating system.
Therefore, we have collected several methods that will help you temporarily deactivate the touch panel.
Attention: If you don't have a mouse nearby, do not try to disable the touchpad using one of the methods below, as you must use the cursor to enable it. Therefore, we strongly recommend connecting the mouse before manipulating the touchpad.
Laptop manufacturers use special key combinations to control additional options.

Key combination on an ASUS laptop
As a rule, you can disable the touchpad on a laptop using the combination of pressing “Fn + F9”.
However, the key combination may vary, and instead of F9, any function button (F1-F12) is used, but it must have an image of the touch panel (less often crossed out). By the way, pressing it again activates the operation of this device.
For example, to disable the touchpad on a Lenovo laptop, you need to use the combination “ Fn+F8" or " Fn+F5". The touchpad on an ASUS laptop is disabled using a different combination - “ Fn+F9" or " Fn+F7“, and you can disable the touchpad on an HP laptop with a separate button.
As you can see, the touchpad control settings are individual and vary from model to model.
Additional keyboard shortcuts on various laptop models:
On some Acer, HP and Lenovo laptop models, the touch panel control button is located separately. Just click on it to deactivate or activate the device.

Button on an HP laptop
In gaming laptops, the touchpad control key is additionally backlit for user convenience.

A separate button in an Acer gaming laptop
In most cases, Windows comes with a touchpad control program from the manufacturer Synaptics. The software also includes the correct driver and they work together.
The installed Synaptics software can be identified in the tray - this is a panel in the lower right corner near the clock - there you can see the touchpad icon. When you right-click, you can call up the program settings, among which there is an option to disable it - just activate it.

Setting up your Synaptics touchpad
If there is no tray icon, you can access the touchpad settings through the settings in the Control Panel.
On Windows 10 you need to go to Start > Settings > Devices, where the peripherals menu will open. There we select the item "Touchpad" and press the button "Extra options", after which the properties of the touch panel will open, where you can already manage its settings.

Setting up in Windows 10
On Windows 8.1 this option is located at a different location: Start > Computer Settings > Computer and Devices > Mouse and Touchpad.

Settings in Windows 8.1
In Windows 7 and Vista, access to these settings is located in the following path: Start > Control Panel > Hardware and Sound > Mouse. Yes, in these operating systems the touchpad is included in the mouse settings, and if the touchpad driver is installed, a separate tab with settings will appear where you can disable the device.

Control Panel in Windows 7
There is a way to forcefully disable the Synaptics software, which is responsible for the operation of the touchpad. The method is simple and the same for all versions of Windows.
Just press a key combination on your keyboard Ctrl + Shift + Esc and “Task Manager” will appear. Next, you need to manually find a program called "Synaptics" or "ETD control center" (on ASUS laptops) in a long list - there is no search, so you will have to find it manually.

Disable via Task Manager

ASUS laptops use ETD Control Center software
After finding, select the process with the mouse cursor and click to the “End process” button in the lower right corner of the window. After this, the touchpad will stop working until the laptop is rebooted.
If you need a reliable way to deactivate the touchscreen, then disabling it through the “Device Manager” will be very useful.
However, this method is suitable for more experienced users, since accidentally changing the settings of other hardware can lead to unstable operation of the entire system as a whole - be careful not to disable anything unnecessary.
There are two ways to get to Device Manager.
The first way is through the option "Run": press key combination "Win + R" and in the window that opens, enter the command "devmgmt.msc"(without quotes).

Run window with the command “devmgmt.msc” entered
The second way is through a keyboard shortcut "Win + Pause / Break", where in the menu that opens "System" choose "Device Manager"

Calling "Device Manager" through "System"
In the "Device Manager" you need to find the item "Mice and other pointers". In the list that opens will appear "HID compliant mouse"– disable, agreeing with the warning.

Disabling via Device Manager
In some cases the touchpad will continue to work even after being turned off, but then "HID-compatible mice" Usually there are 2 or more - so it is necessary to switch between them, turning off each one in turn, until the result is achieved.
This method is reversible; if you need to turn the touchpad back on, right-click on the deactivated device and simply turn it on.

Turn it back on
It is also important that disabling through the BIOS is the most reliable method of deactivation. The fact is that the BIOS is directly connected to all hardware parts of the computer, in particular to the south bridge, which is responsible for controlling connected peripherals.
Important! You should not enter the BIOS if you don’t understand why it is needed and how it works. Careless behavior and disabling important options can affect the loading of the operating system and the failure of individual computer components.
If you are determined to use this method, then read carefully.
First, turn off your laptop completely. Then turn it on again and after the POST logo appears, quickly press the “F2” or “F10” or “F12” or “Delete” key. It may not work out the first time, since there is little time to choose, and different buttons are responsible for entering the BIOS for different laptop models.

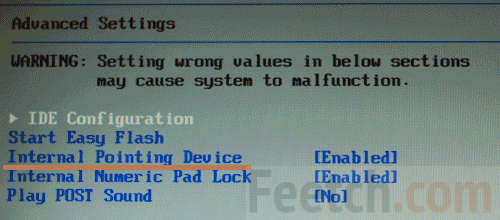
Disabling Internal Pointing Device in BIOS
If the login was successful, then use the keyboard to go to the tab "Advanced"(confirm the input with the “Enter” key), and then select "System Properties". Next, depending on the laptop model, the function will be displayed "Keyboard/Mouse features" or "Device Options"- go there.
Find the line that says like "Internal Pointing Device"– press “Enter” and in the window that appears, select the item "Disable"– this option will disable the touchpad.
You can exit the BIOS using the button "Esc": exit to the main menu, then use the arrows to navigate to the menu "Save & Exit", select item "Save Changes and Exit" and confirm exit with the button "Yes".

Exit the BIOS, saving the selected settings
If the item you are looking for is not found, do not worry - not all laptop models support the function of disabling the touch panel. We have another way to disconnect.
There are a number of small utilities that forcefully block the operation of the touch panel. They were created just in case the methods described above did not help you or are not suitable.
We recommend a universal utility - TouchPad Blocker. This small free program has a wide range of useful functions for working with the touchpad: autoloading when the operating system starts, disabling the pointer for a while, disabling multi-touch and scrolling, as well as your choice of key combinations to turn it on and off.
The program does not distract during operation and is located in the tray, but can be called by right-clicking. You can download it at this address.

TouchPad Blocker Settings
Program functions and settings:
Automatically run on startup– automatic start of the program upon login. Check the box so that the program starts working immediately after Windows starts.
Show system tray notification– option to enable or disable notifications in the system tray.
Block accidental taps and clicks– blocking accidental clicks, in other words, turning off the panel when entering text on the keyboard. When you select this item, a drop-down menu becomes available in which you must specify the time for which the touchpad turns off after pressing any key.
For example, if you set it to 3 seconds, then during this time the touchpad will not respond to your actions.
Also block move and wheel event– blocking page scrolling if it is present on the touchpad.
Beep when click is blocked– sound notification when the touchpad is locked.
Turn blocker On and Off– setting up hot keys to turn on/off the program.


