At htmlAcademy and I work as a mentor for it. As part of the intensive, students will have to raise working environment and this note aims to simplify this difficult task for a beginner. Eat different ways raising a full-fledged LAMP stack, but we will go the classic way. Let's configure all the components separately (without using ready-made combines) and start with PHP (there will definitely be a note with consideration of ready-made LAMP assemblies). Since I plan to work as tutors on PHP intensives and beyond, I'm going to write similar instructions for repetition in other operating systems (Linux, macOS). As they say, it is better to sweat once, but then it will become easier for everyone. So let's get started.
Go to the official website and download current version PHP. At the time of writing, this is 7.1.4 . There are several distribution options available on the page. I have Windows 7 x64, so I choose zip archive with VC14 x64 Thread Safe.
Please note that there are two distribution options available for download: Thread Safe (TS) And Non Thread Safe (NTS). The choice depends on how you plan to use the interpreter. TS is recommended to be used for a single web service process (for example, by configuring through the mod_php module for Apache). NTS is recommended for use with IIS (Internet Information Service) and alternative FastCGI web servers (such as Apache with the FastCGI module) and command line.
Let's start preparing PHP for comfortable work from the command line. In the previous step, you downloaded the PHP distribution archive. Unlike most programs, PHP comes in a simple archive and not as an installation package. Therefore, you will have to extract the files yourself to any directory convenient for you. I prefer to keep things like this in the root system disk. Create a directory in the root of the "C:" drive (or anywhere else) "php" and extract the contents of the downloaded archive into it.

A lot of files will appear in the directory, but we are most interested in:
We have the unpacked distribution kit, let's connect the configuration file for it. We are going to experiment, so we will take as a sample php.ini development. Make a copy of this file in the php directory ( C:\php) With name php.ini. IMPORTANT! Make a copy, not a simple rename. During development, you may need to change the configuration file and there is every chance of making a mistake that will be difficult to detect.
In such cases, there is nothing better than returning to the reference settings. In our case, it will be enough to repeat the copying of the file php.ini development V php.ini. So, at the end of the gestures, the php.ini file should appear in the directory with php. In further notes, we will definitely talk about its contents in more detail.

At this step, the so-called "installation" is completed. Open console ( cmd.exe, the shortcut is available in the Accessories menu) and enter the command:
C:\php\php.exe --version
The result will be something like this:
PHP 7.1.4 (cli) (built: Apr 11 2017 19:54:37) (ZTS MSVC14 (Visual C++ 2015) x64) Copyright (c) 1997-2017 The PHP Group Zend Engine v3.1.0, Copyright (c) 1998 -2017 Zend Technologies
The result confirms that PHP is working. For example, try creating a new script file (I created the file “test.php” directly in the root of the “C:” drive) and put the text into it:
Now try to execute this file and see the result:
C:\php\php.exe –f test.php
Function phpinfo() displays PHP configuration information in a convenient way. We'll talk more about this feature.
PHP is ready to go, but you must admit, it is rather inconvenient to enter the path to the php interpreter in the console every time. To make our life easier, let's make some small changes to the environment variables. Launch the applet in the control panel "System"(or just press the hot key Windows + Pause Break. Then click on the button "Change settings". In the window that appears "Properties of the system", go to bookmark "Additionally". Find and click on the button "Environment Variables".
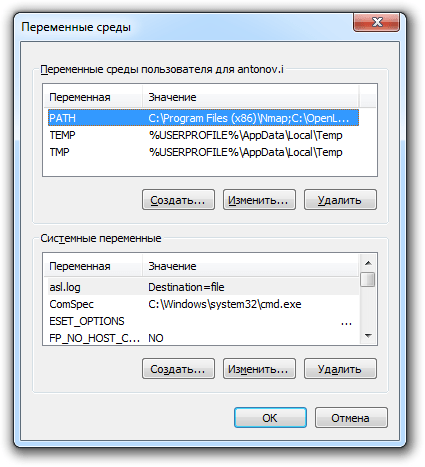
Finding a variable in a list "PATH" and press the button "Change", the variable editing window will appear. In the "Variable value" field, we need to add the path to the directory with PHP. Go to the very end of the line and specify the path to the PHP directory separated by a semicolon: c:\php;

Everyone, click "Ok". Now reboot the system (alas, you have to). After restarting Windows, you can access PHP simply: php. For example, to display the version name, just write:
php-version
And to interpret the test.php file located at the root of the "C:" drive:
php -f C:\test.php
Or even start the built-in web server:
Php -t C:\ -S 127.0.0.1:8888 Listening on http://127.0.0.1:8888 Document root is C:\ Press Ctrl-C to quit.
To test, open a web browser try http://127.0.0.1:8888/test.php . Note that after the parameter -t we specify the path to a directory that will become the root directory of the web server. All scripts located in this folder will be available for request from the client. I have one file on the "C:" drive 1.php and that's what I'm asking for.

Assoc .php=phpfile ftype phpfile="C:\php\php.ee" -f "%1" -- %~2
Now let's talk about how PHP will look for a configuration settings file (remember about php.ini). The documentation provides the complete search chain. In order to avoid unnecessary difficulties, I recommend immediately adding a new one to the environment variables - PHPRC and specify the path to the directory with the configuration file as the value. My config is located in the same directory as the main php files, therefore I specify as the value of the variable -
C:\php. A reboot is required after making the change.

That's all for me. The first part of the manual for beginners is ready.
We indicate the version of our operating system (I indicated 64-bit Windows), and go to the download page (Go to Download Page https://dev.mysql.com/downloads/windows/installer/5.7.html).

I chose to download the full msi installer. At the time of writing this note, the current version of MySQL was 5.7.21, and the distribution kit was downloaded by the name mysql-installer-community-5.7.21.0.msi.
At the time of preparation of the article, x64 version 2.4.33 was available, built on the basis of vc14:
httpd-2.4.29-o110g-x64-vc14.zip.
The size of the archive is about 10 MB.
At the time of writing this article, the x64 version of PHP 7.2 (7.2.2), Thread Safe built on VC15 was available: php-7.2.2-Win32-VC15-x64.zip.
Zip archive size: 24 MB.
Now there are newer ones.
To manage MySQL databases on a local computer, install the free phpMyAdmin package.
We will download its distribution kit from the site http://www.phpmyadmin.net/
At the time of writing, version 4.7.7 was available:
phpMyAdmin-4.7.7-all-languages.zip
Size - about 11 MB.
We put the contents of the archive in a pre-prepared folder, for example:
D:\sites\localhost\www
Distribution downloaded. Install in this order:
Run the previously downloaded MySQL installer (mysql-installer-....msi).
In the License Agreement window, check the box:
I accept the license terms
- and click the Next button.
In the Choosing a Setup Type window, select the Custom item (to choose the parameters for installing the MySQL server yourself). Click the Next button.
In the Select Products and Features window, be sure to select the MySQL Server - X64 component. The rest of the components are optional. Having selected a component in the left part of the window, press the right arrow so that this component from those available for installation goes to the right part of the window - a list of what we will install.
Click Next after selecting components.
In the Installation window, click the Execute button to start the installation for execution.
You can monitor the progress of the installation by clicking the Show Details button.
When the installation is completed (Status becomes complete), click the Next button to proceed to configuring the MySQL server.
In the Product Configuration window, click the Next button.
In the Type and Networking window
leave the item Standalone MySQL Server enabled, click Next.
In the next window Type and Networking
set item Config Type = Development Machine
Leave the checkboxes next to TCP/IP and Open Firewall port for network access.
The MySQL communication port is also left with the default value (Port Number = 3306).
Check the box next to Show Advanced Options.
In the Accounts and Roles window, set the password for the main user (with the login root - administrator).
In the MySQL User Accounts field, you can add other users who will have access to MySQL databases. We will not create others yet: we will connect as root.
In the Windows Service window, leave the checkbox next to Configure MySQL Server as a Windows Service (so that the MySQL server starts as a system service).
Leave the system service name (MySQL57) as default.
We will start the MySQL server service manually (we only need it for the development and testing of local sites), so uncheck the Start the MySQL Server at System Startup item (so that the server does not start every time you start OC Windows).
We will start the service on behalf of the Standard System Account (we do not change this option).
In the Plugins and Extensions window, leave everything as it is. Click Next.
In the Advanced Options window, you can change the parameters of the logs (logs) where the server writes messages in the course of its work. Here you can leave everything as it is.
In the Apply Configuration window, click the Execute button to apply the server configuration.
When finished, click the Finish button.
In the Product Configuration window, click Next.
In the last window of the Installation Complete, checkboxes for items can be left unchecked. Click Finish.
The installation and configuration of the MySQL server is now complete.
You can start/stop the MySQL server manually by going to the list of Windows services.
Find MySQL57 in the list, right click on it and select "Start/Stop".
There are many articles on the internet that describe how to install Apache 2.4 for Windows. I may repeat something, but I will state my version step by step.
The archive downloaded from the developer's site (using the httpd-2.4.29-o110g-x64-vc14.zip option) contains the Apache24 folder. We place it, along with its contents, on drive C:
In addition to the package itself (the Apache24 folder), the archive contains the readme_first.html file, which is useful to read.
Particular attention should be paid to the presence of the Visual C++ 2015 x64 Redistributable Package in the installed Windows OS.
This package contains a set of libraries without which this build of Apache will not work.
You can download this package for free from the Microsoft website at the link (https://www.microsoft.com/en-us/download/details.aspx?id=49984) given in the readme_first.html file. Be sure to install it if it is not already in your OS.
If you have programs installed on your computer that listen on port 80, then it is better to discourage them from using this port, or assign them another one. The Apache server is configured on this port by default, see the Listen parameter in the C:\Apache24\conf\httpd.conf file
We are trying to start the server (later we will consider the option of starting the server as a system service (service)).
To do this, run the command line in the mode (on behalf of) the administrator.
Go to the C:\Apache24\bin folder and run the httpd.exe program

On first launch, you may see a Windows Security Alert that Windows Firewall has blocked some features of this application (see picture)

Check the box to enable Apache HTTP Server communication for Private networks.
Work in public networks can be prohibited.
Opening any browser, enter in the address bar the address http://localhost/
- the builder page for this Apache server package should appear.

(it is installed with the package in the C:\Apache24\htdocs folder - this is the value of the DocumentRoot variable in the httpd.conf file,
but we will change it later).
So the Apache server starts up and works fine.
If the server does not start, then you need to see what errors it gives. Errors can be seen at startup: on the command line and in the file C:\Apache24\logs\error.log
Let's make it so that the Apache server is started by the service (described in the readme_first.html attached to the distribution).
On a command prompt run as administrator, navigate to the C:\Apache24\bin folder and run the command
httpd -k install
It is convenient to monitor the status of the Apache server service and restart it (we will do it often during configuration) through the C:\Apache24\bin\ApacheMonitor.exe program. Make a shortcut for it and place it in a convenient place to launch it (on the taskbar or on the desktop).
It remains to configure the Apache server for our needs:
focus on the folders in which our sites will be located;
Prepare to work with MySQL and PHP.
Let's say we want to have 2 sites on the local computer with the names localhost and wp-test
http://localhost/
http://wp-test/
To do this, the system file C:\Windows\System32\drivers\etc\hosts should contain the following lines
127.0.0.1 localhost
127.0.0.2 wp-test
The first line usually already exists by default.
We fill the second one ourselves.
These lines tell you to look for hosts named localhost and wp-test at IP addresses 127.0.0.1 and 127.0.0.2
- both addresses correspond to the local computer.
Restarting the OS is optional.
Let's create folders on the local computer to store site files, for example, in the folder:
D:\sites\localhost
D:\sites\wp-test
In each of these folders we will create 2 files with the names
access log
error log
and subfolder www
D:\sites\localhost\www
D:\sites\wp-test\www
- in these folders we will create index.html files with the following content:
this is localhost
this is wp-test
Now let's configure the Apache server to use the virtual hosts corresponding to our sites.
Let's edit the server configuration file (C:\Apache24\conf\httpd.conf).
To do this, you need to open it in a text editor.
I use NotePad++ (a very feature rich free editor) for this.
I usually add virtual hosts to the end of this file.
Let's add the following lines there:
#localhost
Checking if browsers open pages at addresses
http://localhost/
http://wp-test/
When opened normally, the page should display the following lines:
this is localhost
And
this is wp-test
Similarly, you can create other virtual web servers on the local computer.
The content of the downloaded archive php-7.2.2-Win32-VC15-x64 is placed in the folder C:\php\
Carefully read the C:\php\install.txt file from the distribution.
This file briefly describes how to install PHP on the system and configure it to work with Apache.
The path C:\php is added to the PATH system variable
For testing PHP on our local site http://localhost/
create a php_test.php file in its folder (D:\sites\localhost\www) with the following content:
Then, when opening the address http://localhost/php_test.php, a page with data from the phpinfo command should open.
Prepare Apache for PHP
In httpd.conf file
In the place where the modules are loaded (look for the LoadModule group of commands), at the end of the group (if there is no such line yet), add:
LoadModule php7_module "C:/php/php7apache2_4.dll"
Specify the path where php is installed with the directive:
PHPIniDir "C:/php"
In section
DirectoryIndex index.html index.php
In section
add a line
AddType application/x-httpd-php .php
Save httpd.conf and restart Apache.
After that, the test page http://localhost/php_test.php will open.
Let's edit the PHP settings file for phpMyAdmin and more.
Rename the php.ini-production file to php.ini (leave it in the same folder C:\php\)
Edit php.ini like this
Uncomment the line
Extension_dir = "ext"
Enable the parameter (default=Off)
Enable_dl = On
Specify a folder to download temporary files
Upload_tmp_dir="d:/sites/uploadtemp" upload_max_filesize = 500M
In chapter; Dynamic Extensions ;
uncomment the lines:
extension=gd2 extension=mbstring extension=mysqli
Let's enable another extension:
Extension=openssl
In order, for example, to update wordpress plugins on a local site through the admin panel. Otherwise, an error occurs: No working transports found.
To execute long scripts, we will extend the maximum execution time, for example, like this:
Max_execution_time = 300
After downloading the distribution and placing its contents in the folder D:\sites\localhost\www
go to the documentation folder \www\doc\html and open the setup.html file
Following his instructions, we will create a config subfolder in the root directory of the site (www) (this is necessary for the time of configuring phpMyAdmin with a script that can be run by opening the setup page at http://localhost/setup/).
Rename the file located in the root directory \www\config.sample.inc.php
to the working file \www\config.inc.php
- open this file for editing and define the $cfg["blowfish_secret"] parameter in it - fill it with any characters, for example, the phrase ANY_WHAT_YOU_WANT:
$cfg["blowfish_secret"] = "ANY_WHAT_YOU_WANT"; /* YOU MUST FILL IN THIS FOR COOKIE AUTH! */
and, having saved, we will close this file.
Let's check if the pages of the site open:
http://localhost/
http://localhost/index.php
If you are a Linux user, then refer to the article "".
PHP 7 release
PHP 7.0.0 Alpha release 2 is currently available. The first beta will appear in the coming days. Neither alpha nor beta are recommended for real work. But you can already try them on the test server.
Especially since PHP7 changes are very significant:
PHP of any version is almost always paired with a server and a database management system. If you do not have a server at all, then refer to the article "". When you get to installing PHP in that article, come back here.
If you already have a server, then you can find general upgrade questions in the article "".
Features of installing PHP 7 on Windows
I installed on Apache 2.4 VC14. If you haven't upgraded the server yet, then do so. Links and details on this manual.
To download PHP 7.0 go to
Hidden from guests
Always download all programs only from official sites!
Select version Thread Safe(64-bit or 32-bit as your Apache server).
Definitely needed Visual C++ Redistributable for Visual Studio 2015! If you have already upgraded the Apache server, then that server also needs this package. Those. you should have installed it already. If this is not the case, then go to
Hidden from guests
And download the appropriate bitness package.
After downloading, install it.
If you use when installing the server, then unpack the contents of the downloaded archive from PHP into the directory C:ServerbinPHP.
Go to this directory, find the file php.ini development and rename it to php.ini.
Open this file with any text editor, find the line there
; extension_dir = "ext"
And replace it with
Extension_dir = "ext"
Now we need to enable PHP extensions, because most sites and scripts won't work without them. Attention: at the moment with some extensions it is not possible to start the server, so take a close look below. Find a group of lines:
;extension=php_bz2.dll ;extension=php_curl.dll ;extension=php_fileinfo.dll ;extension=php_gd2.dll ;extension=php_gettext.dll ;extension=php_gmp.dll ;extension=php_intl.dll ;extension=php_imap.dll ;extension =php_interbase.dll ;extension=php_ldap.dll ;extension=php_mbstring.dll ;extension=php_exif.dll ; Must be after mbstring as it depends on it ;extension=php_mysqli.dll ;extension=php_oci8_12c.dll ; Use with Oracle Database 12c Instant Client ;extension=php_openssl.dll ;extension=php_pdo_firebird.dll ;extension=php_pdo_mysql.dll ;extension=php_pdo_oci.dll ;extension=php_pdo_odbc.dll ;extension=php_pdo_pgsql.dll ;extension=php_pdo_sqlite.dll ; extension=php_pgsql.dll ;extension=php_pspell.dll ;extension=php_shmop.dll
And replace them with the following lines. Please note that some extensions are left disabled, because when they are enabled, Apache does not start!
extension=php_bz2.dll extension=php_curl.dll extension=php_fileinfo.dll extension=php_gd2.dll extension=php_gettext.dll extension=php_gmp.dll extension=php_intl.dll extension=php_imap.dll ;extension=php_interbase.dll extension=php_ldap. dll extension=php_mbstring.dll extension=php_exif.dll ; Must be after mbstring as it depends on it extension=php_mysqli.dll ;extension=php_oci8_12c.dll ; Use with Oracle Database 12c Instant Client extension=php_openssl.dll ;extension=php_pdo_firebird.dll extension=php_pdo_mysql.dll ;extension=php_pdo_oci.dll extension=php_pdo_odbc.dll extension=php_pdo_pgsql.dll extension=php_pdo_sqlite.dll extension=php_pgsql.dll ; extension=php_pspell.dll extension=php_shmop.dll
Now we find the following group of lines:
;extension=php_soap.dll ;extension=php_sockets.dll ;extension=php_sqlite3.dll ;extension=php_tidy.dll ;extension=php_xmlrpc.dll ;extension=php_xsl.dll
These extensions can include all:
extension=php_soap.dll extension=php_sockets.dll extension=php_sqlite3.dll extension=php_tidy.dll extension=php_xmlrpc.dll extension=php_xsl.dll
We save and close the file.
Now let's move on to the Apache configuration file. For those who installed according to my instructions, this file is here C:ServerbinApache24confhttpd.conf
Open it with any text editor. We find the lines with which we connected PHP 5 and delete them.
And describes just highlights for installing Apache24 and PHP7 on Windows. The description of the installation of the MySQL DBMS remains the same and is not repeated in this manual.
Before you continue reading, do you really need to install and configure all this under Windows? Maybe you should pay attention to and not waste your time and nerves setting the same thing directly in Windows? In any case, read the article about. Perhaps it will save you not only time, but also health.
This manual is intended for developers with basic knowledge Apache and PHP. This manual will describe only difference in the Apache and PHP installation with the main PHP 5.6 installation instructions. If you don't know what a WEB server, http protocol and PHP interpreter are, then you can always learn more about it by reading the documentation.
I will not answer questions in the comments that are answered in this or the main instructions, the link to the main instruction is indicated in the first paragraph, as well as questions that relate to understanding the operation of Apache and PHP, and even more so questions about errors in development. For this, there are appropriate resources, literature, forums, courses. However, you can always ask any question that interests you. Perhaps someone from the community can help you.
So let's go!
If you have problems running curl, please refer to this guide.
Installation and configuration of everything else has not changed. Please refer to PHP 5.6 installation for details.
And so we installed the nginx server, now it's the installation turn php 7.1 on ubuntu. The nginx + php7 bundle has proven itself very well, saving money and server resources.
First, let's add a repository from which we will download and install php 7.1.
sudo add-apt-repository ppa:ondrej/php
sudo apt install -y language-pack-en-base sudo LC_ALL=en_US.UTF-8 add-apt-repository ppa:ondrej/phpNote: If the system encoding is different from utf-8, then there may be problems when adding the php 7.1 repository. So let's run these two commands
Update the list of repositories
Sudo apt update
If everything is fine, proceed with the installation ..
Apt install php7.1 php7.1-fpm php7.1-opcache php7.1-zip php7.1-xmlrpc php7.1-xsl php7.1-mbstring php7.1-mcrypt php7.1-mysql php7.1-odbc php7.1-pgsql php7.1-pspell php7.1-readline php7.1-recode php7.1-snmp php7.1-soap php7.1-sqlite3 php7.1-sybase php7.1-tidy php7.1-xml php7.1-json php7.1-ldap php7.1-intl php7.1-interbase php7.1-imap php7.1-gmp php7.1-gd php7.1-enchant php7.1-dba php7.1-bz2 php7.1-bcmath php7.1-phpdbg php7.1-cgi php7.1-cli
We agree with the installation, we wait until everything is completed.
And so everything is ready - php 7.1, and the extensions are installed. If other versions of php5 were installed on the system, then you can remove them by running the command:
Apt autoremove php5* -y && apt purge php5* -y && apt clean php5*
The php setup will be as follows:
Open php.ini
Sudo nano /etc/php/7.1/fpm/php.ini
looking for a line
;cgi.fix_pathinfo = 1
uncomment the line and put 0 instead of one
cgi.fix_pathinfo = 0
Increase the size of uploaded files. We find post_max_size and bring it to the form
Post_max_size = 100M
Let's increase the script processing time, look for max_execution_time by setting 300 seconds - usually needed to work with large mysql tables
opcache.enable=1 opcache.enable_cli=1 opcache.memory_consumption=64 opcache.interned_strings_buffer=4 opcache.max_accelerated_files=7963 opcache.revalidate_freq=20
We save the file. Restart php7.1-fpm
Service php7.1-fpm restart
During installation, we will be asked to set a password for the mysql server administrator. Complete the request.
All is ready. Now install the database manager
sudo apt install phpmyadmin
During installation, it will most likely ask you to select a web server, select any, if it asks you to set a password for the database, set it.
Now we will make a symbolic link to the directory where we will have the site
Ln -s /usr/share/phpmyadmin /var/www/html/my.site.ru
You can access the database manager at
My.site.ru/phpmyadmin/
In the future, you can create your own nginx configuration file for the phpmyaadmin database manager, and transfer it to a subdomain like mysql.my.site.ru, and set server authorization.
If you have any questions write in the comments.


