Program files for the Android operating system have the extension .apk. They are usually installed using a special application store for Play Market devices, but some programs can also be installed using a computer.
Go to the menu of your Android device and find the Play Market program, which searches for the necessary utilities. To install the application, you need to have a working Internet connection, which can be done either using Wi-Fi or through a mobile operator's access point.
In the window that appears, select the category of the application you are looking for. If you want to install a specific program, use the search bar at the top of the window and enter the appropriate query there.
After selecting the program, click the “Install” button and wait until the procedure is completed. The program will be downloaded using your Internet connection and will be automatically installed on your device.
After a notification appears about the completion of the operation, go to the Android desktop and press your finger on the shortcut of the newly installed utility. After this it will launch.
If you want to install a utility with the .apk extension downloaded from the Internet using a computer, you must first configure the settings of your device. Go to “Settings” - “Security”. On the screen that appears, check the box next to “Install from unknown sources.”
Connect the device to your computer using a USB cable. On the device screen, select a connection in data storage or removable disk mode. Wait for the device to be detected in the operating system and select “Open folder to view files.”
Move the .apk to a separate directory using the left mouse button. Wait until the copying operation is completed, after which you can disconnect your device from the computer.
Launch the Play Market and enter the query “file manager” in the search bar. Among the results that appear, install the program you like most, then launch it using the shortcut created on the desktop of your device.
In the list of files and folders, find the .apk that you copied from your computer and run it. Press the "Allow" button, and then wait until the utility is installed. After the operation, a program shortcut will appear on the device’s desktop and in the main menu. To launch the application, you just need to click on it.
All you need to do is download and install the free program and make a few settings. As a result, you will get a virtual Android phone that runs on your computer.
To get a virtual Android phone, you will have to install and learn how to use the Android Software Development Kit (SDK), which developers work with when creating their programs and utilities for Android OS. Using the SDK may sound intimidating, but by knowing a few basics and following the instructions in this whitepaper, you'll find that it's quite easy to use.
But first, a few caveats. Firstly (and probably most importantly), you won't be able to use your virtual Android phone to make real calls. The project is focused only on providing the feel of Android OS, its user interface, and the ability to try some of its applications without purchasing anything.
Another limitation is that any application that works with the phone's camera or GPS module will find that these components are actually missing. Also, any app that uses location services (which provide sensitive information based on your phone's physical location) will not be able to figure out where you are (although an Android virtual device can be made to work with a connected camera or GPS, but that level of trickery is beyond the scope of this story) . You'll also find that your virtual device is slow—perhaps much slower than the real world of Android phones.
But there are still a lot of things that the Android virtual device can do - especially when starting to install applications (though, of course, even this causes some headaches, as we'll describe below). If you can tolerate the above limitations, then keep reading and you will learn how you can have a working Android virtual device on your Windows PC in just a few minutes.
There are a few things you need to remember about Android apps. Unlike the highly demanding iPhone App Store, its version for Android OS - called Android Market - provides much more freedom. In fact, some consider the Android Market to be the wild west of applications: almost everything is allowed there, and dangerous (malicious) applications are often removed from it only after user complaints. As for the prevalence of malware on the Android Market, SMobile Systems, a company dedicated to the security of software on mobile phones, recently stated in a report that approximately “one in five programs requests permission to access private or sensitive information that an attacker could use.” for your own purposes."
It is unlikely that each of these applications requests this information in order to send it to cybercriminals. Apparently, most of these applications either use this information for legitimate purposes (for example, for Internet banking) or simply ask for it due to the weakness of the developer as a coder. But at least some of these apps may still be trying to steal your information from you and put it in the hands of people you don't want to give it to.
However, the Android Market is not the only place to download and install Android applications. There have been several independent Android app stores running for some time now (like Softonic, Handango, and GetJar), and new stores are also emerging (like AndSpot, SlideMe, and AndAppStore). But how they will treat hackers remains to be seen.
In general, you should be careful about what you install on Android - even virtual ones - especially if you've already entered any personal information, such as your Google account name/password. How do you know if an application is dangerous? Without installing some kind of security program, this can be difficult. For example, I installed Lookout Mobile Security FREE (beta) on several of my virtual Android devices (and on my Android phone), and so far, in my opinion, it does what it is supposed to do - protect against malware.
Once you start installing applications on your virtual Android device, you will, however, encounter difficulties. By default, any virtual device created using the Android SDK does not have access to the Android Market - Android OS images created using the SDK are quite simple. Therefore, you may be limited in terms of installing applications - you can only install applications that are available in independent Android application stores.
For example, the Lookout Mobile Security FREE version I installed was downloaded from GetJar. By the way, using Android OS 1.6 I was able to access the Android Market on my virtual device, although I will describe how I did it below.
Also below, I'll show you how to create and use an Android virtual device on a Windows computer, and how to download and install Android apps from independent stores. All this is done using the latest version of Android OS: 2.2, which is also known as Froyo (Froyo is short for "frozen yogurt" - frozen yogurt, because all Android OS code names come from desserts). Then I will show you how to create a virtual device with Android 1.6 and Android Market. But first…
All instructions presented here were performed on a Windows 7 system, but they should also apply to other 32-bit versions of Windows XP or 32-bit or 64-bit versions of Windows Vista. Moreover, there are versions of the Android SDK that work on Mac OS X 10.5.8 (and later) and even some versions of Linux. True, you will not find descriptions of installing the package for these operating systems here.
The first thing you need to do is make sure you have Java installed. The official Java website can help with this, which will tell you whether Java is installed or not. If you don't have Java installed or the version is too old, just follow the instructions on the site and you will get yourself the latest version of Java. The Android SDK documentation suggests that you install the JDK version of Java, but in reality, if you are not a developer, you will only need the standard version of Java, which is officially called the Java SE Runtime Environment. However, when using Internet Explorer, Java may be called "Java for Windows Internet Explorer."
After checking that Java is installed, download Android SDK Starter Package, which will be packaged in zip. After unpacking the downloaded archive, you should get the android-sdk-windows folder. You can place it anywhere - everything you need is already there, you don't need to install the program the traditional way. Just remember where you put the folder, otherwise you will have a hard time creating icons to launch the application.
Go to the android-sdk-windows folder and run the SDK Setup.exe file, which is the Android SDK and AVD Manager application.

If Java is not installed correctly, you will see an error message pop up.

When you launch the Android SDK and AVD Manager for the first time, you may see a Refresh Sources window, which will inform you that the storage cannot be found.
If you encounter such a message, you will have to change the SDK settings to use HTTP rather than HTTPS. To do this, click Close. Next, you will see a window for selecting packages for installation - “Choose Packages to Install” - in which, however, nothing appears. Click on Cancel. Next you should see the Android SDK and AVD Manager window. Select the settings tab - Settings - and in the Misc section, enable the "Force https://... Sources to be fetched using http://..." option.

Then select the Available Packages tab. You should see a single site in the list: https://dl-ssl.google.com/android/repository/repository.xml. Select that site and a list of packages should appear below it. If you want to play around with different versions of Android OS, enable all packages.

If you want to use only Android 2.2, then you only need to download such packages as: "Documentation for Android SDK, API8, revision 1"; "SDK Platform Android 2.2, API8, revision 1"; "Samples for SDK API8, revision 1"; and Google APIs by Google Inc., Android API8, revision 1."
Having selected the packages, click on the “Install Selected” button. This will take you to the “Choose Packages to Install” window for selecting packages to install, where all previously selected packages should be listed (by the way, if you didn’t encounter an HTTPS error when you first launched the SDK, this will be the first window you see). Do not click on the Install button yet. You will notice that some packages have a question mark next to them. This means that for each such package, you must accept the license agreement before installing it. Select all the packages with the question one by one and click on the Accept button. Then, when you see checkmarks next to all the packages, click the Install button.

Once you have selected all the packages to install, you will have to wait for them to finish downloading, which may take several minutes. When everything is finished, you will see a window with a message like, “Done, 12 packages installed.” Click Close.
You are now ready to create your first virtual device. In fact, the Android SDK calls them Android Virtual Device or AVD, as I will continue to do. Select the Virtual Devices tab and click the New button.

You will see a window for creating a new Android virtual device - Create new Android Virtual Device (AVD). There isn't much you need to do to create an AVD. All you need is:
Now click on the Create AVD button.

The AVD will be created very quickly, at the end of which you will see a pop-up window with a corresponding message about the creation of the AVD. To close it, click OK.
Please note that once you create an AVD, you will not be able to change its settings. Therefore, if you want to change anything, you will have to create a new AVD. Otherwise, the AVD you created should appear in the list of virtual devices - Virtual Devices.

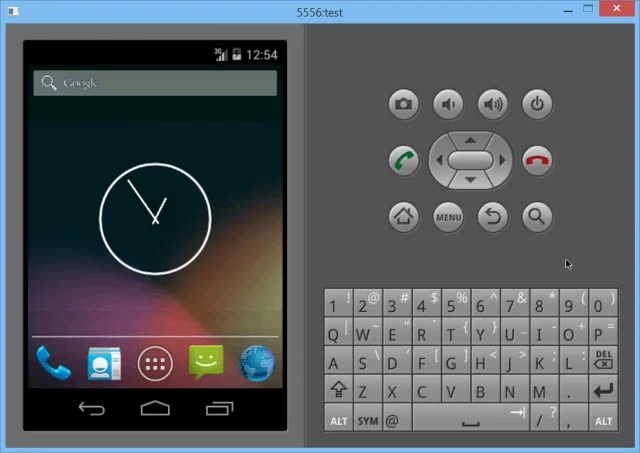
To launch the AVD, click on it and then click on the Start button. You will see a Launch Options window - which will allow you to Scale the screen and wipe user data. You'll probably be attracted to the ability to zoom the screen, but you shouldn't use it. Otherwise, the window will be the physical size of a phone screen (only three inches tall).
You should not use the ability to erase user data (although later, when installing Android 1.6 AVD from the Android Market, we will still use this opportunity). Just click the Launch button to start the AVD.

It may take a couple of minutes for the AVD to launch, so please be patient. Soon you will see on your screen - AVD. By the way, AVD is also called an “emulator” - emulator, because... it “emulates” an Android device.

The Android application technology platform has proven to be versatile and developer-friendly. You can develop an Android app and publish it on the Google Play Store with minimal restrictions. This concept has led to the rapid development of popular Android applications, some of which are not available on iOS and other platforms. To run an Android application, you usually need to use a smartphone or tablet with this OS - this is obvious. What to do if you want to try using Android without buying a device?
Fortunately, you have this opportunity; Android can be run even on an old desktop computer. There are several ways to accomplish this task, each of which has its own advantages and disadvantages.
Perhaps the easiest way to run Andoid apps on a Windows computer is to use the ARC Welder app for the Google Chrome browser. The application was developed by Google and can be used not only on Windows computers - this method also works on Chromebooks and Macs. The launch process is practically independent of the platform used. Simply go to the Chrome Web Store and install the ARC Welder app from the catalog.
The ARC Welder application is in beta and is intended primarily for developers. However, the process of downloading the app is quite simple. You need to upload the APK file to ARC Welder. The APK file can be obtained by backing up the app on a physical Android device or by downloading from various third-party sites on the Internet. We do not recommend downloading paid applications and games from dubious sites. There are resources that archive free apps, such as APK Mirror.
Once the required APK file is downloaded and ready for download, you can open ARC Welder from the list of extensions in Google Chrome and point to the file. Then you need to choose how to display applications - landscape/portrait mode, smartphone/tablet mode and clipboard access method. Not every Android application will launch this way, and some applications may lose some of their functionality. ARC Welder, unfortunately, does not currently have built-in support for Google Play services (unless you are an application developer and do not have access to the source code), so Google applications and some third-party applications will refuse to work.
Applications or games that run in ARC generally run smoothly. You can get full functionality from Evernote, Instagram and even Flappy Bird. You can only have one application installed in ARC Welder at a time; to launch another application you need to return to the installation dialog.
The application deployment process and the limitation of running only one application at a time create barriers to everyday use of the tool. However, the extension is suitable for the needs of developers and testers, or simply to get acquainted with the capabilities of the mobile platform.
The next easiest way to run Android apps on a PC is to use an Android emulator developed by Google as part of its software development kit (SDK). The emulator can be used to create virtual devices running any version of Android with different screen resolutions and hardware configurations. The first disadvantage of this method is the rather complicated installation and configuration process.
Neither product is perfect - you need devices supported by the tools, such as the Dell XPS 12 in the case of the Intel version or the Lenovo ThinkPad x61 for Android-x86. You can install these environments on top of Windows, but this is not a good idea. The smartest way is to create a separate hard drive partition and install Android on it.
If your PC configuration is not supported by these products, you can try installing them in VirtualBox or VMware virtualization environments, which are faster than the Android emulator. These products may still not be suitable for testing games, but most applications will install and work correctly. You will need to install applications yourself, because... There is no Google Play integration in these products. For help, you can use the instructions on our website - Installing Android in VMware Workstation.
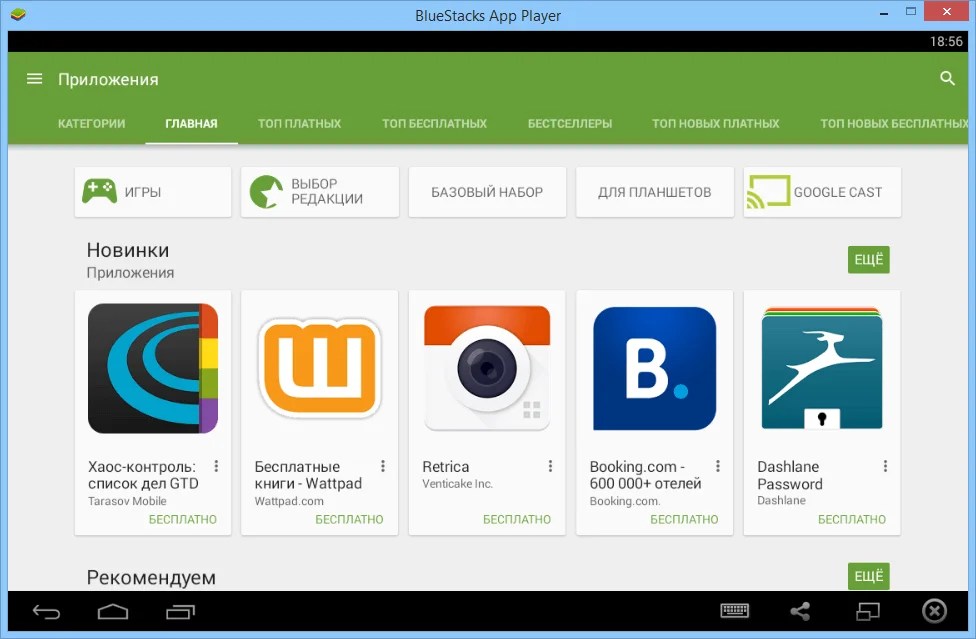
If you're looking for a way to run multiple Android apps and games at once, and it's easy to install and configure, then BlueStacks is your choice. represents one of the easiest ways to launch applications. However, the product uses a highly modified version of Android to run applications. BlueStacks contains a built-in Google Play store, and you have access to all purchased paid applications. The program is added to the list of Google Play devices under the name Galaxy Note II.
A separate BlueStacks window contains a list of applications divided into categories: games, social networks, etc. When searching for an application or clicking on the icon of a specific application, the unexpected happens - the Google Play client in tablet mode is displayed. The user can navigate the interface as they would on a regular Android device, making BlueStacks more than just an “app player.” In fact, the user can install third-party launchers such as Nova or Apex from the app store and select them as the default launcher. The home screen in BlueStacks with app categories is a variant of the home screen. Thus, by replacing it, you can feel like the owner of a real Android device.
Full access to the Google Play store eliminates problems with application deployment, and BlueStacks itself works stably and quickly. You can play most games, but you may have problems using the mouse. If your computer has a touch screen, you can use applications that support multi-touch. BlueStacks can turn a Windows 8 tablet into an Android tablet. The technology used in BlueStacks is called “LayerCake” because Android applications run in a separate layer on top of Windows.
The only drawback of BlueStacks is the use of a modified build of Android. All changes made by the product developer to run Android applications on PC may cause crashes and failures in the application. This modified environment is of little value to developers - there is no guarantee that applications that display and run correctly on BlueStacks will behave the same on a physical device. The service uses a freemium monetization model - you can either pay $2 for a subscription or install several sponsored applications.
If you want to test an app before installing it on physical devices, Android emulator offers the best way to test the app on your computer first. The product is quite slow, but it is standardized, so the developer can see how the application will behave on a real smartphone or tablet. Porting Android to PC can achieve decent performance, but there may be issues and glitches and it requires compatible hardware.
If you need to get several Android applications on your computer at once, the best solution is BlueStacks App Player. The product provides full access to Google Play, works quickly and supports Windows devices with multi-touch. Don't forget about ARC Welder as a way to run one application at a time. The extension is free and easy to install.
If you have a favorite Android application that you want to run and use on your computer, then believe me, now this can be done really easily.
It will, of course, be better to play the game on a large monitor screen, while using keyboard and mouse controls that are more convenient than on a phone.
Or maybe you're used to a certain mobile to-do list or calendar app? Now, instead of going through the difficult journey of installing various Android emulators on Windows, we can use a free and functional tool called “BlueStacks App Player”.
It is essentially a standalone virtual machine designed to run Android applications on computers compatible with Windows or Mac OS operating systems. It features more advanced capabilities compared to other similar products, namely:
Before you start working with BlueStacks, you need to download the installation file (about 316 Megabytes in size) from the official website at the following address:
https://www.bluestacks.com/ru/apps.html
and click on the “Download” button.
After the download is complete, launch it and you will go through the normal installation process step by step, making sure that the “App store access” and “Application Communications” items are checked during installation.

Next, after clicking the “Finish” button, you will be asked to create or log in to your Google account, with which you can synchronize settings across different devices, such as a computer and laptop.

After logging in, you will be able to go through the standard set of settings, as if you were turning on a new Android tablet for the first time.

The first thing you can do is go to and install any game or program of your choice.

You will receive notifications about ongoing processes in the lower right part of the computer desktop in the form of a pop-up window and as standard in the emulator itself. By selecting an icon with three lines in the upper left corner near the Google Play inscription, you can get applications and games that you previously used on your phone or tablet with the same account, both paid and free.

Notice the left sidebar:

The top panel contains:

At the time of testing, the emulator works stably and without failures. The Android application is installed and launched on the computer. I ask everyone to share their feedback in the comments!
Visit where you will find a large number of different useful computer tips. Don’t forget about the social networking buttons below, with which you can share this resource with your friends and acquaintances!
Do you love the game on your smartphone and would like to play it at home on the big screen? Or did the Android utility turn out to be so convenient that it would be useful to use it when working on a computer? There are cases when a program was created exclusively for this platform and the search for analogs for the PC does not give the desired results. For all the situations described, there is one solution - launching the Android utility on your computer. For these purposes, you will first need to select an emulator that allows you to run Android programs on a computer running Windows OS.
There are many similar programs available on the Internet. The most common ones are Bluestacks, Droid4x and Genymotion. All of them are free to download and are always available on the developers' websites. The application distribution is added to the emulator in two ways. You can use installation files with the APK extension, previously downloaded from our website, or access the programs directly through Google Play.
Let's consider options for using voiced emulators.
All emulators considered cope with the main function - running Android utilities on a PC. Regarding ease of use and performance, small conclusions can be drawn. They will help you choose an emulator in order to transfer Android applications to your computer.
BlueStacks- a simple emulator that performs the main task, but nothing more. The utility allows you to run games, but it is not always stable and performance leaves much to be desired. It is distributed as a shareware, that is, the basic set of functions is free, but you will have to pay for additional features. An acceptable option for home use.
Droid4x– also simple and undemanding, but, unlike its previous colleague in the shop, more functional and productive. A huge plus is the stability of operation and at the same time it is absolutely free, it never asks for the purchase of additional functions and other things. An excellent option for home use.
Genymotion– a higher-ranking emulator with many additional features. However, they will be of interest mainly to developers for the initial testing of their programs before testing on real devices. The quality of the product and focus on professional use have led to a disadvantage for ordinary users - the emulator is distributed on a paid basis. The free version does not have an Internet connection and many necessary functions. Not suitable for home use.


