Smartphones have a special button that allows you to turn on the screen. It is most often located on the desktop. When using this function, all photos immediately go into a special folder with an appropriate name like Screenshots or Screen capture.
If the manufacturer has not provided such a function, then you can screen it in two ways.
The first one, as a rule, can be applied on most modern devices. You can take a screenshot using a specific key combination. It may differ for different phone models. The most common option is to press the menu and lock buttons. If this key combination fails to take a screenshot, try other combinations:
For Android 4.0 and higher - lock and volume down button;
For Android 3.2 - long press on the “Recent Documents” key;
For some Sony brand phones - long press the power button until the corresponding menu appears;
For Samsung Galaxy - a combination of the menu and back buttons.
If you can’t screenshot your phone screen using a keyboard shortcut, you can go the second way, using special programs. Some of them are installed on your computer. For example, Android SDK. In this case, you can take a screenshot when connecting your computer and phone via a USB cable. Others install directly on a smartphone. Among them are Screenshot It, Screenshot UX, Screenshot ER PRO, etc. To take a screenshot of the screen on your phone using an application from the Market, you will need root rights.
You can take a screenshot on Nokia Lumia 520, 620, 720, 820, 920, 925, HTC Mozart, W8S, W8X or other Windows phones by pressing the lock and start keys. The screenshot will be saved in the photo folder in the screenshots section.
If you can’t take a photo of the screen using the keys, you can install the Screen Capture program on your phone.
iPhones have a special feature that allows you to take a screenshot of the screen. To get an image, you need to press the round HOME button under the screen and the lock key on the top end of the phone body.
The photo will be saved in the folder where all other photos are located. On Apple On your phone, you can take a screenshot of the screen while in any application, and even during a call or working with the camera.
New users of mobile devices sooner or later face this question. This is one of the most popular mobile operating systems in the world, and information like this will be useful to many. It seems that on a Windows desktop computer, a separate key on the “PrintScreen” keyboard is responsible for this operation, but there is nothing like this on the desktop or in the virtual keyboard of the Android operating system.
If you don't know how to take a screenshot on an Android phone, then we will tell you about all the possible methods, including individual options depending on the mobile device manufacturer.
First we will introduce you to universal methods.

It is worth noting that with each method of creating a screenshot, they will be saved in the “Photos” folder (the “Gallery” folder on older versions of the Android operating system).

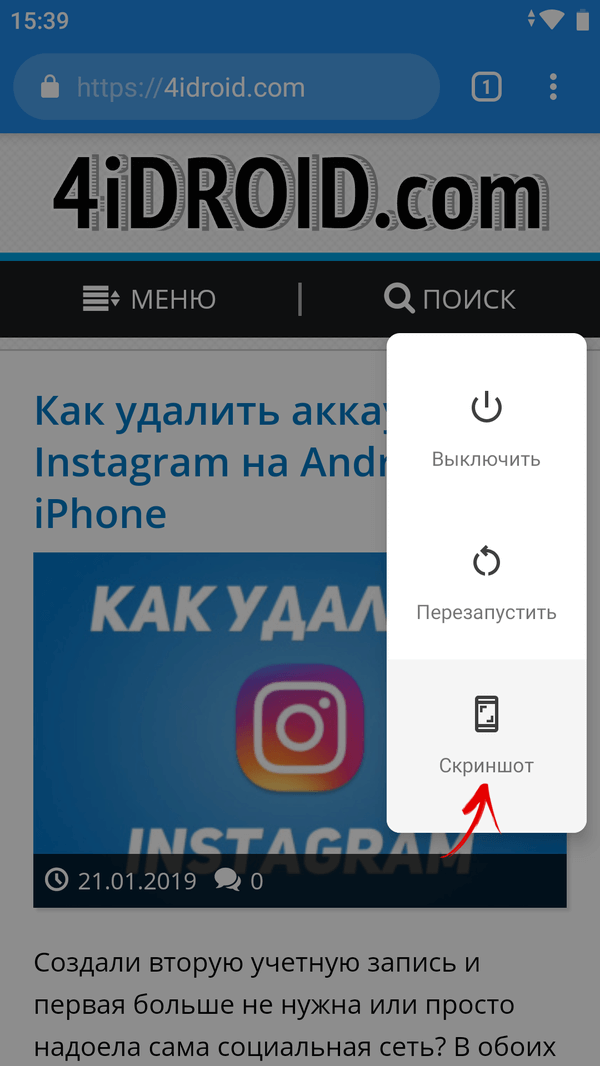
Many branded firmware for Android OS have an additional menu, which is called up by pressing the power button of the mobile device. Therefore, we do everything according to the following algorithm:
Some manufacturers include individual commands for creating screenshots in the Android OS. We will look at several popular smartphone manufacturers.
Modern models of Samsung mobile devices have been equipped with another simple way to take screenshots. To do this, just move the edge of your palm across the working display from left to right or from right to left.
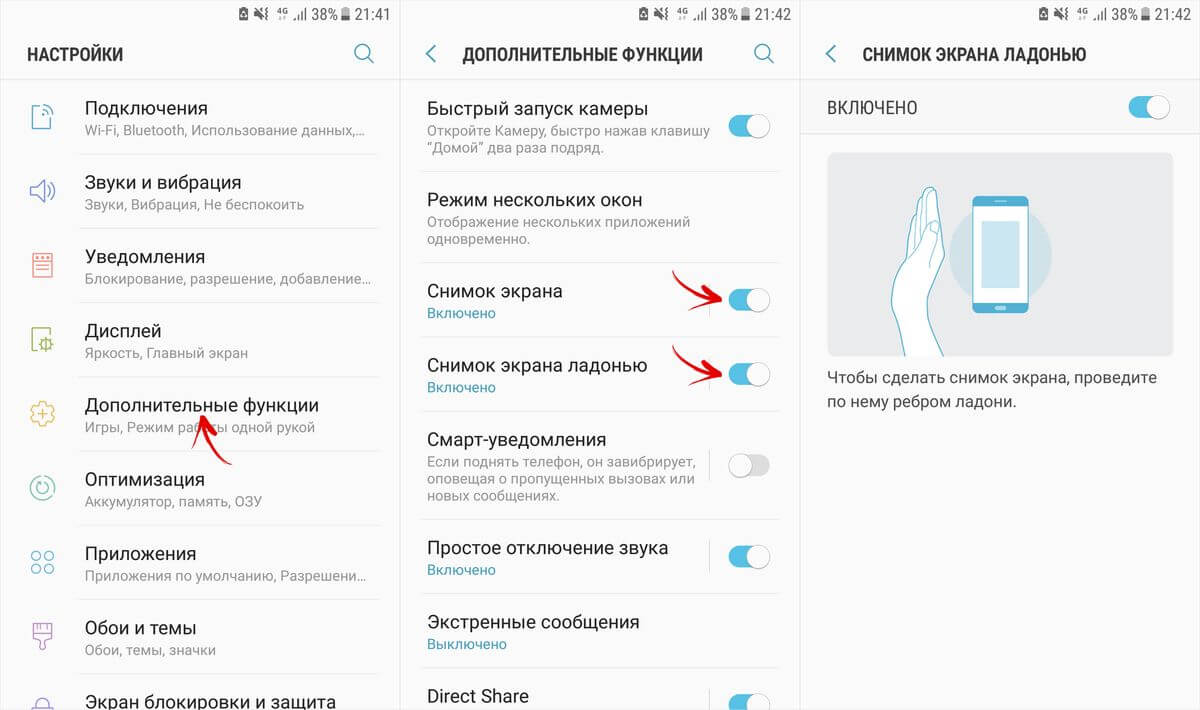
Attention! This feature may not be enabled by default. To activate it, you need to go to the “Settings” menu, select “Management”. Next, in the new submenu, go to “Palm Control” and select “Screen Capture”. After this, the newfangled method of creating screenshots will be available to you.
LG's proprietary Android add-on called UX has an application for creating and editing Quick Memo screenshots. The activation button is located in the top curtain of the notification panel. This application will simultaneously take a screenshot of any application or desktop, and also edit it, for example, crop it.

If you have purchased a new mobile device from Xiaomi and are interested in how to take a screenshot on Android, then here's another quick way. The latest Xiaomi models, such as the Mi 8, allow you to take a screenshot of the screen in one simple motion: swipe down with three fingers from top to bottom on the display. The proprietary MIUI shell immediately recognizes this command and takes a screenshot.
We hope our tips will help you choose the most convenient way for you to create screenshots on Android.
Taking a screenshot usually requires pressing two buttons on an Android device - either the Volume Down key and the Power button, or the Home and Power buttons.
When the correct combination is pressed, your device's screen will flash and is usually accompanied by a camera shutter sound. Sometimes a pop-up message or notification appears indicating that a screenshot has been taken.
In some cases, you may find a screenshot option in the power menu. Simply press and hold the Power button, wait for the menu to appear, and select either Take Screenshot or Screenshot to take a snapshot of the current screen. This can be a useful method, especially when pressing combinations of physical buttons is difficult.

Android device manufacturers often offer additional and unique ways to take screenshots on your device. For example, you can take a screenshot on Galaxy Note series smartphones using the S Pen. On most Samsung smartphones, you can take a screenshot by swiping your palm across the screen. There are many alternative ways to take screenshots, but not all of them may be mentioned in this guide.

For Samsung phones with a physical Home button, you can use the Home and Power key combination to take screenshots.
Simply press both buttons at the same time until the screen flashes and you hear the camera shutter sound. You will also receive a notification confirming that the screenshot has been taken.

Own a Galaxy S8 or other Samsung device that doesn't have a physical home key? In this case, you can take a screenshot as on most smartphones - using a combination of the Volume Down and Power buttons. Hold both buttons until the screenshot is taken.

If you have a flagship Samsung Galaxy phone, such as the Galaxy S9 or Galaxy Note 9, it comes pre-installed with Bixby digital assistant. It allows you to take a screenshot using a voice command. All you have to do is go to the screen where you want to take a screenshot, and if it's set up correctly, just say "Hey Bixby." When the assistant starts working, just say “Take a screenshot” (unfortunately, Bixby does not support Russian language), and it will take a screenshot. You can see the saved photo in your phone's Gallery app.
If your Samsung phone isn't set up to call Bixby using a voice command, simply press and hold the dedicated Bixby button on the side of your phone and then say "Take a screenshot" to take a photo.

On Samsung devices that come with an S Pen (such as the Galaxy Note series), you can use the stylus itself to take a screenshot. Simply take out the S Pen and launch Air Command (if it's not done automatically), then select Screen Write. Typically, once a photo has been taken, the image will be immediately open for editing. Just remember to save the edited screenshot later.

On some Samsung phones there is another way to take a screenshot. Go to Settings and then tap on Advanced Features. Select Motion, Palm Control, Gesture Control, or Advanced Features (the name may vary by model and OS version) and activate the feature.
Then, if you want to take a screenshot using this method, simply swipe the side of your hand across the screen from left to right or right to left. The screen should then blink and you will receive a notification that a screenshot has been taken. You can view the generated screenshot by tapping the notification or going to the Gallery app.

On HTC devices, you can take a screenshot by holding down the Home and Power buttons. If you have a smartphone without a physical Home button, you can simply press the Power and Volume Down buttons at the same time, like on most Android devices. If you have an older HTC model, you may find that this option doesn't work and instead you need to first press and hold the Power button and then quickly press the capacitive Home button. The screen will flash and you will hear the camera shutter sound. You will also see a pop-up message confirming that your screenshot has been saved.

On Sony Xperia phones, the key combination for taking a screenshot is the Volume Down and Power buttons. Hold them down at the same time until the screen blinks and a screenshot thumbnail appears on the screen. A notification also appears in the curtain after a screenshot has been taken.
There is also an alternative method. You can also take a screenshot through the power menu. Hold the Power button until a dialog box appears. Click on "Take Screenshot".

On LG devices, you can take a screenshot using the Volume Down and Power buttons. Press and hold these buttons simultaneously until the screen flashes and you hear the camera shutter sound. A notification also appears in the curtain after taking a photo.
You can also take a screenshot using the Quick Memo app, which can instantly create and allow you to take notes on the screenshots. Just activate Quick Memo from the curtain. Once enabled, the editing page will appear. You can now take notes on the current screen, and when finished, tap the floppy disk icon to save the image.

There are several ways to take a screenshot on OnePlus smartphones. Standard - using the Volume Down and Power key combinations. You can also take a screenshot in the power menu - you need to hold down the Power button and select the “Screenshot” item in the menu that appears. Another way is to take a screenshot by swiping three fingers across the screen. For this method to work, you must first enable it in the settings. To do this, you need to go to “Settings”, select the “Buttons and gestures” section, then go to “Quick gestures” and activate the “Three-finger screenshot” item. Now, to take a screenshot, you need to swipe down with three fingers from top to bottom of the screen.

On Xiaomi, you can take a screenshot by holding down the Power and Volume Down buttons. On older devices with touch keys below the screen, you can press and hold the Volume Down and Menu buttons at the same time. You can also find the “Screenshot” item in the quick settings panel, after clicking on it, a snapshot of what was open before the curtain was lowered will be created. There is also a way to take a screenshot by swiping three fingers down the screen. To activate this feature, you need to go to Settings → Advanced → Screenshot and check the “Swipe down with three fingers to take a screenshot” feature.
As you can see, taking a screenshot in Android is very easy. With these snapshots, you can easily share what's on your device's screen with everyone. What methods of taking screenshots on Android do you know? Share about it in the comments below.
How often do we, Android device users, have to take screenshots: to save correspondence, show an area on a map, cut a fragment from a video, make a copy of a train ticket, capture an achievement in your favorite game, etc. In each of these situations, you will need to take a screenshot, so it is useful to know what combination of buttons is used to take it.


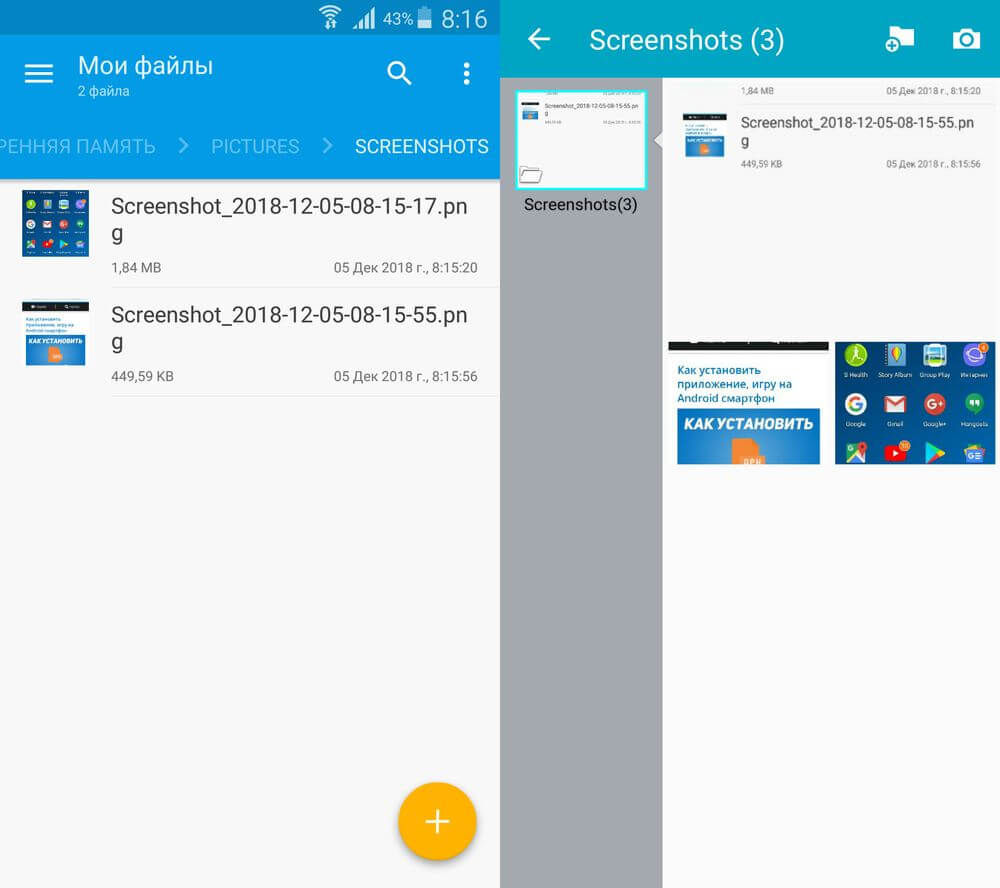
If you need to upload the screen to your computer, connect your smartphone or tablet to the PC via USB, go to the internal memory → “Pictures” → “Screenshots”. Then select the images you want and transfer them to your computer.

Another standard way to capture what is shown on the display is to long press the power button to bring up a menu with available actions and select the desired option. Usually the list consists of the following items: “Shutdown”, “Reboot”, “Airplane mode”, and in some firmware (usually custom ones) there is also “Screenshot”. We are interested in the latter.

The feature also appeared on stock Android 9 Pie.
On most Samsung smartphones and tablets, screenshots are taken as follows: press and hold for a couple of seconds lock key and home button until it sounds like a camera shutter clicking. An icon will appear in the notification area indicating that the screenshot has been saved.

On new models of Samsung Galaxy S8, S8 Plus, S9, S9 Plus, Note 8, Note 9, J8, J6 Plus, A6 Plus, A9 and others, where there is no Home button, the usual key combination is used to capture screenshots: "ON" + decrease volume.

On older devices such as the first generation Galaxy S, press and hold for a couple of seconds Home buttons And "Back".

Modern flagship Samsung smartphones and some models in the mid-price segment support the “Palm Screenshot” function. On most devices, the option is enabled by default, but if not, go to “Settings” → “Additional features” (depending on the model and firmware, it may be called “Palm control”, “Gesture control” or “Motion”) and activate the “Snapshot” items screen" and "Palm screenshot". Now, to take a screenshot, swipe the edge of your palm across the screen from right to left or left to right.
On Samsung, screenshots are saved to the “Pictures” → “Screenshots” or “Pictures” → “ScreenCapture” folder. You can also view them in the Gallery or Google Photos app.
Xiaomi developers have come up with 6 options for taking a screenshot. Four of them are available only to owners of smartphones and tablets with MIUI 7, 8, 9 and 10, but as of the end of 2018, most Xiaomi mobile devices run these firmware.
The first standard method is to press and hold the buttons for a second nutrition And decrease volume.

Another option to capture an image from the screen using keys is to quickly press the touch button "Menu" and a hardware key Volume Down.

Starting with MIUI 7, the firmware added a screenshot function from . To use it, swipe from the top edge of the display to open the notification shade. Then swipe down a second time to fully open the Quick Settings panel. Click on the “Screenshot” item (if the language is set to English) and the screen image will be saved.

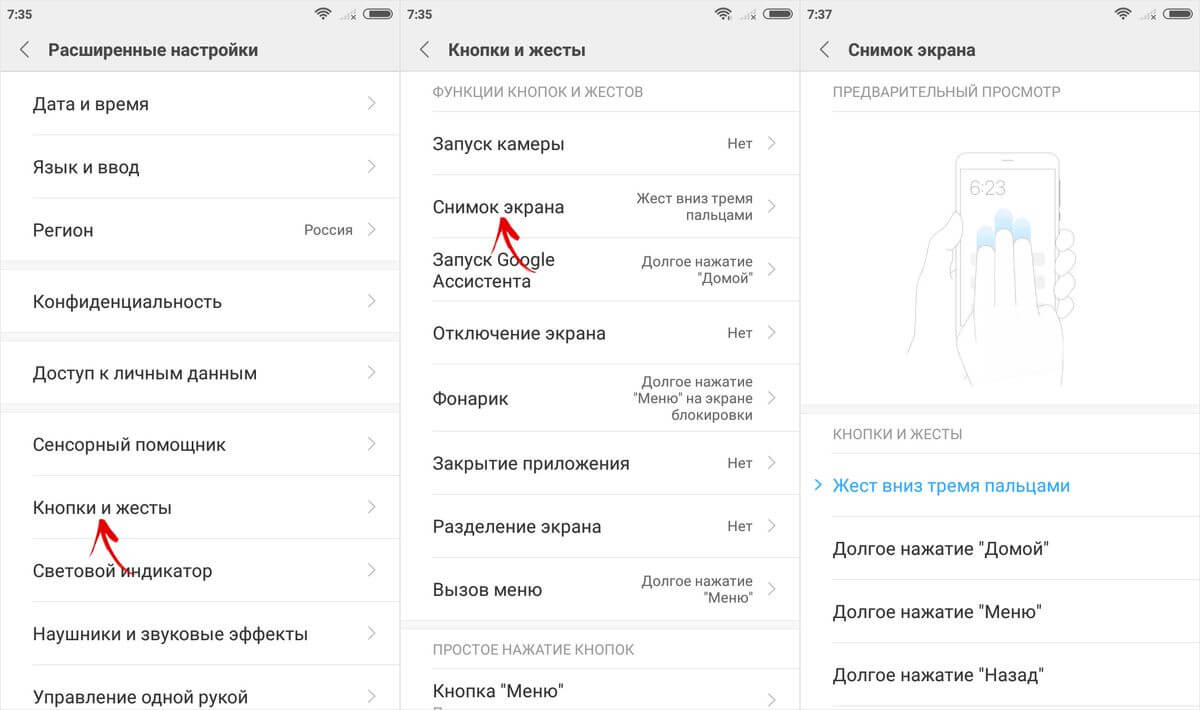
Users of Xiaomi smartphones running MIUI 8 and higher now have access to two more ways to create a screenshot. The first is to swipe down the screen with three fingers. This gesture is set by default, and if you want to change it, go to “Settings” → “Advanced settings” (in older firmware, instead of this item – “Advanced”) → “Buttons and gestures” → “Screenshot” and select another option or simply disable the function.

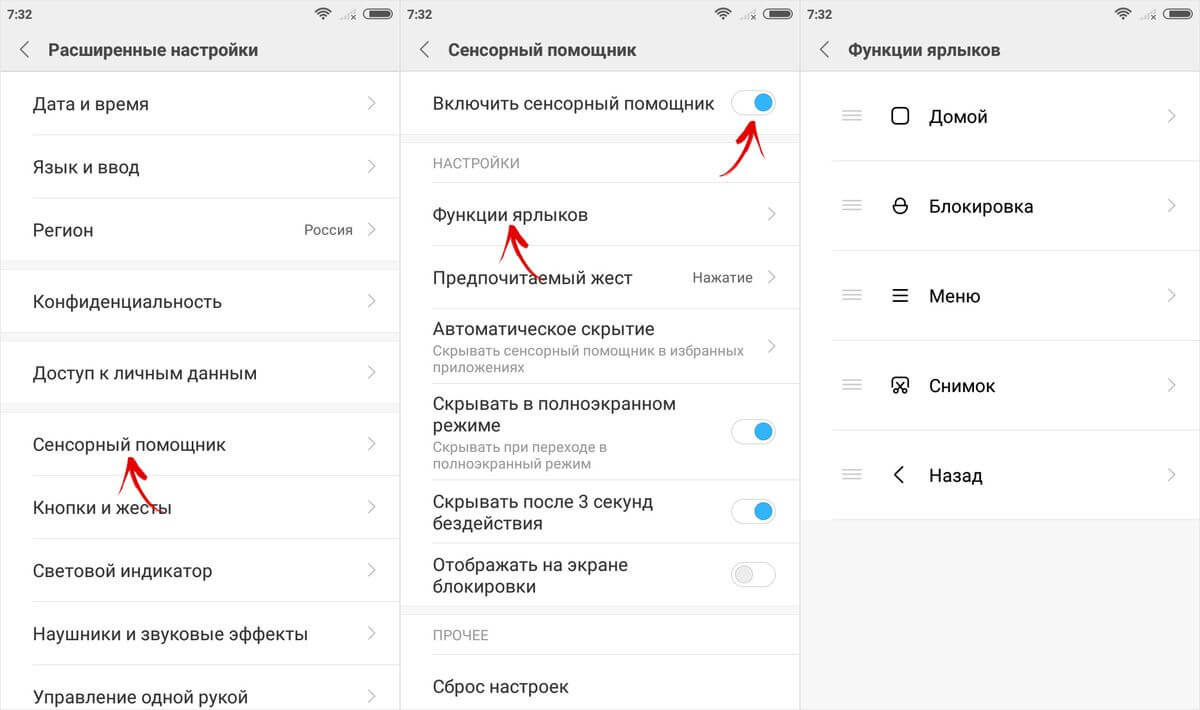
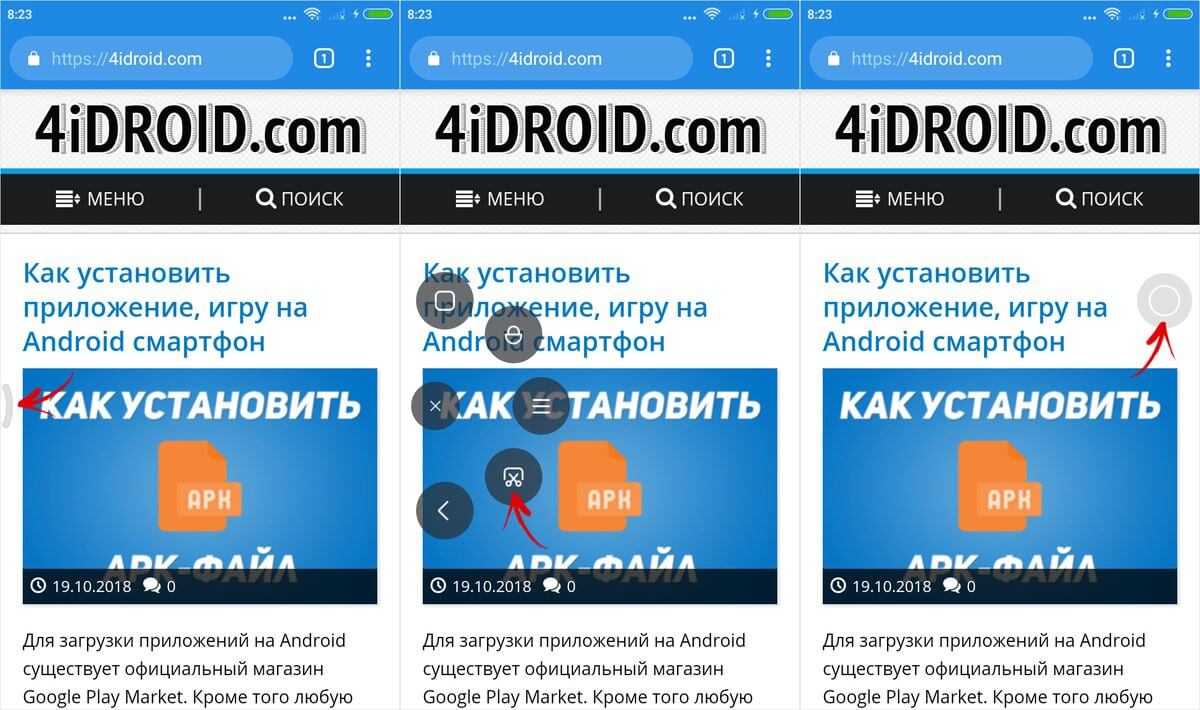
MIUI 8 also features the Quick Ball touch assistant. This is a useful feature that makes it easier to use a smartphone with a large display with one hand. To display Quick Ball on the screen, go to Settings → Advanced Settings (or Advanced) → Touch Assistant and turn on the toggle switch. A translucent arc will appear on the side; clicking on it will open an interactive menu with available options. Among them there is an icon with scissors. Click on it to capture what is shown on the display. If you pull the arc, it will turn into a circle - its location on the screen can be changed by simply dragging it. In addition, by going to “Shortcut Functions” in the Touch Assistant settings, you can change the purpose and order of the buttons.
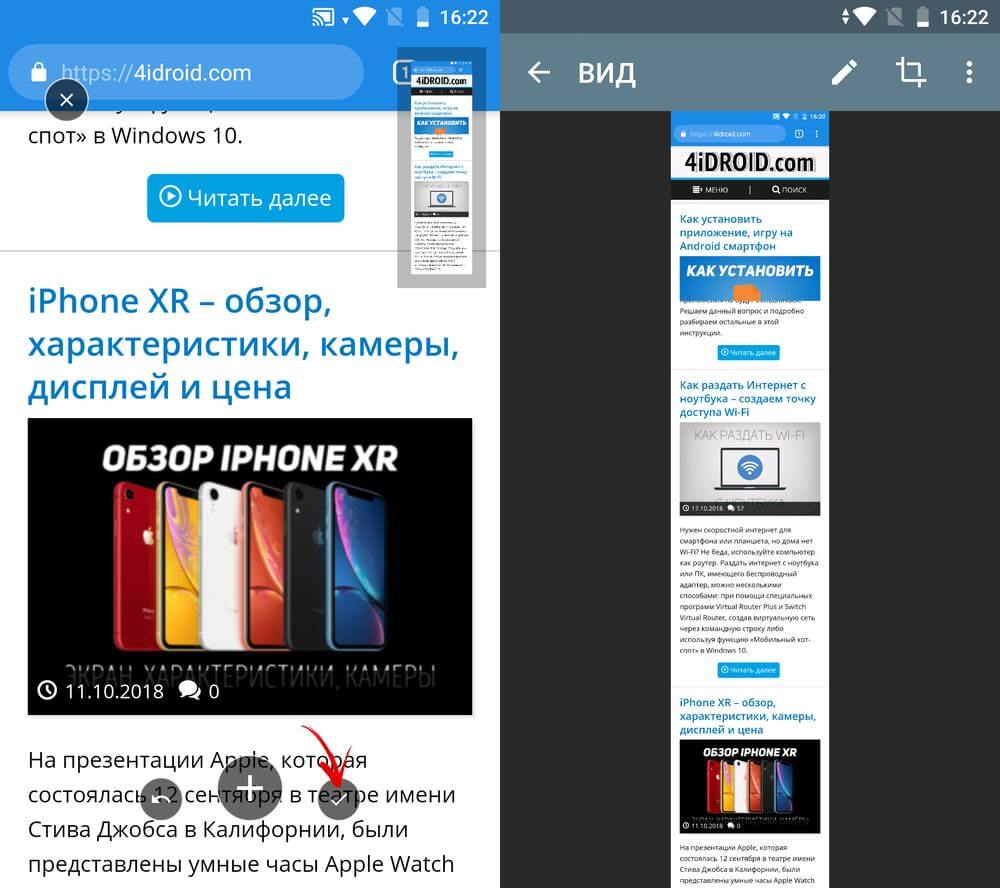
A miniature of the created image will appear in the upper right corner of the display and will “hang” there for some time. Clicking on it will take you to a list of available options. To add text, sketch, or crop an image, select Edit, make your edits, and click Save.
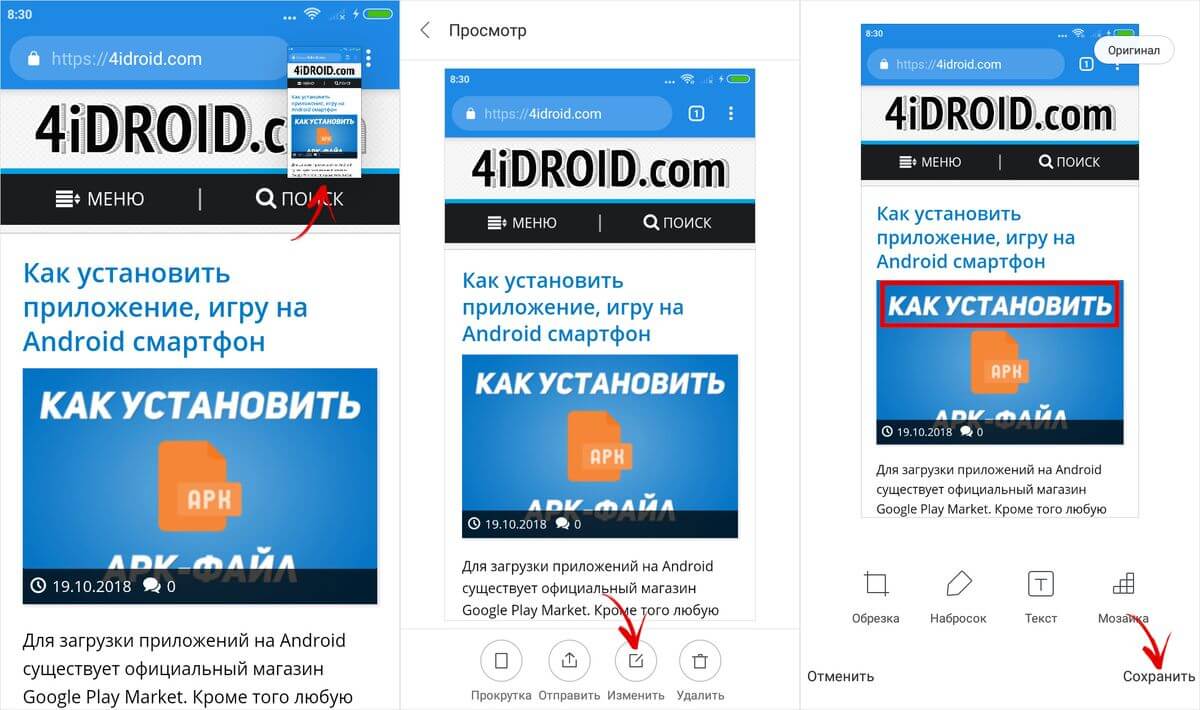
But the most interesting feature is the long screenshot. It comes in handy when you need to “screen” the contents of the screen along with what does not fit on it. After creating a photo, click on its thumbnail and select “Scrolling” (or “Advanced” in previous versions of MIUI) from the list of options. The image will begin to descend and to crop it, click on the Stop button. If you do not press it, the application will scroll to the maximum set by the developers. You can also scroll to the desired point manually. For an unknown reason, the Scroll feature does not work correctly in the Chrome mobile browser.


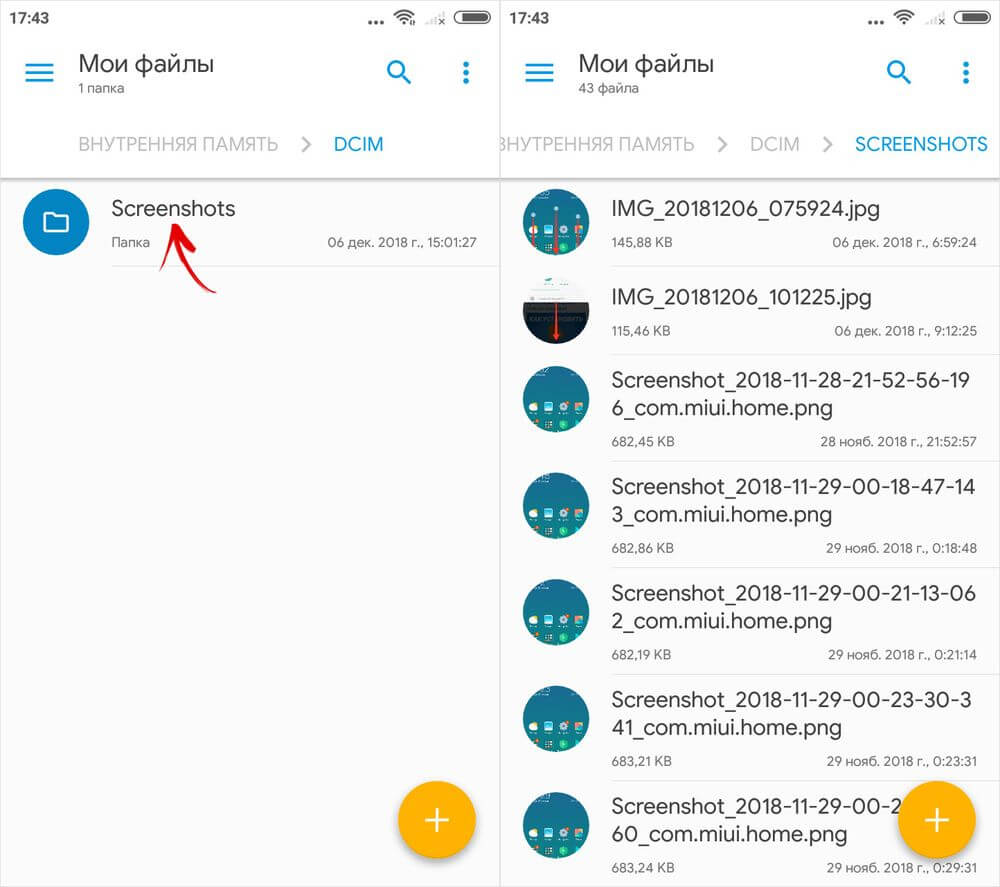
On Xiaomi, screenshots are stored in the “DCIM” → “Screenshots” directory in the internal memory and are displayed in the “Albums” → “Screenshots” section in the gallery.

On LG smartphones, in addition to standard screenshots, the Quick Memo function is available. First of all, it is intended for creating text and graphic notes. You can also use it to save and edit an image from the display: crop it to the desired size, apply your own drawings, delete fragments and add text.
The Quick Memo app is not installed on all LG phones. Check if it is present in the menu and if the corresponding button is located on the quick settings panel (opened by swiping down from the top edge of the display).
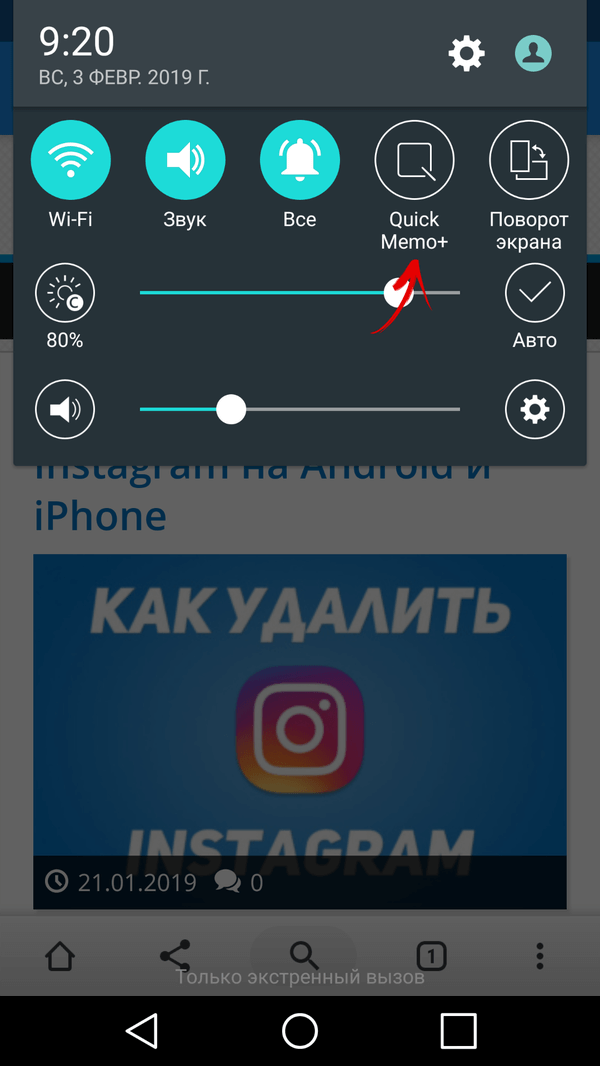
If not, scroll to the last option and select Change. Check the “QuickMemo+” checkbox and, if necessary, move the item - this will change the location of the button in the notification area.

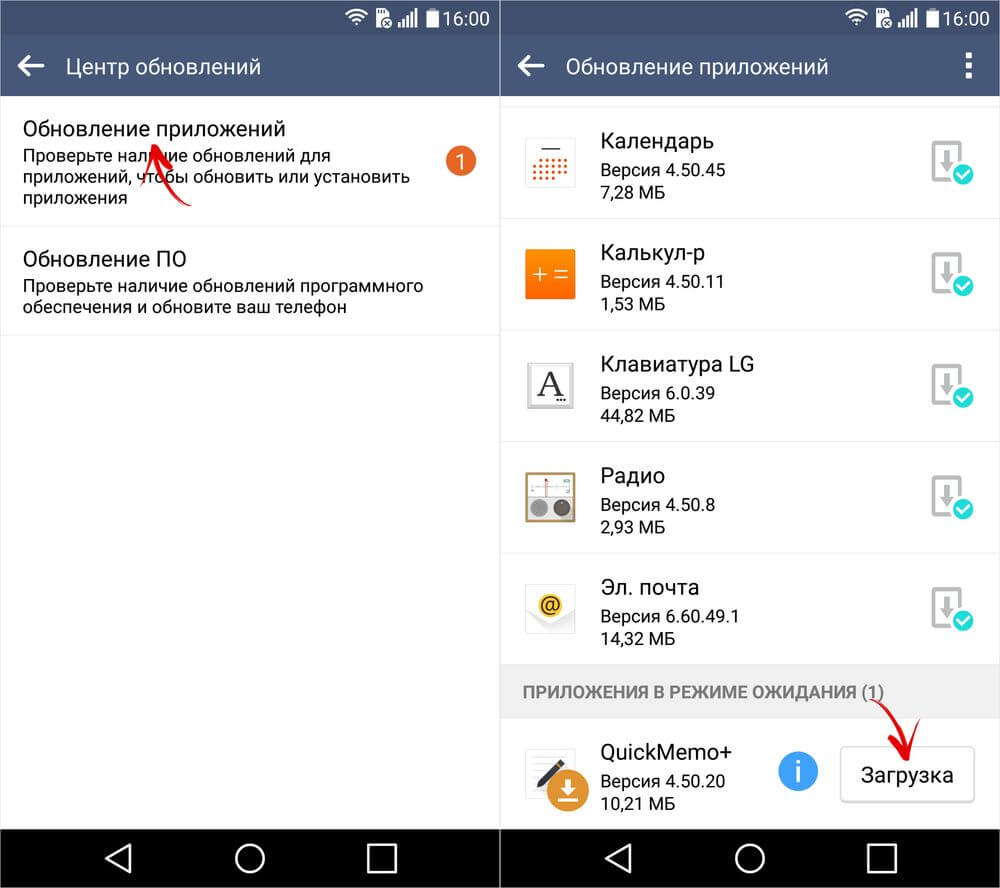
If you don't see "QuickMemo+" in the quick settings panel editor, go to "Settings", open the "General" tab and select "About phone". Go to Update Center and click on Application Updates. Scroll down to the "Applications in Idle Mode" section and click on the "Download" button. After the installation of the program is complete, activate Quick Memo in the notification panel editor.

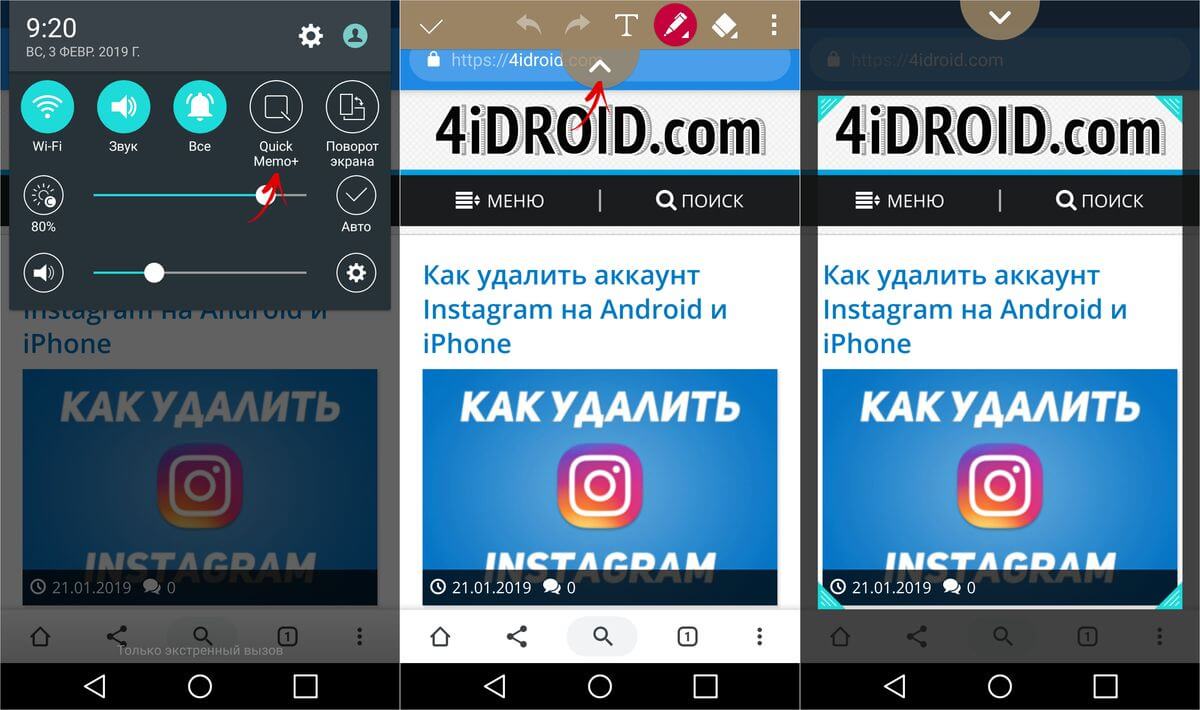
Now, to “screen” the information displayed on the screen, open the “curtain” and click on “QuickMemo+”. You will immediately proceed to editing the photo and will be able to add text or drawing. To crop the image, click on the arrow in the center at the top, which will open a window where you can set frames.
To save a picture, click on the checkmark in the upper left corner and select QuickMemo+ or Gallery.
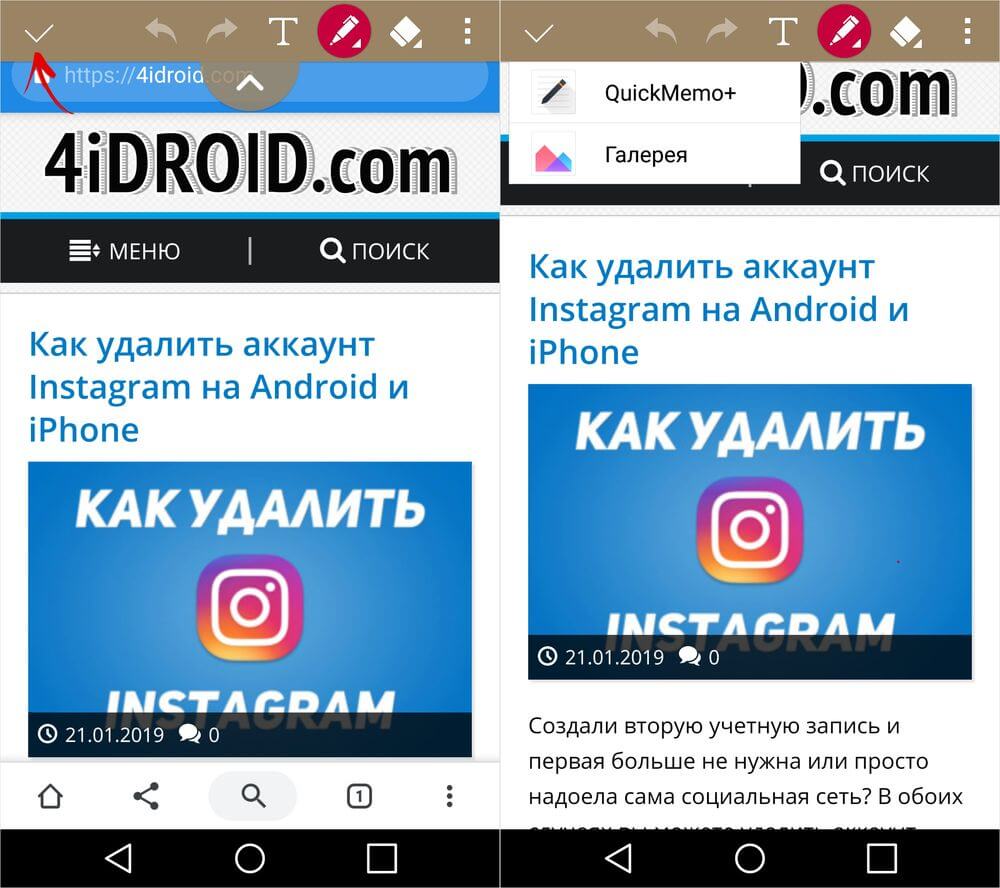
In the first case, a note will be saved, which will be available for viewing and subsequent editing in the QuickMemo+ application, and in the second, a picture will be saved, which will be displayed in the Gallery in the “QuickMemo+” folder.

The extended screenshot feature is available on Xiaomi, Huawei and Samsung smartphones running the latest firmware. But what to do if such an option is needed, but the mobile device manufacturer has not added it to the system? In this case, use one of the proposed programs.


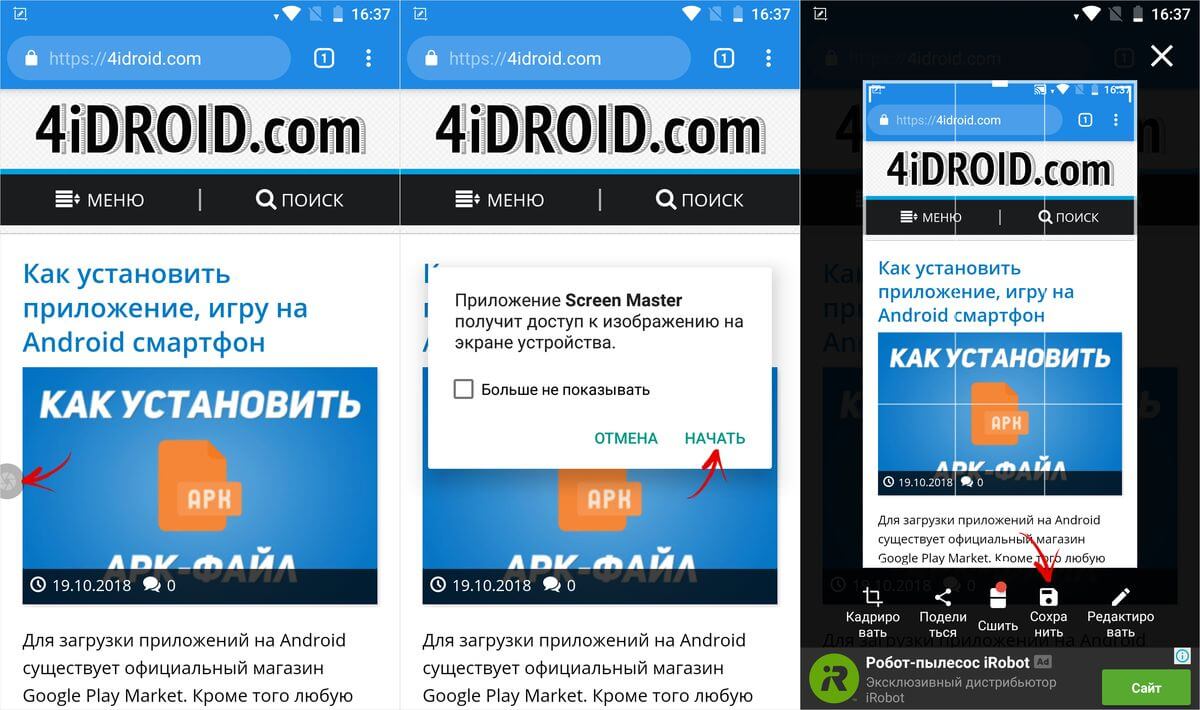
If the hardware volume buttons or the lock key do not work on your smartphone, programs that “can” capture screenshots will come in handy. For example, applications and Mobizen designed for support this function. Download any of them, run it and provide the necessary permissions, after which a “floating” button will appear on the side. Click on it and a list of available actions will open. Select the camera icon and click “Start” in the pop-up window. At the same moment, a screenshot will be created.


There are other screen capture apps available on Android that work in a similar way. For example, Screen Master displays a button that, when pressed, performs a screen. You can immediately crop or change the picture: add text, a sticker, a drawing, or create a long photo. And you will need the Screenshot Assistant program to assign Print Screen to a long press of the home button.

To take screenshots of the display on an Android device connected to a computer via USB, you need the ADB utility. Turn on and connect your tablet or phone to your PC via USB. Go to the “platform-tools” folder and, while holding down the “Shift” key, right-click on an empty space. Select "Open a Command Window" or "Open a PowerShell Window Here."

The command to capture a screenshot is adb shell screencap /sdcard/screen.png . You can change the file name and path and it will come out, for example:
adb shell screencap /sdcard/pictures/screenshots/screen1.png
Paste the command into your running Command Prompt or Windows PowerShell and press Enter to execute. In PowerShell, add ./ before ADB commands. The image will be saved in the specified directory and will be displayed in the gallery.
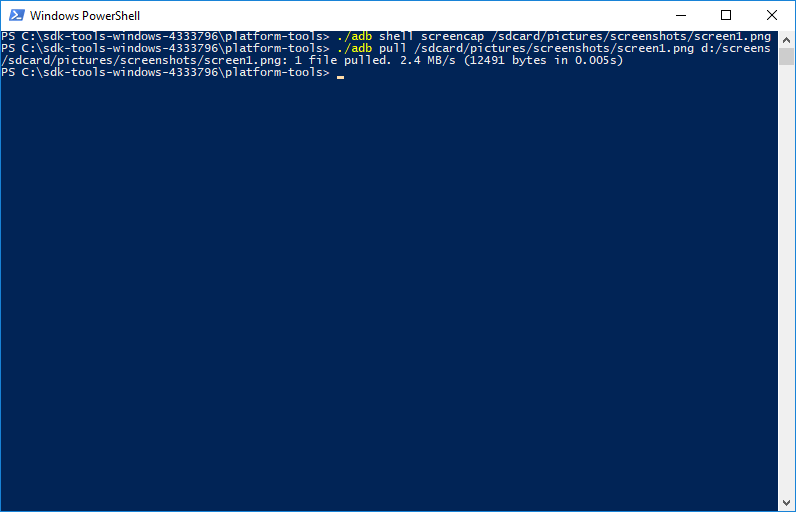
To send a file from your mobile device to your computer, run the adb pull command. Eg:
adb pull /sdcard/pictures/screenshots/screen1.png d:/screens
In this particular case, the file “screen1.png”, which is located in the “pictures/screenshots” directory on the smartphone, will be downloaded to the “screens” folder on the “D:\” drive on the computer. If you do not specify a path to download the file, it will be saved in “platform-tools”.
Smartphone users often need to take a screenshot. There can be many reasons for this - send a screenshot of your desktop to a friend, show a message, photo, and so on. Like any action with the operating system, there are many ways to take a screenshot. You can take screenshots using standard tools, third-party software, and a program on your computer. In this article you will get acquainted with all the methods. You will learn how to take a screenshot on Android.
In many situations, you need to transfer an image from the screen of a mobile device in picture format. To do this, unknowing users will immediately pick up another device with a camera to take a picture of the screen. But there are more convenient options.
Screenshot – Captures an area of the screen or the entire screen and displays what is on it in a graphic file format. With its help, it is convenient to share information, clearly show the actions being performed, introduce users to the functionality, etc. When writing these instructions, screenshots were also used for a visual explanation, which you can verify below.
Unlike the iOS operating system, on Android the screen capture key combinations have changed across versions and generations. If Apple's combination for taking a screenshot has not changed since the first generations, then Android (for example, Meizu) is more complicated. Let's figure out how to take a picture from the display on different versions of the operating system.
When the first generations of the OS were released, Google developers had not yet built this function into the standard set of capabilities. Therefore, smartphone manufacturers added it themselves.
For example, old Samsung or Alcatel devices could create screenshots by pressing keys simultaneously "Home" And "Back". Therefore, to clarify the combination, you can enter the exact name of your model (for example, Dexp Ixion or Samsung A5) in a search engine and find information regarding the device.
After the release of the 3rd generation of the operating system, screen capture was added to the standard set of features. Now with a long press on the button "Recent Programs" A snapshot of the desktop was created and saved to the phone gallery. This method is no longer used in modern devices, but it will be useful for owners of old smartphones that are no longer updated to modern OS versions.
Before the release of Android 6, a general algorithm for creating screenshots was used using the volume down and "Enable/lock". Most Chinese manufacturers (Huawei, Meizu, etc.) decided not to change the established traditions, so the print screen in them is created using the volume and power buttons.
All the methods presented above work for the standard operating system shell. If a smartphone manufacturer uses custom launchers, then it has the right to change the way the system is controlled.
Now let’s look at individual manufacturers that are in greatest demand among users:
Samsung often changes the OS controls in its devices. For example, in the new Samsung Galaxy you can take a screenshot using the edge of your palm from one edge of the screen to the other.
Samsung j3, j1, j7 and similar models have a mechanical button "Home", so the screenshot is created via "Home" + "Inclusion", or "Home" + "Back".
The creators of the Sony Xpiria model line decided not to limit themselves to key combinations and added a corresponding item to the menu, which can be called up by long pressing the power key.
Chinese manufacturers, known for the Xiaomi Redmi and Meizu M3 series, chose not to change the standard controls and left "Volume Down" + "Blocking". On Asus Zenfone smartphones, you can use the function in the menu. Asus also supports taking pictures using system keys.
Depending on the shell, all screenshots appear in different places and folders. In most cases, saved screenshots can be found in the Gallery on your phone in the corresponding folder:
If you use Google services that are preinstalled on your smartphone, then you will need the application "Photo". In it you should open the menu.
Standard combinations are convenient and fast. But not in all situations they can be used. A trivial example is a broken button "Home", volume or power key, and there is no function to take a screenshot from the menu on your device. What to do then?
In this case, the Android system will not offer you anything. You'll have to use third-party tools. Enter “screenshot” in the Google Play store and select one of the applications in the list:
So that you don’t have to search for a long time and select a working application, we offer several convenient programs for creating screenshots. Most of them require Root rights to capture the screen. This will require certain time, skills and software.
If you already have Root access for your smartphone, you can use OK Screenshot, Drocap 2 for root users or Screenshot ER. But we need to quickly and easily take screenshots, so let's move on to describing other applications.
You can download this program from the Play Market completely free of charge, and it does not require root rights. Let's try to take a screenshot in Viber:
All screenshots taken through Screenshot Capture will be displayed here.
So you can take a photo with correspondence in Viber, WhatsApp or any other messenger, and then send it to a dialogue or group.
The application with a simple name is also downloadable for free on the Play Market. After launching "Screenshot" you will see the following menu:
Let's look at the interface:
In the application settings you can:
And finally, if none of the above methods helped you, move on to the help of a personal computer. To do this you will need:

With this program you can automatically create a screenshot. The utility can be downloaded for free from this link. After starting the program, you will see the following menu.


