The phone book is the most important thing in every phone. It is very difficult to accumulate, as it is replenished over the years, and it is very easy to lose. Some numbers can be restored simply by asking them from your friends, but most contacts will disappear without a trace.
Therefore, in order to protect yourself from nervous stress and sleepless nights spent trying to restore lost contacts, you should always make a backup copy of your phone book. The best way, of course, would be to transfer all your existing contacts to your Google account and in the future, save new ones only in the account from which they will not disappear anywhere and you will have access to them even if you have your phone at hand.
Step 1 Open Contacts app on your smartphone
Step 2 Press the / (Options) button on the screen or the touch button if you have one and select Import/Export

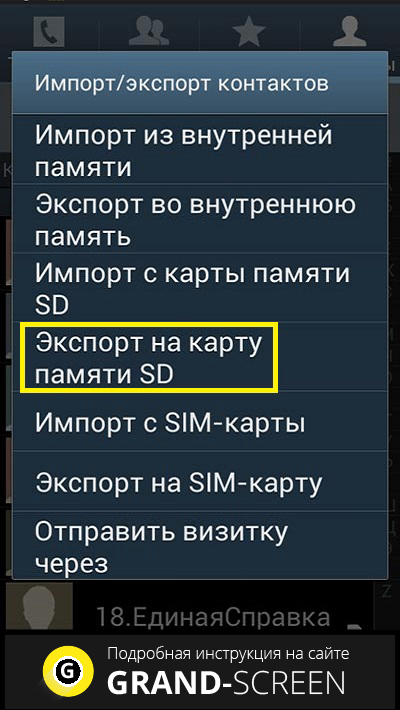
Step 3 In the menu that appears, select the location where you want to export contacts: to SIM or to a storage device (SD card / memory card)

If you want to transfer your contacts via Bluetooth or send by email, then select Transfer visible contacts
Step 4 Next, select all contacts, press the / button on the screen again or the touch button. Specify the location to save the backup copy, give it a name and press the Save button. By default, contacts are exported to the root of the memory card with the name contacts.vcf, so you may not be able to choose the location of the saved file yourself

Ready! Now you have a backup of all contacts.
It may happen that you may have different buttons and menu items, it depends on the smartphone manufacturer and the installed version of Android, but the export algorithm remains the same.
We hope the article was useful to you. If yes, then add it to your bookmarks and share with friends, and also subscribe to our communities on social networks
Are you planning to upgrade to a new device or just want to keep your contacts on your PC as a backup? We will help you do this. From this article you will learn how to save contacts from Android to your computer. To do this, we have prepared two ways at once. The first does not even use the computer itself and the main operations are performed on a smartphone, while in the second case you will need to use your Google account.


Most problems with a device running on the Android operating system can be solved by rolling back the settings to factory settings (hard reset). With this action, you may lose some information that is stored on your device. Including contacts. There is probably not a single mobile phone user who has not experienced such an unpleasant moment at least once in his life. In order not to experience this unpleasant moment again, you can save your contacts on your personal computer. How to do this will be discussed in this article.
Navigation
There are several options for saving contacts on your PC. Previously, those who were smarter used Excel for this purpose and manually recorded contacts in a specially created file. It was not very convenient and took time. Today, technologies make it possible to synchronize smartphones with a desktop computer and save all the necessary information “in two clicks.” Including contacts.
For this purpose, you can use the two most popular methods:
All owners of smartphones running the Android operating system have a Google account. Without it, it is impossible to download applications in Play Market or use the postal service Gmail. If for some reason you don’t have such an account, then it’s time to create one.
Without a Google account, a smartphone on the Android operating system cannot be used 100%. In addition to the services mentioned above, having such an account makes it possible to use Google Drive cloud storage or the increasingly popular photo storage service Google Photo. But such an account has another useful function. It will help you save your contacts even if your phone has lost them forever.
Transferring contacts to a Google account is not very difficult. Let's go to "Settings" your smartphone and go to the section "Accounts". Choose "Google".
The mailbox address will appear in the window that opens. This is your account in the “Corporation of Good” services. Click "Sync everything".

Using this action, we synchronize our smartphone contacts with our Gmail.

We wait a few minutes and log into your Google account on your desktop computer. Opening the mailbox "Gmail".

Let's go to "Contacts" your mailbox. To do this, click on the red Gmail inscription, which is located on the left side of the screen, immediately below the Google logo.
In the “Contacts” section, not only phone numbers from the newly synchronized “Contact Book” of your smartphone will open, but also other data. For example, contacts of the social network Google+.
In order to save contacts, click on the link "Additionally" and select the contacts that we need. Click "Export contacts" and select the format in which you want to save your contacts.

You can leave the contacts file on your computer, but it is advisable to save a duplicate of it to some cloud service. Notepads can be used for this purpose. Evernote, Google Drive and so on.
There is another way to transfer contacts from your smartphone to your PC. To implement this, you need to connect your smartphone to your computer using a USB port. Connect and go to “Contacts” on your smartphone:

Using the double button at the bottom of the screen (display button), call up the context menu where we select "Import Export".

In the list of actions that opens after this, you need to select “Export to SD memory card.” We confirm this action and wait a few seconds.

We go through Windows Explorer to the SD card and look for a file with the VCF extension. These will be the contacts of our smartphone. This format is “readable” by Microsoft Outlook.
The 2Memory application, which was developed by the Russian company Mobile Data LLC. Essentially, this application is a cloud server for storing backups of your devices. Moreover, on 1GB of reserved disk space you can save not only contacts, but also music, videos and other files from your smartphone.
After installing 2memory, you need to register in the application: indicate your nickname and password, and also give a name to the device. Then you need to enter your phone number and a confirmation code that will be sent to it. After the registration procedure, you can start working with the program.
The program has an intuitive interface. Therefore, everyone can easily figure out how to save their smartphone data, including contacts.
IMPORTANT: If you have several devices and you will collect contacts from all of them via 2Memory, then you don’t have to worry about duplicating them. Duplicate phone numbers will be ignored when using this application.
Photos, videos and music saved using 2Memory can be easily shared on your social networks: Odnoklassniki, Facebook and VKontakte.
Sometimes, in the event of any problems with your Android device, you have to resort to such radical measures as, for example, resetting the settings (hard reset), thereby losing (sometimes irretrievably) all information, including contacts. Anyone who has encountered such a situation at least once wants to protect themselves and save numbers from their phone book on their PC.
In fact, there are many ways to perform this procedure, and now we will tell you about them.
First, you need to create an account on Google or create a Gmail.com email (which is basically the same thing). It must be said that the Android mobile device is closely connected with the Google service, so if you want to get 100% return on your smartphone, then creating this account is a must. You will have to do this procedure from your device, so you will need a network connection.

A window will open showing your account. Here, to start synchronization, you need to click on your account, or on the “Sync” button. everything" located at the bottom of the window:

So, we synchronize phone numbers from our gadget with gmail.com mail. (that is, with the Google service). Therefore, to start synchronization, click “Synchronize”:

It remains to wait a few minutes until the end of the procedure.

Three items will appear in the window that opens: Gmail, “Contacts” and “Tasks”.
By clicking “Contacts”, we open a list of data. Here, in addition to phone numbers, there will be a list of all friends from Google+. You can start saving data into a text document. To do this, click “Advanced”, after which the “Export” window will appear. By choosing the first option, saving will take place in Microsoft Excel, but you can save in any format convenient for you:

It is possible that this method will be easier for you. What do we do in this case? First you need to connect your Android to your PC using a USB cable. Then open the phone book:

Now you need to open the context menu (display button at the bottom) and select “Import/export”:

A list of commands will open, from which you need to select “Export to SD memory card”, and then confirm by clicking “Yes”, which saves the data to the SD card:
Now open the external card with the computer. A file with the VCF extension (Microsoft Outlook format) appeared on it. This is where our copied information is located:

After this procedure, by setting up mail using Microsoft Outlook, the file will open in an easy-to-read format.
If you don’t have this program, or you use another email client, then without turning off your smartphone, go into your mail again, click “Advanced” and select “Import”. Then click “Select file” and find our file in CSV format via your computer:

Now, by clicking the blue “Import” button, we will receive the data, as in the first case. And by clicking the “Advanced” button and selecting “Print”, the data will be displayed in an easy-to-read form. Now you can select the list with the mouse or hot keys (Ctrl+A) and copy it to a Microsoft Word document or notepad.
It remains to add that there are also special applications that allow you to transfer contacts from Android to your computer. However, it’s probably not worth it to specifically take up gadget space to transfer contacts using a program, because the methods that we’ve just talked about cope with the task quite successfully.


