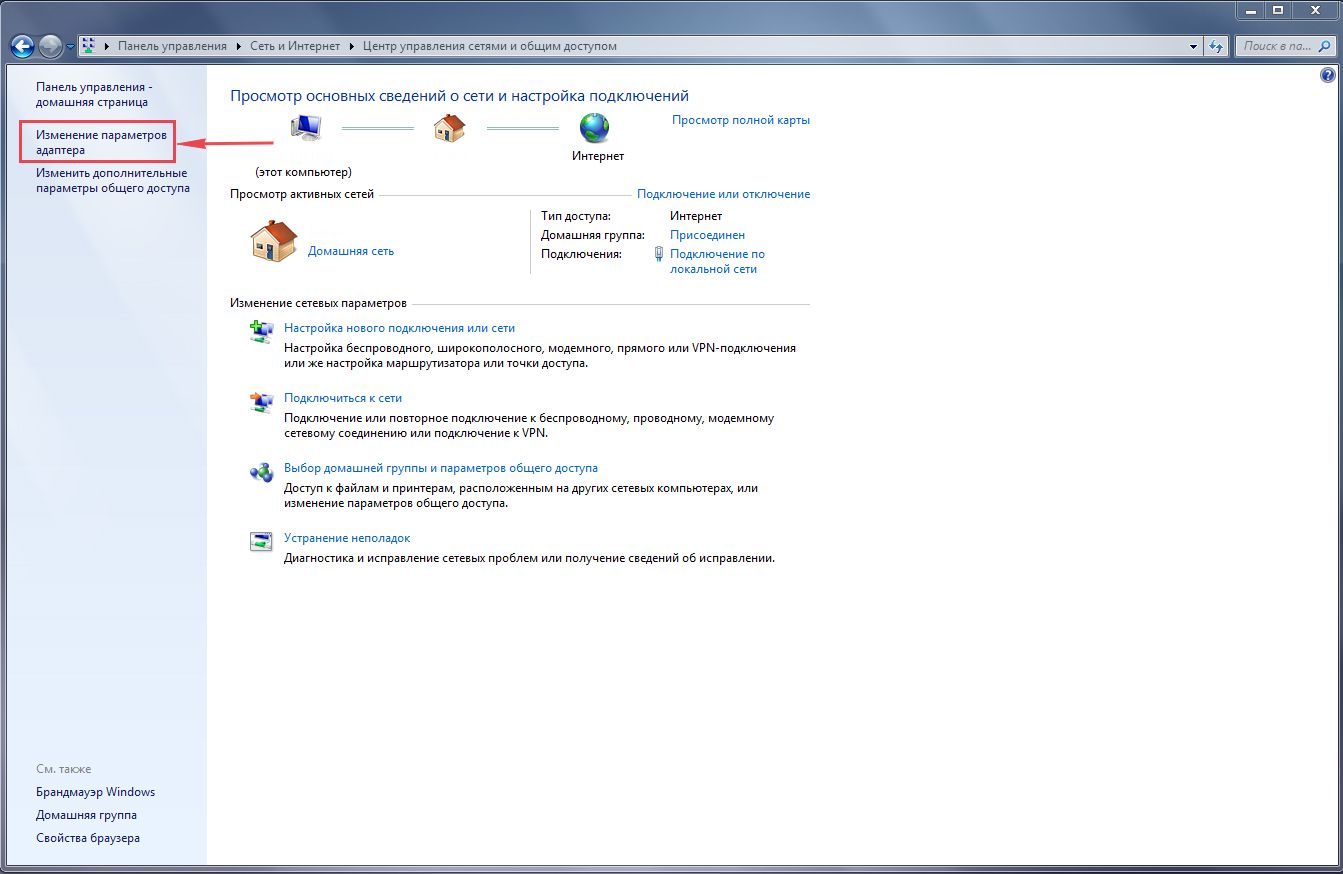
Before we start setting up the router, let's check the local network connection settings. For this:
Windows 7
1. Click on " Start", "Control Panel".
2. Click on " View network status and tasks".

3. Click on " Change adapter settings".
4. LAN connectionProperty".
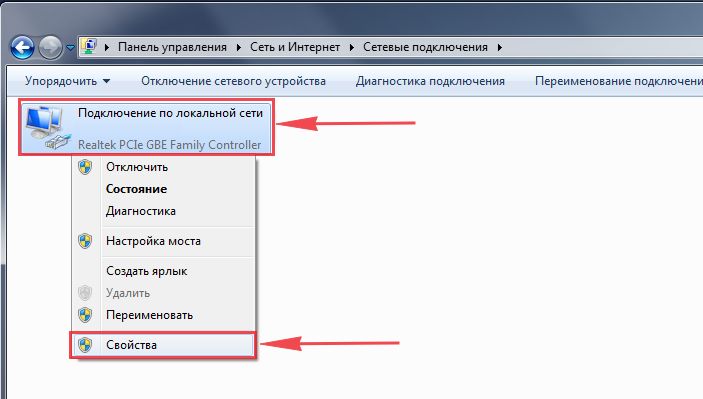
5. From the list select " Internet Protocol Version 4 (TCP/IPv4)" and press " Property".

6. " and "", then press the " button Ok".

Windows 10
1. Click on " Start", "Options".

2. Click on " Network and Internet".

3. Select " Ethernet" and click on " Configuring adapter settings".

4. In the window that opens we see " Ethernet". Right-click on it and select " Property".

5. From the list select " IP version 4 (TCP/IPv4)" and press " Property".

6. In the window that opens, you need to check the box " Obtain an IP address automatically" And " Obtain DNS server address automatically", then press the button " Ok".

The next step is to connect the router ASUS RT-N11P B1 to your Laptop or Personal Computer (PC). To do this, you need to connect the cable that your provider provided to you to the WAN port of the router (that is, this is the cable that goes to your apartment, house, office, etc. from outside), and the cable that came with router, connect one end to one of the four LAN ports, and connect the other end to your laptop or PC. And yes, don't forget to connect the power cable.

So, we have connected the router, now you need to access its web interface through any browser (be it Google Chrome, Mozilla Firefox, Internet Explorer, etc.). To do this, open the browser and enter the router address in the address bar: router.asus.com or 192.168.1.1 and press the button " Enter" on your keyboard.
So, enter the data and press " Sing in"


And finally we got to the router’s Web interface. Now you need to configure the equipment. First of all, let's secure the wireless network by setting a password for wi-fi. Then you will need to find out what type of connection is used to access the Internet, is it PPTP, L2TP or PPPOE. You can find out by calling your provider (this is the organization with which you entered into an agreement to provide Internet services). So, let's start setting up the router. First, let's change the language of the Web interface to Russian. To do this, go to the upper right corner of the interface and click on " English"and choose" Russian"

I bring to your attention Video instructions for setting a password for wi-fi on a router ASUS RT-N11P B1
Let's also take a written and illustrative look at setting up a Wi-Fi password on a router ASUS RT-N11P B1.
1.
On the Web interface, go to the menu in the "tab" Wireless network".
2.
In the column " SSID“come up with and indicate the name of your wireless network; this name will be displayed in the future when you connect to the network. I advise you to indicate the frequency used in the name of the network, for example: “imya seti 2.4”.
3.
"Channel width" - 20 MHz.
4.
Now you need to set a password for the wireless network. To do this, select " Authentication method" - WPA2-Personal".
5.
In field " WPA Preshared Key"we come up with and enter a password. Then click " Apply".

PPTP on the router ASUS RT-N11P B1 using the ASUS RT-N56U router as an example.
Let's also write and illustrate PPTP on the router ASUS RT-N11P B1.
1.
Internet".
2.
IN " WAN connection type"choose" PPTP".
3.
"" and "" select " Yes".
4.
Username"), password (in line " PasswordVPN server
5.
"Hostname
6.
Apply".

Let's look at the connection setup PPTP with static IP address on the router ASUS RT-N11P B1.
1.
Go to the menu in the tab " Internet".
2.
IN " WAN connection type"choose" PPTP".
3.
No" against " Obtain WAN IP address automatically" And " Connect to DNS server automatically".
4.
IP address"), subnet mask (in line " Subnet mask"), default gateway (in line " Main gate") and DNS (in the line " DNS server 1" And " DNS server 2").
All this data is usually specified in the contract with the provider. If for some reason you could not find them, you need to call your provider's hotline and find out how you can get them.
5.
Below you are asked to indicate your username (in the line " Username"), password (in line " Password"). You will also need to specify the server IP address (in the line " VPN server"). All of the above data is provided to you by the provider (the organization that provided you with the Internet).
6.
"Hostname" - any word in Latin, for example "Host".
7.
After you have entered all the necessary data, press the button " Apply".

Let's look at the connection setup L2TP on the router ASUS RT-N11P B1.
1.
Go to the menu in the tab " Internet".
2.
IN " WAN connection type"choose" L2TP".
3.
"Obtain WAN IP address automatically" And " Connect to DNS server automatically"choose" Yes".
4.
Below you are asked to indicate your username (in the line " Username"), password (in line " Password"). You will also need to specify the server IP address (in the line " VPN server"). All of the above data is provided to you by the provider (the organization that provided you with the Internet).
All this data is usually specified in the contract with the provider. If for some reason you could not find them, you need to call your provider's hotline and find out how you can get them.
5.
"Hostname" - any word in Latin, for example "Host".
6.
After you have entered all the necessary data, press the button " Apply".

Let's look at the connection setup L2TP with static IP address on the router ASUS RT-N11P B1.
Typically, a static IP address is provided to legal entities, or as an additional service to the basic tariff to individuals.
1.
Go to the menu in the tab " Internet".
2.
IN " WAN connection type"choose" L2TP".
3.
Since the connection uses a static IP address, set " No" against " Obtain WAN IP address automatically" And " Connect to DNS server automatically".
4.
Specify the server IP address (in the line " IP address"), subnet mask (in line " Subnet mask"), default gateway (in line " Main gate") and DNS (in the line " DNS server 1" And " DNS server 2").
All of the above data is provided to you by the provider (the organization that provided you with the Internet).
All this data is usually specified in the contract with the provider. If for some reason you could not find them, you need to call your provider's hotline and find out how you can get them.
5.
Below you are asked to indicate your username (in the line " Username"), password (in line " Password"). You will also need to specify the server IP address (in the line " VPN server"). All of the above data is provided to you by the provider (the organization that provided you with the Internet).
All this data is also specified in the contract with the provider.
6.
"Hostname" - any word in Latin, for example "Host".
7.
After you have entered all the necessary data, press the button " Apply".

I bring to your attention Video instructions for setting up the connection type PPPOE on the router ASUS RT-N11P B1 using the ASUS RT-N56U router as an example.
PPPOE on the router ASUS RT-N11P B1.
1.
Go to the menu in the tab " Internet".
2.
IN " WAN connection type"choose" PPPOE".
3.
"Obtain WAN IP address automatically" And " Connect to DNS server automatically"choose" Yes".
4.
Below you are asked to indicate your username (in the line " Username"), password (in line " Password"All of the above data is provided to you by the provider (the organization that provided you with the Internet).
All this data is usually specified in the contract with the provider. If for some reason you could not find them, you need to call your provider's hotline and find out how you can get them.
5.
After you have entered all the necessary data, press the button " Apply".

Let's look at the connection setup PPPOE with static IP address on the router ASUS RT-N11P B1.
Typically, a static IP address is provided to legal entities, or as an additional service to the basic tariff to individuals.
1.
Go to the menu in the tab " Internet".
2.
IN " WAN connection type"choose" PPPOE".
3.
Since the connection uses a static IP address, set " No" against " Obtain WAN IP address automatically" And " Connect to DNS server automatically".
4.
Specify the server IP address (in the line " IP address"), subnet mask (in line " Subnet mask"), default gateway (in line " Main gate") and DNS (in the line " DNS server 1" And " DNS server 2").
All of the above data is provided to you by the provider (the organization that provided you with the Internet).
All this data is usually specified in the contract with the provider. If for some reason you could not find them, you need to call your provider's hotline and find out how you can get them.
5.
Below you are asked to indicate your username (in the line " Username"), password (in line " Password"). All of the above data is provided to you by the provider (the organization that provided you with the Internet).
All this data is also specified in the contract with the provider.
6.
After you have entered all the necessary data, press the button " Apply".

After connecting and setting up the router, you need to connect the computer to a wireless network (wi-fi), let's consider connecting to wi-fi in two operating systems, these are Windows 7 and Windows 10:
Windows 7
Video instruction
1.

2. Sultan

3.
Check the box next to " Connect automatically" and press
"Connection".

4. Specify " Security KeyOK".

5.

Windows 10
Video instruction
1. In the lower right corner of the desktop, find the wireless network (wi-fi) icon and click on it with the left mouse button.

2. A window pops up with a list of available wireless networks. Select a wireless network, in my case it is the network " Sultanova"(You select the network whose name was given at ).

3.
Check the box next to " Connect automatically" and press
"Connect".

4. Specify " Security Key"This is the wireless network password that you specified when . After you have specified the key, click " Further".

5. We wait perhaps a couple of seconds and you are connected to your wireless network.

After connecting the Internet cable to the appropriate port of the router, you need to go to the device control panel. The standard IP address for RT-N11P routers is 192.168.1.1, but it may be different depending on the firmware version.
Important! If when you enter the address in the browser the page does not load, you need to check the current IP on the sticker at the bottom of the Asus router. If the download is successful, enter the default username (admin) and login password (also admin).
In the Asus factory firmware, serious attention is paid to security settings. This is confirmed by the fact that already at the first step of setting up the RT-N11P router, the user is prompted to enter a new password to log into the admin panel. Next to the “New password” text field there is an indicator of its strength, which turns green when using numbers, letters in different cases and special characters.
Important tip! Re-entering the standard “admin” in the field to enter a new password is also possible, but is highly not recommended. If unauthorized persons gain access to your WiFi, they will most likely try to log in using standard data.
Next, the Asus RT-N11P router will attempt to connect to the Internet. To do this, the connection type used by your provider will be determined. This can be PPPoE, L2TP, PPTP, connection with dynamic or static IP. If after this you need to enter additional data, you can clarify them in the documents provided by the provider. If this information is not in the contract, you can contact the provider’s support, whose specialists will provide the required information.

You can specify the user account information in the next step, when the type of connection used is determined. This setup is performed only when connecting the router for the first time. In the future, this data is saved in the settings, and the connection will be made automatically.

The third step in the quick setup is to specify the network name (SSID) and network key. You set these parameters yourself. The network name will be displayed to any WiFi device within the signal range. If you do not want to make this setting public, you can hide the name in one of the following steps - in the “Advanced settings -> Wireless network” menu. To proceed to the next step, click the “Apply” button.

All previously entered data will be displayed on the “Network configured” page. All you have to do is check them and confirm they are correct by clicking the “Next” button. This page will also display information about the Asus router: local IP and MAC address of the router.

After completing the quick setup of the router, you will be redirected to the “General -> Network Map” menu. Here you can find basic information about WiFi, encryption settings and connected devices. In the right column, you can quickly change the SSID, encryption method, and password for your wireless connection. Below are the LAN settings and PIN code for logging in using QSS technology. They can also be changed on this page.

You can return to the quick setup of the RT-N11P WiFi router at any time using the “Quick Internet setup” button in the upper left corner of the control panel. This may be necessary if the provider's settings have been changed or you encounter difficulties connecting to the Internet, but there are no restrictions from the provider.
The next tab in the Asus RT-N11P settings is “General -> Guest Network”. With its help, you can launch up to three additional WiFi networks with your own parameters on the router. There are three “Enable” buttons on the page, with each of which you can activate a separate connection.

For guest networks, you can change the following settings:

Remember! Access to the Intranet (internal network, it is important not to confuse it with the Internet) - the ability to access local resources.
For guest networks, you can restrict connections to internal devices. This may be necessary if you provide an Internet connection to third parties, but do not want them to be able to view sensitive information on your home computers.
In the next step (menu tab “General -> Traffic Manager”) you will be able to configure priorities for various connections. To do this, you must select one of the values in the drop-down list: “User-defined priority” or “User-defined QoS rules”. Then select the services for which you want to change custom traffic rules and set priorities for them. The list offered by the standard firmware of the Asus RT-N11P includes several dozen popular protocols, individual applications and online games. You can also add any other application.
To do this you will need to specify:
Advice for inexperienced users!
It is advisable to leave the value “Automatic mode”.

The last item in the general settings is “Parental Controls”. This feature helps limit the Internet for certain devices at a given time. You can add a new device by its MAC address. If it is already connected to a wireless network, you will be able to select the device from the list. In addition to time restrictions, Asus RT-N11P allows you to configure the blocking of Internet access for specified devices on certain days.

To fine-tune the device, you need to go to the “Advanced settings -> Wireless network” menu. At the top of the page there are six tabs in which you can change the technical parameters of WiFi. Most of the settings presented on the General tab have already been configured in previous steps. The new items are:
In the menu item “Advanced settings -> Wireless network -> WPS” you can change the WiFi connection settings using a PIN code or by pressing a button on the router. The “Wireless Network MAC Address Filter” tab allows you to blacklist certain devices (prohibit their connection to the Asus RT-N11P router via WiFi).

It is not recommended to change the parameters that are on the other tabs (Bridge, Radius Setting and Professional Setting) unless necessary, as this may result in WiFi malfunction. The settings presented there are highly specialized; changing them may only be required to solve application problems. In other cases, it is enough to leave the default settings.
In the “Local Network” menu there are 4 tabs on which you can configure addressing. In the “LAN IP” tab, you can set a new address for the Asus RT-N11P router (instead of the standard 192.168.1.1). The “DHCP Server” tab is responsible for setting the automatic assignment of addresses for network devices. By default, DHCP is enabled. If you disable this setting, you will need to manually bind network devices to local IP addresses.
Clue! For example, after setting up this feature, your smartphone will be able to receive the same IP address 192.168.1.7 every time, even if 192.168.1.2 to 192.168.1.6 are free. This may be useful for fine-tuning the connection (port forwarding, changing routing rules).

In the menu “Advanced settings -> Firewall” you can enable network protection against hacker attacks. To do this, change the value of the “Enable firewall” option to “Yes”. You can also activate DOS protection, thanks to which the Asus RT-N11P router will filter incoming traffic and block suspicious multiple connections. Such filtering increases the load on the device, so its use is only justified if there is a real threat.
The URL Filter tab allows you to block access to user-defined pages. You can also block access to all pages whose URL contains a certain combination of characters. Using the “Keyword Filter” item, you can block the loading of pages whose text contains certain words. “Network Services Filter” allows you to restrict Internet access in accordance with user-specified rules and time restrictions.
The Asus RT-N11P router is a budget option for wireless equipment for network data transmission. Despite the cost of about 1,800 rubles, transmission via wire or wifi is lossless. IPTV connection is also available. The technical characteristics of the model are able to satisfy the needs of any users. Installing the Asus RT-N11P router does not require significant time investment. Connection can be made to any provider.
It is worth immediately noting that the router must initially be connected via a wired channel, and not via Wi-Fi. This will help eliminate possible problems during further setup. The procedure for connecting the router to the power supply and computer is as follows:
Tip: after startup, it is advisable to check the settings of the network card to ensure the router operates correctly.
If the equipment has already been connected before to work with other computers, then you need to reset the installed settings of the Asus RT-N11P to factory settings. To do this you need:
A reset can help if errors occur during the setup process or if you lose your password.

On the left you see the “RESET” button
After these steps, the asus rt n11p router will open the Wi-Fi network setup menu, in which you need to enter two parameters:
After clicking on the “Apply” position, you will be redirected to the settings page, which indicates that the router is ready for operation.

In order to independently create an Internet connection from the Rostelecom provider on the asus rt n11p router, you need the following:

Instructions for setting up a router within the framework of the Beeline Internet provider are as follows:

Tip: Beeline does not require mandatory changes in other parameters. You can write any data in the Latin alphabet in the host name.
To set up Wi-Fi on the asus rt n11p model, you need to go to the wireless network creation menu. The instructions for setting up the network in the window that opens are as follows:

IPTV in the asus rt n11p router is configured when setting the characteristics of the Internet connection. To do this, you need to select the “Select IPTV STB port” option and enter the number of the input to which the wire from the IPTV set-top box will be connected.
The firmware of the asus rt n11p router is carried out in cases where the user is not satisfied with the operation of the router or if additional features need to be activated. To carry out the operation you need:
Important: It takes at least 5 minutes to download the new version, so it is not recommended to disconnect the router from the network to minimize the risk of unexpected errors.
Found a typo? Select the text and press Ctrl + Enter
If you ask a modern person whether he can live without the Internet for at least one day, the answer, of course, will be negative. Developments in this industry have not stood still for a long time. For convenience, users are provided with a wireless connection. It's called Wi-Fi. In order to create such a network at home, you need to purchase a special router, or, in other words, a router. Currently, stores offer a wide selection of this type of equipment. Devices differ in configuration method, functionality, bandwidth and other characteristics.
What criteria should you pay attention to when buying a router? Advanced users recommend models with minimal settings, extensive functionality and do not require constant maintenance. The Asus RT-N11P router, a review of which is presented in this article, is exactly such a device. Taking into account its cost (about 2000 rubles), this device can be classified as a budget class device. Recommended for home use only. Why are there such restrictions? The answer is hidden in the characteristics.
Buyers have long been accustomed to the fact that budget devices are not equipped with a large set of components. The Asus RT-N11P router was no exception.
The manufacturer packages the device in a black box. It contains information about the manufacturer, brief characteristics and warranty period. A good marketing ploy was the use of a message that the router was tested by Russian providers. The front panel also contains an image of the device itself. Inside the box, unfortunately, the set of equipment is quite meager. In addition to the base station itself, there is only a charger and a patch cord. The manufacturer did not bother with special mounts for wall mounting. There are also no branded stickers, which can often be found on competing models from other brands. In addition to all of the above, the kit necessarily includes a warranty card and an instruction manual. The instructions will help you quickly, and most importantly, configure the router correctly.

What is the Asus RT-N11P router? This is a device that provides a wireless connection. Its body is made of plastic. The quality of the material, unfortunately, leaves much to be desired. In reviews, users point out that when they press a finger on the panel, an unpleasant squeak is heard. The dimensions of the router are quite compact - 145x110x25 mm. The device weighs 180 g. Dimensions undoubtedly add to the list of advantages. According to many owners, due to its light weight, the router can be attached to the wall even with double-sided tape.
Many buyers have no complaints about the choice of external design. The manufacturer used a combination of two surfaces: plain black and checkered (a combination of black and gray). On the top of the front panel there is the name of the brand and the model itself. At the bottom of the Asus RT-N11P case, the user will see indicators that display operating modes. They are highlighted in green. Two antennas are attached to the rear side edge. Between them there are four connection ports, there are reset and power buttons, as well as a socket for a 220 V cord. Next to the latter, the developer has placed a connector for an Internet cable.
On the back there are two ventilation holes, four legs and a device for wall mounting. It’s also worth adding that there are ventilation grilles on the side edges, so users don’t have to worry about the device overheating.

As mentioned above, the Asus RT-N11P router has two antennas. They are non-removable. Thanks to a special mount, the user can rotate them in any direction along the axis by 180 degrees. If you look at the instructions, you can find information there that talks about the purpose of these antennas. The developers claim that they are installed to strengthen the signal. How true are these characteristics? Testing has shown that this configuration is more related to decoration than to improving technical performance.
The most advanced users decided to experiment with the router. They took aluminum soda cans, cut out the bottom and put them on the antennas. A copper wire was drawn from the base, securing it to the body. The homemade antenna was pointed directly at the wireless signal receiver. Surprisingly, it was this device that helped achieve the 5 dB gain claimed by the developers.

What conclusions can be drawn about the performance of the Asus RT-N11P router? Reviews from both users and experts are mostly positive when it comes to the “filling”. The developers indicated that the device is capable of operating at a data transfer rate of 300 Mb/s. This performance is provided by the MediaTek processor. It operates at a frequency of 580 MHz. For home use, these characteristics are more than enough. Unfortunately, this router model does not have a USB interface. To service it, a more powerful chipset is required. The amount of RAM is 32 MB. It cannot be called large, but for the given tasks such storage is quite sufficient. Built-in memory - 8 MB. The specialists who disassembled this device noticed that the manufacturer’s name was missing on the chips. Therefore, they concluded: Asus used low-quality components to reduce the cost.
Despite some shortcomings, the Asus RT-N11P router is extremely popular. Reviews left by users on relevant information resources naturally highlight the low price. It is this criterion that in most cases forms consumer demand. However, the range of functionality cannot be ignored. The manufacturer has assembled a device that can work with all existing Russian providers. You can connect to any network and protocols. There are no restrictions on these indicators. Surprisingly, the router can work with virtual private networks. It also provides support for proxy servers.
Data transmission is carried out at a frequency of 2.4 GHz using the 802.11n protocol. The stated speed is 300 Mb/s. Unfortunately, it may be declining. The testing showed the following results: when transferring a large file (up to 10 GB), the speed decreased by half.

After purchasing, many buyers are concerned with the question: “How to connect a router of this model?” To do this, it is recommended that you first study in detail the information contained in the instructions. In this article, we will briefly consider this process. The first thing you need to do is connect the provider cable to the connector that is located near the network socket. It is marked with the letters LAN or a special sign. The remaining four ports are used if you need to connect the Asus RT-N11P router directly to a computer. For these purposes, you need to use a patch cord. The package includes a power supply. The buyer will see a plug on one edge, and a network adapter on the other. This cable connects the router to power. Before turning on, the plug must be inserted into the socket.
After connecting all cables, you must press the “On/Off” button. and wait until the indicators light up. If everything was done correctly, then you can start setting up.
After connecting the RT-N11P router, you need to configure the device. To do this, on a computer that is directly connected to the device, you need to enter the router address in the address bar of the browser. As a rule, it consists of a combination of the following numbers: 192. 168. 0.1. A pop-up window will appear on the monitor asking you to enter your username and password. By default this word is admin. It is entered only in English. Those who for some reason have forgotten the address, login or password of the Asus RT-N11P can look at the information on the sticker located on the back panel of the router. In this model, the manufacturer has provided quick Network setup. That is, the user just needs to connect the device correctly, activate the special mode - and the wireless connection will appear automatically.

Creating a wireless connection with the RT-N11P is quite easy. However, it will be necessary to correct some points. First, the user needs to select an authentication method. Experienced experts recommend setting the WPA2 mode. In this case, the encryption type must be AES. It is important that no one other than the owners can connect to the wireless Network created on the Asus RT-N11P. The protection setting is selected in a special section of the menu. To do this, you need to use a password or MAC address filter. The user will only be able to find out some parameters directly from the service provider, for example, the type of IP address determination or connection method. If some mistake is made in the settings, then there is no need to worry ahead of time. It's quite easy to reconfigure the Asus RT-N11P router. Resetting the settings can be done by pressing a special button. It is located on the rear panel on the left side. When pressed, the device will return to factory settings.

This router model belongs to the budget class, so consumer demand for it is quite high. It attracted attention thanks to its expanded functionality. The Wi-Fi signal is strong and uninterrupted. Bandwidth - 300 Mb/s. For home use this will be quite enough. The advantages of the Asus RT-N11P also include simple setup that does not require special knowledge. Many owners claim that the process itself takes literally a few minutes. As for the negative aspects of the router, these include the quality of materials, a combined reset and reboot button, and the lack of special fasteners. But, according to many owners, the low cost largely justifies all the shortcomings.


