Installing drivers for new hardware usually happens normally, but sometimes the installation surprises and you have to be smart. In certain cases, you may need to disable driver digital signature verification in Windows 7, Vista, XP, 8/8.1. 64-bit operating Windows systems make such a check on a mandatory basis.
Attention! Disable developer digital signature verification only if you are sure that the driver you are installing comes from a trusted source.
Using the keys Win+R open utility Run and type gpedit.msc. Click OK and if an error message box appears on the screen, then you have one of the initial versions of Windows 7 installed. The problem is fixed self-installation Group Policy Editor, details. After installing the editor, repeat the algorithm above. In utility Run enter gpedit.msc- the window "Editor of the local group policy".
The next algorithm is as follows. Go to the "User Configuration" → "Administrative Templates" → "System" → "Driver Installation" section. Open the "Digital Signature of Device Drivers" option and set the value to "Disabled". Click "Apply", "OK" and restart the computer.
If the above option for some reason does not suit you, it is possible and desirable to use the second method. When you turn on the computer before starting Windows boot press the key F8. The operating system boot menu will open - select " Disabling Mandatory Driver Signature Verification"and press Enter. If instead of the menu, Windows immediately loaded, turn off the computer and repeat everything again.
This OS boot mode will allow you to install any drivers, but after restarting the computer, signature verification will turn on again, however installed drivers will work. If you need to install new drivers, you will need to boot the OS again in the disable check mode.
Disabling digital signature verification of drivers in Windows 8 / 8.1 is similar to the previous method, but has its own peculiarity due to the lack of a standard F8 menu. So, with a keyboard shortcut win+i bring up the options panel and select , holding down the Shift key.

Next, before turning off the PC, you will need to press a few menu buttons. In the first dialog choose Diagnostics, in the second Extra options, in third Download options, in the fourth, without choosing anything, press the button Reload.
After restarting, an analogue of the F8 menu will appear, in it you need to press F7 thus choosing: 7) Disable mandatory driver signature verification. After that, the operating system will boot in a mode that allows you to install any driver.
Most of the problems of users who are faced with the fact that Windows cannot detect the device is due to the fact that from Windows 7 to the newest Windows versions 10 driver digital signature verification is enabled. How to get around this barrier and install the required driver, read this article!
In short, if a driver has not been signed by MicroSoft, that driver will not be digitally signed for Windows drivers. With such a driver, problems arise during installation.
In this article, we will look at how to disable driver digital signature verification in Windows 10, Windows 8 and 8.1, as well as Windows 7.
Before using this method, save all your work data on the computer and close the programs.
1.Go to " START» and select « Options»

2. Go to " Update and Security» -> « Recovery» -> « Special download options» -> « Reload Now»

3. Next, the computer will reboot into a special Windows recovery mode, you will need to go to " Troubleshooting» -> « Extra options» -> « Download options» -> « Reload»

F7

5. Checking the digital signature of drivers in Windows 10 is disabled for a while (until the next reboot), install the necessary driver.
WIN + R gpedit.msc and click Ok

2. In the window, go to the menu " User configuration» -> « Administrative Templates» -> « System» -> « Driver installation»

3. Translate the parameter to " Disabled", if at the bottom of the window ( If Windows detects a driver file without a digital signature:) changes will be available, set the parameter " Skip»

cmd


4. Confirm the changes and restart the computer, digital signature verification of drivers in Windows 10 is disabled.
1. In the start menu, search - enter cmd
2. Run Command Prompt as Administrator
3. Enter the command:
5. Select "" in the menu

4. Verification of the digital signature of drivers in Windows 10 is disabled.
1. Press keys simultaneously WIN + I
2. In the side menu that appears on the right, select " Options»
3. Hold down the "Shift" button and select "" in the shutdown menu
4. Next, the computer will reboot into a special Windows recovery mode, you will need to go to " Diagnostics» -> « Extra options» -> « Download options» -> « Reload»

4. Windows will reboot again and you will see a menu with boot options, press the key F7

5. Checking the digital signature of drivers in Windows 8.1 / 8 is disabled for a while (until the next reboot), install the necessary driver.
1. Hold down the keys at the same time WIN + R and in the appeared window "Run" write the command gpedit.msc and click Ok
2. In the window Local Group Policy Editor go to menu " User configuration» -> « Administrative Templates» -> « System» -> « Driver installation” and select the parameter to change “ Digitally Signing Device Drivers»

3. Translate the parameter to " Disabled", if changes are available at the bottom in the window (If Windows detects a driver file without a digital signature :), set the parameter" Skip»

4. Confirm the changes and restart the computer, digital signature verification of drivers in Windows 8.1 / 8 is disabled.
1. In the start menu, search - enter cmd
2. Run Command Prompt as Administrator
3. Enter the following commands one by one:
bcdedit.exe -set loadoptions DISABLE_INTEGRITY_CHECKS bcdedit.exe -set TESTSIGNING ON4. Confirm the changes and restart the computer, digital signature verification of drivers in Windows 10 is disabled.
1. In the start menu, search - enter cmd
2. Run Command Prompt as Administrator
3. Enter the command:
bcdedit /set "(current)" bootmenupolicy legacy4. Restart your computer and while the computer is booting, press the F8 key
5. Select " Disabling Mandatory Driver Signature Verification»

4. Verification of the digital signature of drivers in Windows 8.1/8 is disabled.
1. In the start menu, search - enter cmd
2. Run Command Prompt as Administrator
3. Enter a command
bcdedit.exe /set nointegritychecks ON
4. Restart your computer, driver signature verification is disabled in Windows 7.
5. In order to re-activate the check, enter in the command line:
bcdedit.exe /set nointegritychecks OFF
1. In the start menu, search - enter cmd
2. Run Command Prompt as Administrator
3. Enter the following commands one by one:
bcdedit.exe -set loadoptions DISABLE_INTEGRITY_CHECKS bcdedit.exe -set TESTSIGNING ON4. Confirm the changes and restart the computer, digital signature verification of drivers in Windows 7 is disabled.
1. Restart your computer and while the computer boots, press the key F8
2. Select " Disabling Mandatory Driver Signature Verification»

Many of the drivers that have ever been released are digitally signed. This serves as a kind of confirmation that the software does not contain malicious files and absolutely safe for your use. Despite all the good intentions of this procedure, sometimes signature verification can cause some inconvenience. The fact is that not all drivers have the appropriate signature. And the operating system will simply refuse to install software without an appropriate signature. In such cases, it is necessary to disable the mentioned check. It is about how to disable mandatory driver signature verification that we will tell in our today's lesson.
While installing the driver for the device you need, you may see a Windows Security message on your screen. 
Despite the fact that you can select the item in the window that appears "Install this driver anyway", the software will not be installed correctly. Therefore, simply selecting this item in the message will not solve the problem. Such a device will be labeled exclamation point V "Device Manager" indicating a problem with the equipment. 
As a rule, error 52 will appear in the description of such a device. 
In addition, during the installation of software without an appropriate signature, a notification may appear in the tray. If you see something like the one shown in the screenshot below, it means that you may have encountered a driver signature verification problem. 
There are two main types of disabling checks - permanent (permanent) and temporary. We bring to your attention several different ways, which will allow you to disable the check and install any drivers on your computer or laptop.
In order not to delve into the system settings, there is special program, which assigns an identifier for the required driver. Driver Signature Enforcement Overrider allows you to change digital signatures in any software and drivers.

This method is a temporary solution to the problem. It will allow you to disable the check only until the next reboot of the computer or laptop. However, it can be quite useful in some situations. We will divide this method into two parts, since depending on installed version OS, your actions will be slightly different.
For owners of Windows 7 and below

Owners of Windows 8 and above
Despite the fact that the problem of verifying a digital signature is mainly faced by owners of Windows 7, similar difficulties occur when using subsequent versions of the OS. These steps must be performed after logging in.

This method has one drawback, which manifests itself in some cases. It lies in the fact that after the next inclusion of verification, previously installed drivers without a proper signature may stop working, which will lead to certain difficulties. If you have such a situation, you should use the following method, which allows you to disable the check for good.
By using this method you can turn off the mandatory check completely or until you turn it back on yourself. One of the advantages of this method is that it is applicable to absolutely any operating system. Here is what you need to do for this:


Using one of the above methods, you can easily get rid of the problems associated with installing software without a digital signature. Do not think that disabling the scan function will lead to the appearance of any system vulnerabilities. These actions are completely safe and will not infect your computer by themselves. malware. However, we recommend that you always use an antivirus in order to protect yourself completely from any problems when surfing the Internet. For example, you can use a free solution.
In Windows 8, a special security module is installed, which is responsible for blocking the process of installing drivers on a computer without a digital signature. What's the point in that? In fact, such a firewall provides reliable PC protection from Trojans, spyware and other unwanted programs. It would seem that there are advantages. However, such a precautionary measure is unlikely to fit into the plans of users who need to update the software of older devices. In this case, the only thing left for them is to disable verification of its signature in OS Windows 8 during the installation of the driver.
There are several ways to perform this procedure. However, regardless of the method chosen to disable driver digital signature detection, you must make sure that the software installed on the computer does not contain a virus or any other threat to the system, otherwise the consequences can be very unpredictable.
In order to disable digital signature verification for one specific driver in OS Windows 8 once, the easiest way is to reconfigure the system from the Boot Options menu. To do this, use the keyboard shortcut + I to open the "Settings" tab in the Charm Bar. After that, press Shift on the keyboard and, while holding it down, click the "Shutdown" button and select the "Reboot" item in the menu that appears:

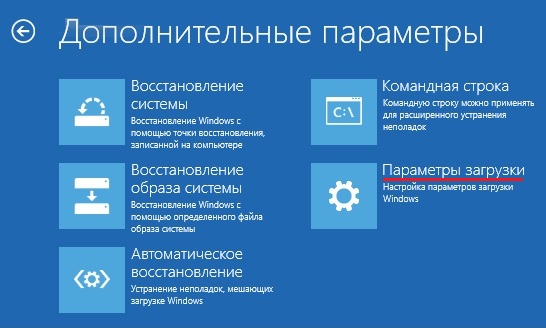
Now open the "Diagnostics" section, find the "Advanced options" item in it and click on it with the mouse:


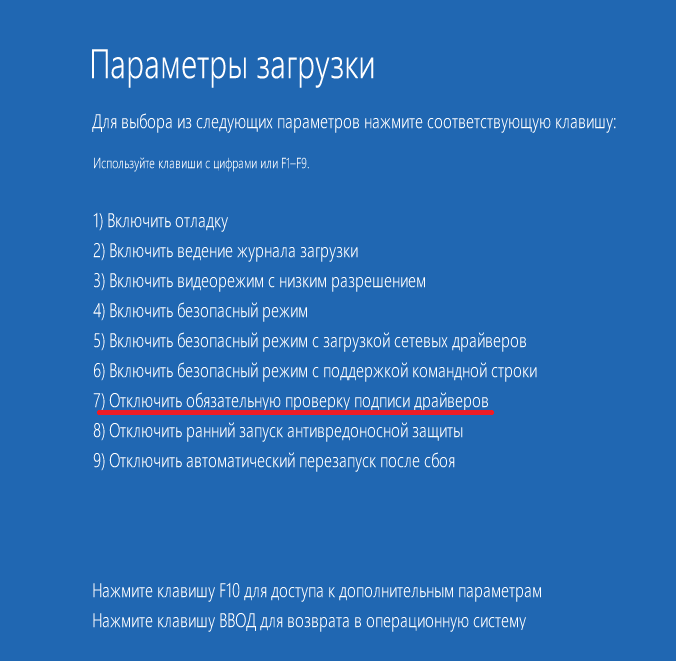
As a result, the "Download Options" window we need will appear. Now the only thing left is to press F7 or just the number 7 on the keyboard to disable on our computer in Windows 8 checking the installed driver for a digital signature:

It is worth noting that disabling the security mode is valid only for one session on the PC. This means that the next time the system is rebooted, the process of blocking unsigned drivers in Windows 8 during their update will be automatically activated. In this case, all previously installed, working "firewood" that do not have a digital signature will not be affected.
In the event that you need to install several unsigned "firewood" in Windows 8 at different times, it is more logical to completely disable the digital signature detection function through the Local Group Policy Editor. In order to run it, press + R on the keyboard, set the gpedit.msc command for the Run utility that opens, and click the OK button with the mouse:

The next step - in the system window that appears in the menu on the left, open the "User Configuration" folder, select "Administrative Templates" in it and go to the "System" section. After that, go to the "Driver installation" folder, find the "Digital signature ..." parameter in it and double-click on it with the mouse:

Windows 8.1 blocks driver installation without valid digital signature(or changed after its application). This is done for security reasons, since the installation of unsigned or counterfeited drivers (possibly with the help of a virus) can lead to unpredictable consequences, up to reinstalling the system.
Signed Driver is a device driver that is digitally signed. Digital signature is an electronic security label that can identify the publisher of this software, as well as the fact that the driver has been modified since it was signed. If the driver is signed by a publisher and the signature is validated by a CA, then you can be sure that the driver was released by that publisher and has not been modified.
In this case, it all depends on what you need to install unsigned drivers for. If you need to install drivers for an old device, such as a scanner, you can temporarily allow the system to install unsigned drivers.
To temporarily disable driver digital signature verification, do the following:
1. Move the cursor to the lower right corner of the screen, select the item "Options" or press the Win + I keys. Press the shift key, and keeping it pressed, select .
2. After the reboot, in the drop-down menu, select " Diagnostics"

3. In the window " Diagnostics"choose"

4. In the window "" select ""
5. In the window "" click ""

6. Now the most important thing. In the window "" you need to select the desired key, in our case it is F7 or the number 7
At the next reboot of the system, the system for blocking unsigned drivers is automatically activated. Previously installed unsigned drivers will continue to work.
In such a non-trivial way, you can solve the problem of installing unsigned drivers by setting up the work of all devices connected to the computer.


