Every Windows user can remove the password from their computer, but it’s still worth thinking about it first. If someone else has access to the PC, then you should absolutely not do this, otherwise your data will be at risk. If only you work behind it, then you can refuse this security measure. The article will tell you how to remove the computer password that is requested when logging into the system.
Each version of the operating system has its own options for disabling the login password. Some of them may be similar to each other, and the differences will only be in the arrangement of interface elements; others, on the contrary, are individual for a certain version of Windows.
The Windows 10 operating system offers various ways to remove your password. To complete the task, you can use both specialized software and internal system tools. There are four methods in total, each of which you can familiarize yourself with by clicking on the link below.

In the Windows 8 operating system, there are also a sufficient number of ways to remove a password from an account. This is due to the fact that, starting with this version, Microsoft changed the authentication policy in the OS. We have an article on our website that details how to remove your local password and Microsoft account password. You can complete the task even if you have forgotten your password.

There are three options for resetting your password in Windows 7: you can remove it from your current account, from another user's profile, and also disable entering the passcode that is requested when you log in. All these methods are described in detail in a separate article on our website.

In total, there are two ways to remove a password in Windows XP: using special software and through an administrator account. This is described in more detail in the article, which you can open by clicking on the link below.
Many users of computers running Windows 10 (or Windows 8.1) use the linking of the operating system to a Microsoft account. Thanks to this, they have access to absolutely all the features and functions of the system. However, this also has its disadvantages, and one of them is that every time the PC is turned on, the user has to enter the password for his account, otherwise he will not be able to log in to the system.
If you only use a computer at home, and no one else has access to it except you, then you have absolutely no need for password protection of the system, which means you can remove the password without fear.
Not everyone knows this, but the Windows 10 login screen password can be easily disabled. To be more precise, just add your Microsoft account password to the Credential Manager once and you will once and for all forget about being asked to enter a password before starting to work with the operating system. Here's how to do it.
Right-click the Start button and select Run, or simply press +R on your keyboard. Enter the command netplwiz and press the "OK" button or the Enter key on your keyboard.

The User Accounts window will open. It can be opened in other ways, for example, through, but the netplwiz command is the easiest option.
In this window, if you have multiple accounts, you need to select the profile for which you want to enable automatic login without entering a password. Uncheck the “Require username and password” option and click the “Apply” button.

Now enter your current password twice and click OK to confirm the changes.

Once you restart your computer, you will see that you no longer need to enter a password. This, of course, has its drawbacks, since by disabling the password, you remove a layer from the security of the operating system, but in this case, for the sake of your convenience.
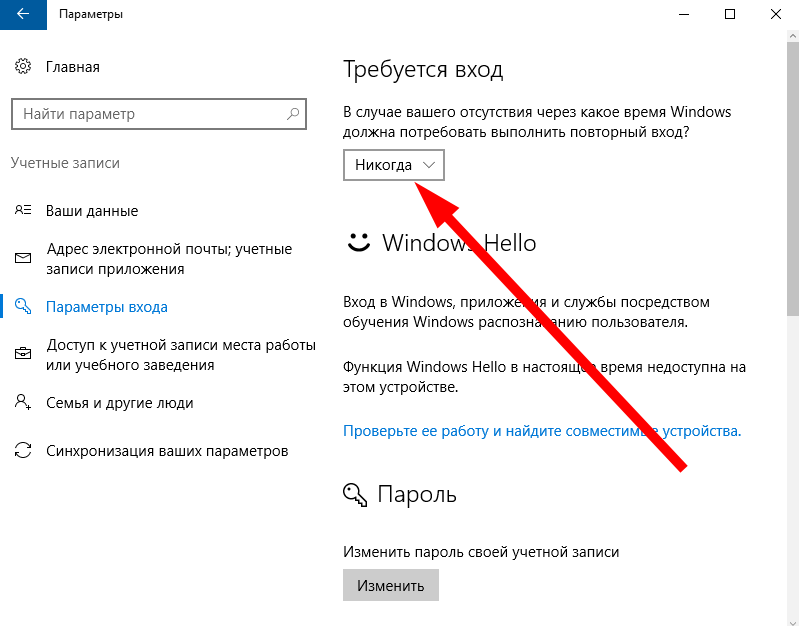
Finally, to remove the password when your computer wakes from sleep, open the Settings app, go to Accounts -> Sign-in Options, and select the Never option from the Require Sign-in drop-down menu.
What are the differences between them? When using a local account, you usually plan to work on one computer, without synchronizing settings, installed applications and objects on the desktop. This approach was used back in Windows 7, and it may not require entering a password when logging into Ten.
With the advent of Windows 8, the authentication method has changed, and now, along with using a local account, it has become possible to use a Microsoft account when logging in. In this case, all OS settings are synchronized with the server, and you can log into your account from other devices. Authentication using a Microsoft account requires the user to set a password each time they try to log into the OS.
In the material presented, I will share with you tips on how to get rid of this. It is advisable to do this if no one is working at the computer except you, and you do not care about the safety of your confidential information (such as an email password stored on your PC, a bank card pin and code, or means of logging into other services). If someone else is working on your computer, it would be wiser to leave the OS login locked.
There are different ways to remove a password in Windows 10. One of them is to use the user account settings.
Open the mini command input panel through the “Run” menu by pressing the key combination Win+R(the Win button is a key on the keyboard with the Windows logo on it). On the panel that appears, enter the command netplwiz.
A form opens with settings for work user accounts. Select our active user in the list and uncheck the box that requires entering the user name and password.

Click the “Apply” button. A transaction confirmation form appears, where you need to specify the current password for your active Microsoft account.

Enter your login password twice in the appropriate fields and click OK. We check that the checkmark in the field we need has disappeared and reboot to check if our method worked.
One of the main disadvantages of this method is that your password will be available for viewing in clear text in the registry, and anyone interested will be able to see it. In addition, this algorithm is very reliable and convenient, so you can have no doubt about the progressive approach of this method.
We launch the registry editor when using a key sequence Win+R and entering the command regedit. The editor window opens.
Opening a thread HKEY_LOUCAL_MACHINE \Softwares \Microsoft \WindowsNT \Current Version \Win logon.

Now all that remains is to check the effectiveness of the procedure performed by restarting the computer and trying to log into the system.
When leaving sleep-mode a form also appears asking you to provide an account code. We'll remove that too.
To do this, go to Windows settings by selecting the appropriate item in the Start menu.

On the parameters form, go to the subsection “Accounts” -> “Login Options” and in the first paragraph we change the value of the parameter to “Never”.
Well, that’s all, now you have the right to freely leave the computer for any length of time, and the password request window will not appear.
As I already said at the beginning of my article, the authentication method can be changed from local to Microsoft and vice versa. Let's say that you preferred the last option. Then, if you switch to a local account, the need to enter a password every time will disappear by itself. How can I switch back to the local authentication method? Go to the Windows Settings menu through the Start menu.


The first number will ask us to enter the password for the active account. Let's do so.

The next form will ask you to enter your local account username and password. We enter the username arbitrarily, but intentionally leave the password fields blank.

Now everything is ready. We exit the operating system and log in with fresh authentication parameters by clicking on the button on the next window to log out.

Now log in again and make sure that a password is not required.
So we figured out how to remove the administrator password when logging into Top Ten. Some of these methods are safer, others are more convenient and practical. We tested them all and can say with clear confidence that they all work. Choose whatever you like and enjoy the comfort of working in Windows 10.
How to remove password from Windows?


When the operating system starts, you are usually asked for a password, which must be entered in order to start using the computer. Sometimes such protection has to be installed when several people use one computer. Then the password is set not only before entering the operating system itself, but even in the BIOS itself, where the protection becomes more guaranteed and reliable.
If you forget the required password or someone made a joke on you by setting an unknown password without permission, you just need to remove such protection. Let's figure out how to remove the Windows password in the BIOS itself and the regular administrator password.
To reset user passwords when the operating system starts, you must first restart the computer and log into safe mode. To do this, without waiting for the system to fully start, press the F8 button on the keyboard and select “Safe Mode” on the screen. If several users are registered on the computer, then you need to enter this mode as Administrator.
When the computer is running in safe mode, you need to go to “Start” and select “Control Panel”. In it we find “User Accounts”. Here you should indicate exactly the user record from which you want to remove the password. Having selected the desired user, click on it. A window will open in which you should select “Remove password”. Next, you just need to carefully read everything that is written on the screen and follow the instructions that are given.
After completing the above steps, you need to restart your computer and log in without using a password. Now the Windows password will no longer be requested. The whole process takes only 15 minutes.
Perhaps the security password set in the BIOS is no longer useful to you, so you can remove or delete it. To do this, you need to enter the BIOS itself. To perform this action, restart your computer and, as soon as it starts to boot again, pay attention to the inscription Press ***, where *** is some kind of key (F1, Delete, etc. - they may differ on different PCs). You need to press this key. If you don't have time right away, reboot again.
Now that you have entered the BIOS, you need to select the BIOS Setting Password item. A window will appear in front of you in which you can perform two actions: either enter a new password and press confirmation Enter, or do not enter anything at all and also confirm your action.
When you press Enter without entering anything, a window will open in front of you that says “Password uninstalled,” press Enter again. To save the final result, press the F10 button on your keyboard. This way you can remove the BIOS password permanently.
The question of how to remove a password in Windows 8 becomes especially relevant if you have lost access to your account. However, there may be several solutions to this problem, depending on the circumstances. Let's look at several situations that users encounter most often.
The simplest situation is deleting a local account's security key.

As you can see, removing the access code in Windows 8 is no more difficult than removing the administrator password in Windows XP. Now let's move on to more complex situations.
By default, Windows 8 checks the access code at system startup. If you are tired of constantly entering the key, deactivate this function.

The ideal situations in which you know the access code and simply do not want to enter it anymore when logging in were described above. Now let's look at a more difficult and, unfortunately, common situation - the password is lost and you cannot access the system.
If you are logging in with a Microsoft account (the login is your email address), follow these steps to remove your password:

You will be presented with three options to solve the problem:

After entering your new password, you will be able to log into your profile without any problems. By the way, if you wish, you can completely delete your Microsoft account. However, in this case you will lose access to some functions: for example, the application store will become unavailable.
To remove the security key that is installed in your account settings, you will need a Windows installation disk or bootable USB flash drive.

When the login window opens, click on the "Accessibility" link, which is located in the lower left corner. Alternatively, you can press the Win+U combination. There will be one outcome - opening the command line.
Enter the command “net user login new password” and press Enter. If your username consists of more than one word, enclose it in quotation marks.
If you see error 8646 on your screen, it means that you are using a Microsoft account and not a local profile.
You can make your life a lot easier by creating a password reset disk ahead of time.
The Reset Disk Creation Wizard will guide you through each step, resulting in media that you can use if you lose your security key.
And lastly: if you set a password on your computer in the BIOS, simply disassemble the system unit and remove the battery from the motherboard, which is responsible for storing the settings. Wait a minute and then install the battery back: all BIOS settings, and along with them the set access code, will be reset.


 is placing emphasis on private labels")


