It is an all-in-one photo viewer with many great features.
Multiple photo viewing modes full screen mode, Thumbnail Mode, Simple Mode, Slideshow Mode, EXIF Mode and Zoom Mode provide a superior photo viewing experience.
Photo viewer for Mac Supports 35 photo files and RAW formats, including Nikon, Canon and other most popular formats. The program is available in 16 languages.
Key Features:
1. Superior fast speed for viewing photos, add only one image to view all image files.
2. View photos in incredible ways high quality using a Retina-aware viewer Mac photos and full mode without interface.
3. Batch process and fundamental touch-up features should be a plus for perfect photo viewing.
4. Various photo viewing modes, manage photos between different folders with ease.
5. Crop photos losslessly, adjust effects, or sort photos by name or data.

Another great solution for viewing images on Windows and Mac (Intel only).
The photo viewer can import images in a fully automated process and arrange photos in chronological order.
You can create folders, use tags, categorize into collections, and share your Picasa Web Albums.
You can also create joint photo albums. Basic editing tools to touch up your images, as well as several effects, are also available in the photo viewer.
But Google announced that Picasa photo viewer is being discontinued, you can use cloud-based Google Photos as a successor.

It's supposed to be an all-in-one photo viewer, but it's not free. Latest version Zoner Photo Studio 18 costs $99.

It is a professional photo viewer with advanced editing tools. The photo viewer supports geotagging, creating albums from templates, and working with large photo libraries.
As an Adobe Photo viewer, you can find some Photoshop features, such as functions to convert color photos to black and white. With the web photo viewer, you can also make edits right in the browser and organize and share your images.
And service for Adobe Photo Viewer, you need to pay US$9.99 per month.
Almost all users who migrated from Windows to macOS look with bewilderment at the standard options for viewing photos. After all, here you can’t just open and scroll through the images - there are some incomprehensible nuances everywhere. In this article we will talk about how to correctly work with navigation when viewing images using standard macOS tools, and will also offer several options from third-party developers.
In general, according to the developers from Apple, we should all use the Photos application. But you, just like the rest of the majority, may simply not understand why you need to constantly import something somewhere, create separate albums and at the same time launch separate application, if everything can be viewed in Explorer, where the files are manually sorted into folders.
Opening an image in Finder launches the Preview app. You won't be able to scroll through photos using arrows this way. There are two options to get out of this situation:
1) Select all images in Finder (use Command (⌘) + A hotkeys) and press Spacebar on your keyboard. Surely you know that the spacebar launches the Quick View application, which allows you to view almost any files without launching the specialized programs with which they are associated. In “Quick View” you can switch photos using arrows.

And if you press the key combination Command (⌘) + Enter (Return) in the “Quick View” mode, you can open a preview of all selected images for quick navigation and switching between them.

2) Select all or required images for viewing and start slideshow mode. To do this, hold down the Alt (Option ⎇) key and open the File → Object Slide Show menu... or just remember the keyboard shortcut Command (⌘) + Alt (Option ⎇) + Y. If you want to manually switch images, then just pause the slide show and use the arrow keys on your keyboard or trackpad.

There is also a very convenient “Index sheet” option (icon with squares). By clicking on it you can see a grid of all images and quickly find and switch to the one you need.

If all the described methods for solving the issue of viewing images using standard tools seem too complicated to you, we suggest downloading and enjoying software from third-party developers.
An ultra-simple and minimalistic program that handles viewing 100%. Simply associate all the image formats in it and by double-clicking on any photo in the folder you can either use the arrows or use the trackpad to navigate.

Many people will like the fact that all interface elements are hidden and the image opens almost full screen (like QuickTime opens a video). An additional menu with information can be viewed by moving the cursor to the right edge of the window. You'll also love rotating or zooming photos using trackpad gestures.

LilyView even opens GIF animation without any problems. There is also a built-in utility for controlling Philips HUE smart light bulbs.

Another high-quality viewer for macOS. Simple, clear, compact and quite easy to use. There are also no functions for editing images here (except for the possibility of cropping), but there is Russian localization. The developers provide the right for a month free of charge, and only then they will offer to buy a license (299 rubles).

Not much different from Hee is an image viewer. The main advantage is that it is free and has a wide range of tools for customizing the program to suit your needs. Very fast and convenient.
Download JustLooking (developer's official website).
Be sure to tell us about your favorite programs or ways to view images on Mac in the comments.
Based on materials from yablyk
Almost all users who migrated from Windows to macOS look with bewilderment at the standard options for viewing photos. After all, here you can’t just open and scroll through the images - there are some incomprehensible nuances everywhere. In this article we will talk about how to correctly work with navigation when viewing images using standard macOS tools, and will also offer several options from third-party developers.
In general, according to the developers from Apple, we should all use the Photos application. But you, just like the rest of the majority, may simply not understand why you need to constantly import something somewhere, create separate albums and at the same time launch a separate application, if everything can be viewed in Explorer, where the files are sorted into folders yourself.
Opening an image in Finder launches the application " View" But it is still possible to scroll through photos using the arrows (left and right) on the keyboard. There are three options to get out of this situation:
1. Select the first (or any other) image in the folder and click Space(or Command (⌘) + Y) on your keyboard. Surely you know that a space starts standard application“ ” (Quick View), which allows you to view almost any files without launching specialized programs with which they are associated. In “Quick View” you can switch photos using the arrows on the keyboard (top, bottom or left, right).

And if in the “ Quick view" (when the images were highlighted and the Space) press the key combination Command (⌘) + Enter (Return), then you can open previews of all selected images for quick navigation and switching between them.

2. Select all or the images you want to view and start slideshow mode. To do this, hold down the key Alt (Option ⎇) and open the menu File → Slide show of objects… or just remember the keyboard shortcut Command (⌘) + Alt (Option ⎇) + Y. If you want to manually switch images, simply pause the slideshow and use the arrow keys on your keyboard or trackpad.

And there is also a very convenient option “ Index sheet"(icon with squares). By clicking on it you can see a grid of all images and quickly find and switch to the one you need.

3. The Gallery view in Finder also lets you quickly browse your Mac's photo folders with an expanded preview pane and detailed metadata. However, this preview is still not good enough to identify the best shots. This Finder functionality works great for basic scenarios, but it lacks powerful tools for managing navigation and getting the information you need.

If all the described methods for solving the issue of viewing images using standard tools seem too complicated to you, we suggest downloading and enjoying software from third-party developers.
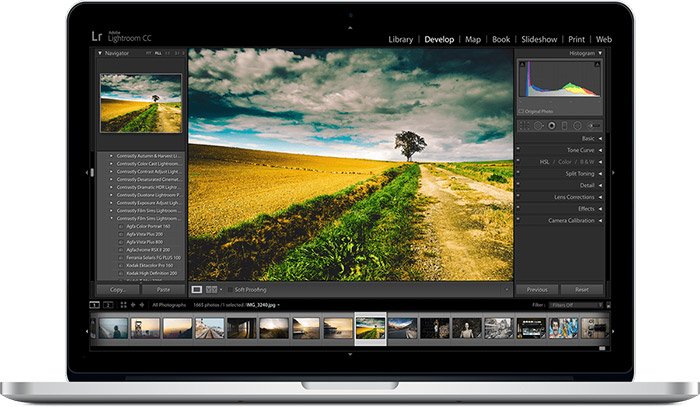
You don't need heavy applications like Apple Photos or Adobe Lightroom or programs that work with complex databases to update and organize your collection when displaying pictures. We will tell you about some of the best apps to view photos for macOS with unique features you can use.

XnView MP is a multifunctional application for viewing and organizing multimedia, and is almost an analogue of the popular ACDSee program. XnView MP provides many features often found only in paid programs. These include tools for classifying and sorting photos, batch operations for processing multiple images, the ability to edit metadata, and support for 500 image formats.

When you first launch XnView MP, you will see three panels. On the left is the displayed Finder file system with three tabs. Folders allow you to view a list of folders on your computer. Photos you like become visible in Favorites. At the same time the tab Filter by category consists of pre-configured categories that allow you to combine them and tag them at the same time.
The central panel shows thumbnails of the images selected in the left window. By moving the slider you can adjust their size. Also on the menu View It is possible to select the view type to show more/less details or set up auto-scaling of images. In addition, xnView allows you to sort images by title, date and file size, or even filter them by rating, tags, comments or tags.

By default, at the bottom of the program there are panels: Preview, Categories And Information, which allow you to quickly view an image, add it to the appropriate categories, and also get acquainted with the file properties, its histogram and EXIF data.
Unique Features:

ApolloOne is an intuitive image viewing app that also lets you organize your photos efficiently. The application has a built-in RAW processing engine from cameras, which makes it possible to quickly view the footage before importing it. ApolloOne gives you access to various local and network folders through Places. To configure them, click ⌘Cmd + N or click the button Browser on the toolbar.
Click the icon Plus (+) to add a folder. To quickly view its contents, you only need to press a few keys. And to learn more about any image, click ⌘Cmd + I or button Inspector on the toolbar. Here you can see detailed information about the image and camera (its serial number, number of shutter times, and much more). ApolloOne has built-in support for thousands of digital cameras.

You can sort images by creation date, modification date, file size, file type, and define your own sorting options in ascending or descending order. There is the ability to filter images by tags, ratings and labels.
Slideshow mode ( Preferences→ Slideshow) shows photos with 12 different transition effects and loops. You can even set a playlist to play in the background. To start the slideshow, click F5, and the key F6 will stop the show.

Unique Features:
An ultra-simple and minimalistic program that handles viewing 100%. Simply associate all the image formats in it and by double-clicking on any photo in the folder you can either use the arrows or use the trackpad to navigate.

Many people will like the fact that all interface elements are hidden and the image opens almost full screen (like QuickTime opens a video). An additional menu with information can be viewed by moving the cursor to the right edge of the window. You'll also love rotating or zooming photos using trackpad gestures.

LilyView even opens GIF animation without any problems. There is also a built-in utility for controlling Philips HUE smart light bulbs.

qView is a simple, cross-platform, minimalist image viewing application without toolbars or unnecessary items menu. The program simply focuses on your image, and a descriptive title bar shows the file name, file number, resolution, and size. When you launch the application for the first time, you will see a blank window. Follow the path File→ Open and select a folder to display its contents.
You can use the left or right arrow keys to navigate through the photos. Scrolling the mouse wheel will zoom in or out. Click right click mouse over the image to display a dialog box with information. You can rotate, flip the image, or return to its original size for a detailed view.
Unique Features:

Fragment is a cross-platform image viewing application. It is based on a Head-Up Display (HUD) interface, similar in visual presentation to video games. You won't see any toolbars, menus, or buttons. Control windows appear on the screen only when you hover your mouse over interface elements. Which controls you see depend on the position of your mouse cursor on the screen.

To get started, click on the link Noimage (no image) and go to the folder. When you hover your mouse over top part window, you will see an elongated panel in the form of a timeline. And for side panels to appear, hover your mouse over the edges of the image.
The left panel offers different viewing modes. And the right panel allows you to crop or rotate the image. Below you will see the details of your photo.

Unique Features:
Many people like to watch TV shows and movies on their computer, but for this they need a good player. One that supported all file formats, had a simple interface, more settings, and was free. Of all the media players that meet these criteria, there are five most worthy ones.
VLC- for a long time remains the most popular media player on macOS and other platforms, which has a well-deserved reputation among users. It plays video in any format and boasts enormous capabilities due to plug-ins.
Support for subtitles, adjustable playback speed, simplicity and an unreal number of settings make it an ideal player that is pleasant and convenient to use.

5KPlayer supports all existing video formats and has a clean interface. The player performs the usual functions, but also has a couple of exclusive ones in its arsenal.
Using 5KPlayer you can watch , Vimeo, Vevo and other services. In addition, the player allows you to stream or mirror content via AirPlay.

Another great cross-platform player with open source code. Despite its apparent simplicity, it is not inferior in functionality to VLC. The player supports hardware acceleration using a video card and automatically picks up audio tracks, allowing you to easily switch them.

Plex can play videos, but it's not really a video player. We have before us a full-fledged media server, which will be useful for those who prefer to enjoy films and TV series on big screen TV or mobile gadgets like iPhone and iPad.
One of the main advantages of Plex is its wide support. The media server works with smartphones, tablets, TV set-top boxes, game consoles and many other devices.

This list wouldn't be complete without QuickTime. The standard player cannot boast such a huge number of supported formats, but for most users this is not necessary.
The good thing about QuickTime is that it's already included with macOS, so you don't need any installation or configuration to watch videos. third party applications or plugins. Don't forget about it!
Which player for Mac do you think is the best? Tell us in the comments!
::
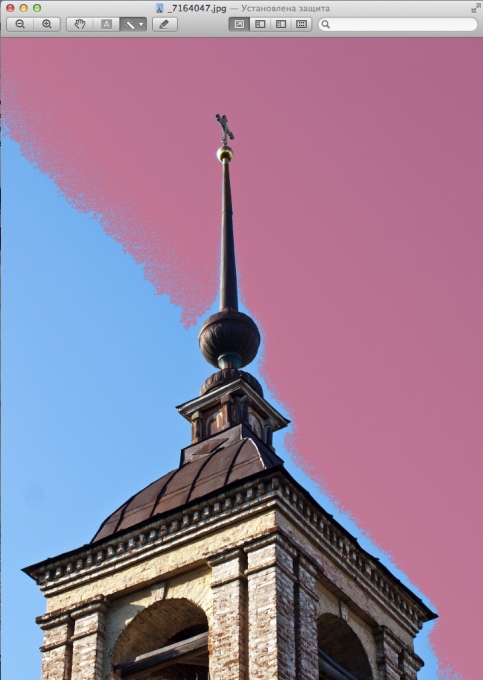
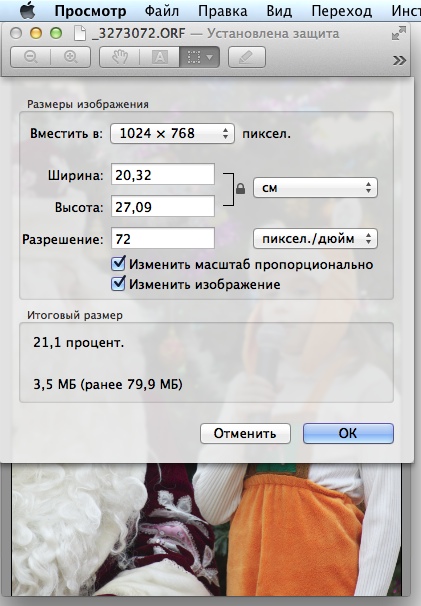
By moving the controls, in literally half a minute, it seems to me, I improved the appearance of the picture (on the left is the “Before” picture, on the right is the “After”): Naturally, the program allows you to crop the photo. To do this, take the selection tool (rectangle), mark desired area and give the command Tools -> Crop: You can make a photo smaller for posting on a website or sending by mail by opening the size settings panel: Here we select one of the standard formats or indicate the one we need. You can also specify what resolution will be written in the file. First, although we can zoom in and out to view the entire photo, sometimes it is convenient to look at a specific part of it. For this purpose, there is a “Magnifier” in View. It can be instantly turned on (and off) by pressing the "`" key (located between the left Shift and Z). But English layout must be selected- it won't work in Russian. The second is special selection tools. We select them from the drop-down menu of the toolbar: "Smart Lasso" allows you to select an object with a sufficiently contrasting border, if you - even not too carefully - drag along it. But even more interesting is the “Transparency Function”. Its principle is similar to the “magic wand” in graphic editors. But the implementation is much more convenient. By “pulling” the mouse with the button pressed over a surface of approximately the same shade, we see in real time how the selected part of the image changes. Like this system program View! And you also ask why I like Mac OS X? 😉

 Perhaps the listed set of tools will be more than enough in many cases. But here's something else...