This article provides a list of account privacy settings Google+.
Google+ is only about a week old, but the service has already attracted the attention of a large part of the IT community and the media. As with any online service, it is important to know how to manage information.
Privacy settings allow you to control who will have access to what information - who will be able to see all your contact information, and who will only be able to see your work phone number. The general privacy settings page is located at plus.google.com/settings/privacy- there you can see what your public information will look like in search results, and define access parameters. Regardless of who can view a specific block of information, users will still not know in which circle you placed them, but they will be able to freely exchange comments on the post that they can read.

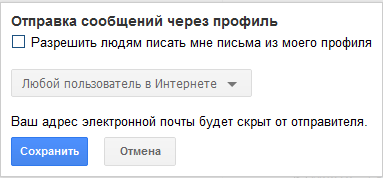
1. How to make sure that everyone registered on G+ doesn’t write to you by email.
Although G+ does not display your address on the pages Email, users have the opportunity to write to you directly by e-mail, which may result in spam or simply unwanted messages.
Here's how to turn it off. We are looking for the gear icon (upper right corner), -> Google Settings+ -> Privacy -> Public profile information -> Set up access to the profile -> Send a letter (under the avatar) -> uncheck “Allow people to write to me through my profile”. (eng - “Google+ Settings.” -> “Profile and privacy” -> “Public profile information.” -> “Edit visibility on profile”)
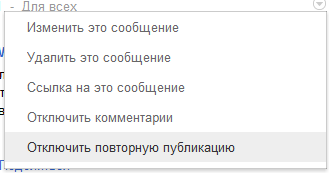
2. How to selectively disable sharing
If you don’t want someone to start sharing your posts, just click on the drop-down menu arrow (upper right corner, in the post title), and click on “Disable republishing.”
3. How to turn off email notifications
Gear -> Google+ Settings -> Google tab+ -> and remove unnecessary checkmarks.

4. How to export all your data from Google+
Click on the drop-down menu in the black horizontal bar (where your name is), then on “Account Settings” -> “Data Upload” tab.

5. How to leave Google+
There are four ways.
1 . Changing profile visibility settings to hide from public access everything except your name and photo. However, what you have shared with someone up to this point will be available to those users.
“Edit profile” button -> select the sections that you want to hide.


2
. Can be deleted profile Google+ with all content.
“Account settings” (via the drop-down menu on the black bar) -> tab of the same name -> Account deletion Close your account and delete all services and information associated with it.
Attention, only the Google+ profile will be deleted. Gmail, Calendar and everything else will not be affected in any way.
3
. For hardcore lovers - can be removed account Google.
And no later for you Gmail and other services, everything will be demolished.
Yes, I will write here how to delete an account, so all actions and potential losses are on your conscience.
1. Go to www.google.com/accounts/Login
2. Should be on www.google.com/accounts/ManageAccount
3. Click on “Change” next to the inscription “My products”
I think many people know that you can pick up any tab with the mouse and move it, or even “unpin” it and place it in another window. But you hardly knew that you can do this with several tabs at once - just hold down the Ctrl button and click on each desired tab. And don't forget to release Ctrl just before dragging.
If it seems to you that nothing changes in your life from day to day, then try changing the browser theme. U Google Chrome There is a wide selection of a wide variety of topics, so finding something to your liking will not be difficult. You need to go to the settings (three circles in the upper right corner) and click the “Select theme” button.
Changing the theme of Google Chrome
This is such an old feature that I always thought everyone was using it. Until I recently “discovered” it for my colleague. If you accidentally or even intentionally closed a tab and now don’t remember how to find that page again, just press “Ctrl + Shift + T” and voila - that same tab is in front of you. Or still not the same. Then the process can be repeated several times.
Chrome has very handy tool- bookmarks panel. It's located right below the address bar and gives you quick access to those favorite bookmarks that you need so often that you'd rather keep them in front of your eyes. To add a link there, just drag it with the mouse and drop it on the panel.
If suddenly you thought that you were looking for something in incognito mode, but it turned out that you weren’t, then don’t rush to get upset. Google Chrome has a keyboard shortcut for this occasion too. Just press “Ctrl + Shift + Delete” and a menu will appear in front of you where you can check off everything you want to clear: cookies, download history, etc.
Deleting history
For example, you’ve been writing a thesis for a week in a row and your browser is bursting with the number of tabs. And then suddenly you need, for example, to choose a gift for your parents, which means that you need to open several more tabs. In order not to risk the previous ones, you can save them all in a separate folder in your favorites. And in Google Chrome it’s as easy as shelling pears: just press “Ctrl + Shift + D” at the same time and select a save location. Now you can safely close all these tabs and open them all at once the next time you want to return to them.
It is not necessary to store links to Internet pages in browser favorites– you can put them directly on your desktop. To do this, just pull any link from the browser and drop it on your desktop. But there is a more elegant way. Again, go to the menu, the icon of which is in the upper right corner, select “Additional tools”, and in the submenu click on “Add to desktop...”. This will give you the opportunity to immediately set the desired name for the shortcut, and also with this method, its image will be the site logo, and not the Google Chrome logo.
Add a shortcut to the desktop
Not the most useful, but still worth attention option. For those who like to touch type and use all sorts of keyboard shortcuts, it will be useful to know that you can navigate between browser tabs without a mouse. To do this, you need to hold down the Ctrl key and click on any of the numbers - the tab corresponding to the serial number will become active.
If you start your (working) day by checking some standard list of favorite or necessary sites, then you can easily configure Google Chrome so that when you open a new window or restart the browser, it opens the same pages. Go to the settings, find the sub-item “Set pages” and add at least a whole list.
Set specific pages to launch when Google Chrome opens
Google Chrome is a powerful and functional web browser that has a lot of features in its arsenal. fine tuning. However, not all users know that the “Settings” section presents only a small part of the tools for working on improving the browser, because there are also hidden settings, which will be discussed in the article.
Many web browser updates add new features and functionality to Google Chrome. However, such functions do not appear in it right away - first they are tested for a long time by everyone, and access to them can be obtained in hidden settings.
Thus, hidden settings are test settings of Google Chrome, which are currently under development, and therefore may be very unstable. Some options can suddenly disappear from the browser at any time, and some remain in a hidden menu, not getting into the main menu.
It’s quite easy to get into the hidden settings of Google Chrome: to do this, use address bar, you will need to go to the following link:
chrome://flags
The screen will display a list of hidden settings, which is quite extensive.

Please note that it is thoughtless to change settings in this menu It is strongly not recommended as it may seriously disrupt your browser.
Hidden settings are usually activated by clicking the button next to the desired item. "Turn on" . Once you know the name of the parameter, the easiest way to find it is to use the search bar, which can be accessed using a keyboard shortcut Ctrl+F .

For the changes to take effect, you will need to restart your web browser by agreeing to the program offer or by running this procedure on one's own.

Below we will look at a list of the most interesting and current hidden Google Chrome settings with which you can use of this product it will become even more comfortable.
1. “Smooth scrolling.” This mode will allow you to smoothly scroll the page with the mouse wheel, significantly improving the quality of web surfing.

2. “Quickly close tabs/windows.” Useful feature, which allows you to increase the browser response time to close windows and tabs almost instantly.

3. “Automatically delete tab contents.” Before the adoption of this function, Google Chrome consumed a huge amount of resources, and also, due to this, spent significantly more battery power, and therefore users of laptops and tablets abandoned this web browser. Now everything is much better: by activating this function, when the memory is full, the contents of the tab will be erased, but the tab itself will remain in its place. Opening the tab again will reload the page.

4. "Material Design at the Top" Chrome browser" and "Material Design in the rest of the browser interface." Allows you to activate one of the most successful designs in the browser, which has been improved for several years in the Android OS and other Google services.

5. “Creating passwords.” Due to the fact that each Internet user registers on more than one web resource, special attention should be paid to the strength of passwords. This function will allow the browser to automatically generate strong passwords for you and automatically save them in the system (passwords are securely encrypted, so you can rest assured that they are secure).

We hope you found this article helpful.
“Whoever owns the information owns the world.” Many people are familiar with this saying and many would like to know as much as possible about the people around them, but at the same time we would like to hide our personal affairs as best as possible. The security of personal information is what worries network users most. And it looks like Google+ does this well, but you need to know how to use it.
In this guide, you'll learn about privacy settings in Google+ Circles, how to control what other people see about you, settings for sharing posts with your friends, and other standard options.
Circles on Google+ are very easy way manage your contacts. Most of the ways you manage your personal information will depend directly on what circles you set up for yourself and what access rights you give them. For example, you create circles such as “Family”, “Friends”, “Colleagues”, “Bloggers”, etc., and “settle” people in these circles with whom you want to share your information or read their feed.
Here's what you should know:
Your circles are private by default. The individual circles you create and the people who belong to these groups are visible only to you. That is, you can create a “WTF” circle and place your boss or an annoying friend there. And neither these people nor everyone else will know about it.
Managing who sees whose post can still be a little confusing. The most important thing is to remember who you placed in which circle. Because some information is not desirable for the “Colleagues” circle or the “Just acquaintances” circle. Be careful when sharing your posts. It’s like sending a message via instant messenger to the wrong person or forgetting to remove the copy from your clients’ email when corresponding with employees. Stupid situation, right?
The difference between Google+ circles, Twitter followers, or Facebook friends
Many people love how easy and intuitive it is to use circles. It's much more open and obvious than a FB friends list. But still, there are certain subtleties in managing circles that you need to remember. Especially if you're used to the way Twitter and Facebook work.
1. Just like on Twitter, you can read posts of any people you are interested in, without adding them as friends. This is not mutual friending like on FB. In this regard, Google+ is very similar to Twitter.
2. At the same time, anyone can add you to their Circle without your consent, unlike Twitter, which has options in the settings to “Protect my tweets” (people who are not on your list cannot read your tweets). Therefore, when choosing correct settings shared access, all responsibility lies with you. Even if someone added you to their circles without mutual consent, they still won't be able to see your posts until you make the post public.
On the one hand, Google+ Circles are much easier to set up and use, since they are the basis of this social network. On the other hand, they are a mixture of several social networks and can seem quite confusing at first.
Your Google+ profile links to your details (education, occupation, location), photos and videos you've shared, links, etc. So once you've set up your Social Circles, editing your profile page is one of the main ways you can manage your privacy in Goole+.
To edit your profile's private settings, click on the button that looks like a circle with a silhouette inside, and then click on the "Edit Profile" button.
Your default profile information settings:
Full name. This is the only option that is required and visible to all users. Changing your name here will change your name across all Google services.
Also, everyone on the network can see: your introduction, your profile photo, your gender, who is in your circles and who has you in their circles, and a button with which they can send you an e-mail (but not your real mailing address ).
Your Circles can see your: entry, place of work, education, place of residence, Family status, interest, links.
Open only to you until you change it in the settings: occupation, home and work contact information.
You can change the viewing availability for each of these sections: for the whole world (anyone online), extended circles, your circles, just you, or user groups. Each privacy setting in groups has its own icon, so when you look at your profile, you'll see which parts are open to which groups.

That is, you can make your education accessible to everyone, show your occupation only to those in your circles, reveal your place of residence only to certain circles, and leave your status open only to yourself.
Want to see how your profile looks to anyone online? Click on “View profile as” and select “Anyone on the web”

Visibility for search engines. If you do not want your profile to be indexed and made available to search engines, this option is just for you. It is located at the bottom of your profile in the About page section. Just uncheck the “Help others find my profile in search results” box, which is there by default.

Who is in your circles/whose circles are you in. While editing your profile, you can also change the visibility of people on your social network. Look at the left column. Below your list of circles, click on “Change who is visible here”. This way you control the visibility of the people who are in your circles and those whose circles you are in.
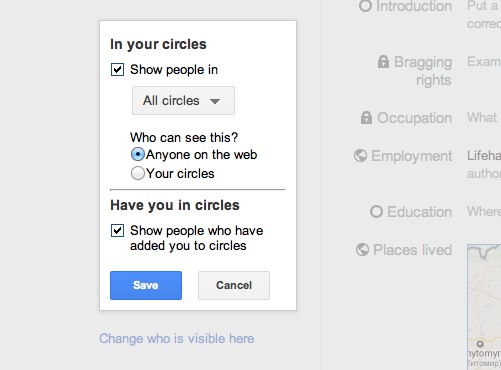
By default, it is visible to everyone. But this is easy to change. You can hide everyone who added you to their circle or those you added, or show only the circles you select.
Photos.
Your profile photo, your other photos, Picasa albums, photos that others have tagged you in Google users+ open to everyone. You can choose not to show this tab, but even if your photos tab is open for viewing, others will only see the photos you share.

The option “People who tag you in photos automatically leave a link to your profile” allows everyone in your circles to tag you by default. This means that if you have verified that you are in the photo, a link to your profile will appear in the photo. Geo-tagging is not enabled by default, even if you upload photos from tagged phones.
Video
In this section you can either show the tab or hide it.
If you click the "+1" button on search results or posts you like, it will automatically show up on your profile page and is in your default settings (if you click +1 on posts in your feed, it will show up in your feed, but will not be displayed on the profile page). If you do not want this to appear on your profile, uncheck this tab.
Once you've sorted people into circles and determined who can see your profile, the next important step is to determine who can see and share your content, which may include photos, links, and videos.
Groups you can share with: When you share information on your feed, you can choose which circles or individuals can see those posts by adding to groups:
Extended Circles - everyone who falls into the General group, plus everyone who is in their circles (like friends of friends on FB).
The name of your one or more circles.
A note about the groups you share information with.
Once you select a group and open the published information for it, you cannot change this. That is, if you made a post public for a specific group, everyone who is added to this group will see it even after publishing this post.
By default, when you create a new post, the people or circles you share it with will then be listed in "Share with" when you publish your next post. This is especially true for those people and groups with whom you most often share information. So every time you publish, check what is in your “Share with”.
You can open your post to certain circles or people, but you cannot open your post to everyone except someone or some circle. That is, if you want to share with someone the little bugs from the life of your office, you will have to create a group “Everyone except employees” and open these posts only to this circle.
In addition to being able to control the visibility of your posts, you have other management tools at your disposal: if trolls appear in the comments on your post, you can either delete them or report them to Google. You can turn off all comments and disable reposting of your posts. All this must be done manually each time before publishing a post.

Incoming streams. Posts from people you add to circles will appear in your news feed under different circle categories.
For people you haven't added to your circles, but who follow you, posts will appear as "Incoming Links." You can mute those posts that you're not interested in sharing, or you can add some of these people to one of your circles.
Blocking people. If you think someone is texting too much or posting photos of kittens, you can block that person in your circle settings. However, blocking may not work as expected. Blocking people removes their posts and comments from your news feed and also hides your public posts from them. But it doesn’t hide your comments on their stream. It also does not hide posts or comments from them if they go to your profile or a specific post.
This is more a function of hiding their posts from you than you are from them (out of sight, out of mind).
Your comments on others' posts are public. Before you leave a snide comment, remember that your comments on other people's public posts are also public and are indexed by search engines. Your +1 on another person's post is also public. Note the post status next to the timestamp, which will tell you how public the post is.
Click on the gear icon (Google+ Settings) to get to full set settings. In the main section of Google+, you can set alert options for certain actions (for example, if someone added you to their circle or tagged you in a post). By default, notifications about any actions will be sent to your email.
Below you can change the ability for everyone to start messaging you immediately (it's enabled by default).
Another great thing you can breathe easy about is that Google has assured everyone that Google+ only uses SSL encrypted connections and that data deleted from Google+ is also deleted from its servers.
You can automatically search many Internet sites without visiting those sites themselves, if they are listed in search engines.
If the site is not included in the list, click right click mouse on the search box on the site and click on the option: “Add as search engine...” Then you can have direct search access through. Google Drive, Gmail. On Mac, press and hold the button Control when you click on the search box.
Most people are familiar with Chrome's ability to drag and drop tabs into own windows browser, or move and match them between browser windows, but what many may not know is that this can be done with more than one tab at a time. Simply press and hold the Shift key (selecting sequential tabs) or Ctrl (selecting non-sequential tabs) and then click on the tabs you want to move as one. If you're on a Mac, hold down the Command key.

You probably know that Google can do basic math in the search bar. However, did you know that you can access similar mathematical functions in omnibox without Google.com? Just type in an example and the correct answer will appear below the omnibox without pressing Enter (which you have to do on Google.com). This little trick only works if the default search engine in the omnibox is Google - you won't get a response if your search engine Yahoo system, Bing, Yandex. It also doesn't work if you're in incognito mode, no matter what your default browser is.

Omnibox can also work as a unit converter. So if you type "9 inches," Chrome may automatically suggest a conversion to centimeters. If you need a different unit, enter it after the equal sign (for example, "9 inches = km" or "9 inches = mm" or "9 inches squared = M squared"). Again, this particular function only works if Google search engine system by default, and it will not work in incognito mode.

On a PC, you can zoom in or out on a page by holding the Ctrl key and scrolling the scroll wheel up or down (or pressing Ctrl+ or Ctrl-). Once you've zoomed in or out once, a magnifying glass icon will appear in the omnibox on the right. By clicking on it, you can manually zoom in or out or restore Default scale. Or you can return the default value by pressing Ctrl-0. On a Mac, you can zoom in and out by pressing Command+ or Command-. Pressing Ctrl-0 will return you to the default values.

If, while tidying up your PC, you find something unclear JPEG file, the browser will also help you see it very quickly and easily: drag the file into a new Chrome browser window and you will see what the file is.

Selecting a word/phrase and dragging it is the same as the copy-paste function, so you can simply highlight the word or phrase and drag it into the omnibox to search in . Conversely, you can also simply right-click on the highlighted word or phrase and you will be prompted to search on Google (on a Mac, Control+click on the highlighted word).
If you need constant and easy access to a site, you can quickly bookmark it by highlighting RL and dragging it to your bookmarks bar. You can drag and drop URLs from other browsers, not just Chrome itself.
If you need to quickly switch to another tab, press and hold the Ctrl key (Command on Mac) and the desired number from 1 to 9. Tabs are counted from left to right from 1 to 9.
Spacebar can be used to scroll down on any web page, and you can scroll back up by pressing Shift + Spacebar.

Many of us visit the same pages every day when we open our browser. You can set Chrome to open the same sites every time you launch the browser. On the menu Settings go to section Open at startup(or just type chrome://settings/startup).
If you need quick access to a downloaded file, one way to do this is to automatically download files to your desktop for quick access. To change the location of downloaded files, go to the menu Settings(chrome://settings/), scroll down the page and click on the link Show additional settings and then scroll to Downloaded files. Specify a new location for downloaded files. You can also check the box here if you need Always indicate the download location.
Closed a tab by mistake? Chrome lets you get it all back. All you have to do is press Ctrl-Shift-T (Command-Shift-T on Mac) and Chrome will open Newly closed tabs. You can also open tabs through your browser history, in which case you need to press Ctrl+H.

You can use the Omnibox to access the Quick Add feature in Google Calendar. The first thing to do is copy the line
http://www.google.com/calendar/event?ctext=+%s+&action=TEMPLATE&pprop=HowCreated%3AQUICKADD
Next go to the menu Settings, scroll down to Search, press the button Tune search engines ... (or paste into the omnibox chrome://settings/searchEngines). In the window that opens, scroll down to the fields Add system, Keyword And Link with parameter %s instead of quotes.
Just write “Calendar” in the first field, “calender” in the key field of the entry, and the above link in the third field. Click the button Ready.
Now type "calender" in the omnibox and press Tab, enter the required event.
If you need to delete the history of visited pages, including URLs, cached images, passwords, cookies, this can be done in the settings. Or click Control-Shift-Delete and a window will open Clear the history. (Press Shift-Command-Delete to access this feature on a Mac.)
Leave your comment!


 Moto G5 smartphone review: affordable “mid-range”")


