This article will describe the main steps that you will have to take when working with the Hyper-V hypervisor.
Sections of the article:
Hyper-V is an embedded hypervisor that is part of the Windows Server server operating system components and has recently been available on regular versions of operating systems since Windows 8. This solution looks better than the Windows Virtual PC that was included with Windows 7.
In this article, we will describe the entire process of creating a virtual machine using the Hyper-V hypervisor, as well as how to migrate from another hypervisor (VMWare), replicate, backup, and restore a virtual machine.
This component is only available on 64-bit operating systems and professional editions or higher. It is also the only Microsoft virtualization technology currently available to support 64-bit guests. Normal client operating systems support sleep and hibernation modes, which are not available in server hypervisors.
To work with Hyper-V, your processor must support virtualization technologies, because without it this component will not work.
The processor must have hardware virtualization. For Intel, this technology is called Intel-VT (may be referred to as VMX), and for AMD-based processors it is called AMD-V (may be referred to as SVM). There must also be a second level address translation, SLAT (Intel EPT or AMD RVI).
How do you determine if your computer is eligible for Hyper-V and meets the requirements?
The Coreinfo utility must be run before activating the Hyper-V component, as judging by the reviews and comments, this application may show incorrect information that can be misleading.
If you are using the Windows Server operating system, then you need to activate the Hyper-V role in the control panel
In a custom Windows OS, Hyper-V is a feature that is not initially activated. To activate this component, you can use 2 methods.
Select your virtualization server by clicking on it once, as in my case it will have the same name as your computer.
After that, in the control panel, select the "Action" item and in the drop-down menu, the "Create" section, and in this section "Virtual Machine ...". 
Now you will see the window "Wizard for creating a virtual machine". The first step is an introductory information before making the settings, you can safely skip it by clicking the "Next" button. 
The next step is to assign a name to the created virtual machine and select its directory (the place where the virtual hard disk will be stored), by default it is C:\ProgramData\Microsoft\Windows\Hyper-V\. If you need to change the location of the wound, check the box next to "Save the virtual machine in another location" and select the path. 
In the next window, you will need to select the generations of the virtual machine. The choice will be presented to "Generation 1" and "Generation 2", the main difference between them is that in the new, second generation, you can install operating systems that will work based on UEFI and only have a 64-bit version of the system.
If you are going to install a virtual machine running Windows XP or below and a 32-bit version (for example, Windows 7 32-bit), then you need to select "Generation 1". In all other cases, select "Generation 2" (for example, Windows 7 64-bit or Windows 10 64-bit)
Once the virtual machine is created, this setting cannot be changed.
The next step is to set up the network. In this window, we can choose whether or not to connect a network adapter to our virtual machine. In the event that more than one provider is connected to your PC or it has more than one network adapter, you can select the one you want to use for the virtual machine, thus dividing the traffic on different network adapters to different virtual machines. 
In the "Connect virtual hard disk" section, you can set the size of the virtual hard disk that the virtual machine will use for its work, in addition, you can specify the location where the virtual disk of this machine will be located.
In the event that you already have a virtual disk with a previously installed virtual machine, and you want to transfer it to connect, then you need to use the second item "Use an existing virtual hard disk". This option is convenient to use if you need to transfer a virtual machine from one server to another without losing data. In Hyper-V, you can mount VHD or VHDX virtual hard disks. You can also transfer virtual machines from other hypervisors (for example, VMWare) in this way, you can read about this.
The third item is "Connect a virtual hard disk later." This item can be used if you need to create and configure a virtual machine for future work. So you can have a ready-made virtual machine and at the right time just install a system on it or import a virtual hard disk of another machine. 
In the "Installation Options" section, you can choose how you will install the operating system on the virtual machine.
The following methods are available to choose from:
Having chosen the method that suits you, we proceed to the last step of creating a virtual machine on Hyper-V 
The last window is a summary of all the settings you have applied to the machine you are creating. In this section, you must check all the information.
After that, click the "Finish" button and wait until our virtual machine is created. 
After the machine has been created, we launch it in order to install the operating system. To start the machine, right-click on it and select "Connect ...". 
A connection window will open, in which you must click the "Start" button, after which it will start.
At the first start, our machine will launch the previously selected system image for further installation, the installation is no different from the usual one, we carry out all the same steps, depending on the task. 
After installing the operating system, we can use it. Thus, we created a virtual machine using Hyper-V technology and installed an operating system on it.
To change the settings of the machine, you need to open the "Settings" window, this can be done in two ways, either by clicking the "File" button and selecting "Settings" in the window for connecting to the virtual machine, or in the Hyper-V Manager, right-click on the machine and select the same item "Settings". In this virtual machine management window, you are given the opportunity to change the configuration, add, change or increase a virtual disk, mount an image, configure the network controller, etc.
Some settings cannot be changed while the machine is running, so it is best to do this when the machine is turned off.
Quite often there is a need to transfer a virtual machine from one platform to another. In this section, we describe how to migrate such a machine from a hypervisor to Hyper-V.
The most important thing in a virtual machine is its virtual disk, we will transfer the named disk, but for this it needs to be converted. The format in which VMware creates and stores virtual disks is .vmdk, which is what we must convert to the .vhd format, since the Hyper-V hypervisor works with it only.
The easiest way is to use the free StarWind V2V Converter, which can be downloaded from the official site, but for this you will need to enter your email address to which you will receive a link to download the installation distribution. This utility will help you convert virtual disks to run on VMware and Hyper-V hypervisors.
When you receive the file by mail, download and install it. After that we start.
The first thing you will see is a window in which we are asked to choose a way to search for a virtual disk:
In this situation, we will look for a local file, since the utility is running on the same computer where the virtual machines are located. Select the first item and click Next. 
The next step is to find and select a virtual disk. To do this, click on the button with the image of three dots and select the desired file in the window that opens.
In the event that when creating a virtual machine on VMware you used the option to create a disk with more than one file, then select the one that was created last from the list of disks.
In the next window, we will be offered more detailed settings when converting to VHDX format. Here we do not touch anything and move on.
In the "Destination image location" window, we can choose where to save the converted disc. The choice is offered either to save it in a certain place on the computer where the conversion is performed, or to send it immediately directly to the server. Since the server is located on the same computer as the virtual disk to be converted, then select the “local file” item. After that, select the place where the disk will be saved and wait for the conversion to finish. 
After the virtual disk is converted, we can insert it into an already prepared virtual machine or create a new one and, during the settings, select an already prepared virtual disk on the Hyper-V hypervisor. You can read how to do this.
There are many more scripts that automatically save disks and backups of machines, but more on that in another article.
To create a checkpoint, open Hyper-V Manager, select the desired machine, and in the Actions section, select Checkpoint. 
After that, the creation of a checkpoint will begin, the progress of creation can be tracked in the “Status” column of the virtual machine. After completion, the checkpoint has been created and, if necessary, you can recover from it, for this, simply select the "Return" item, and after that the restoration of the last checkpoint will begin.
To export, also open "Hyper-V Manager" and select "Export ...", then in the window that opens, select the path to save the virtual machine and click the "Export" button. After that, saving will begin, the progress of which you can also follow in the "Status" column. Once completed, in the directory of your choice, you should be able to see a folder with the name of your virtual machine and all saved data. To restore this virtual machine, select the "Import virtual machine ..." item and point the hypervisor to the desired folder, after which the restoration will begin.
Replication is a way to save a complete copy of a virtual machine on a second server, but unlike a regular backup, this replica is always ready to start and continue working from the last checkpoint, so you won't have to spend time restoring a backup or copying files from one server to another. This method is well suited for situations where stopping a virtual machine is not acceptable, and in the event of a server failure, it is necessary to continue working on this virtual machine without stopping.
Replication occurs according to a schedule that can be configured. Replication does not require external storage and can be easily done from server to server over a local area network.
The replication feature is only available on server operating systems (Windows Server 2008/2012/2016...)

“Check the Firewall settings” so that the required port is open, or if all ports of the receiving replica server must be closed, you can use the command line to connect. To do this, enter the following "netsh advfirewall firewall add rule name="HVReplica" dir=in action=allow protocol=TCP localport=YOUR_PORT".


In this article, we have described the main steps that you may encounter when working with the Hyper-V hypervisor, in particular when creating a virtual machine.
Hello friends, in today's article we will connect a Hyper-V virtual machine to our Windows 8 and install the Windows 7 and Windows 8 operating system on it, we will also answer all the questions asked by users. By the way, you can transfer your entire physical computer to Hyper-V! Several of my acquaintances sysadmins work only on Hyper-V and have even forgotten what a normal operating system is. At the very beginning, we publish some of your letters.
If Windows 8 Pro or Windows 8 Enterprise (corporate) is installed on your computer, then you can use the Hyper-V virtualization system or, in simple words, use the virtual machine built into the Windows 8 operating system. It is very easy to manage and I have no doubt that you will understand it.
Hyper-V requires your processor to support virtualization technology. Before work, be sure to enable the options in the BIOS of the computer:
"Intel Virtualization Technology" for Intel processors or "AMD Virtualization" for AMD processors.

I warn you that Hyper-V is primarily designed and intended for IT professionals and is used on servers.
When working in Hyper-V, you will not be able to use a flash drive, sound card, and WiFi, in this respect it is preferable to use VirtualBox. But I still think that those who read this article know why they need it.
For its operation, the Hyper-V virtual machine puts forward small requirements:
Windows 8 Pro must be 64 bit.
The presence of RAM at least 4GB.
Connecting Hyper-V
We open Control Panel

and choose Programs

Programs and components. Turn Windows features on or off

Find the Hyper-V partition and mark it with a checkmark and click OK.

There will be a short search for the required files and reboot.


After the reboot, go to the Metro interface and left-click on the arrow, then select Hyper-V Manager,

The Hyper-V Setup Wizard appears. We click on the name of our computer, then Create And Virtual machine.

Hyper-V Settings
1) Getting started. This wizard will help you create a virtual machine, click Next.

2) Specify a location. We assign a name to the virtual machine in Latin, for example Windows 7. Specify the location of the Hyper-V virtual machine files, since I have no space on drive C: I will check the box Save the virtual machine in another location and click browse, then specify the drive D: and Next.

3) Specify a generation. I want to install Windows 7 so I will choose Generation 1.

4) Allocate memory. My computer has 8 GB of RAM, which means I can painlessly allocate 2 GB of RAM for a virtual machine. We mark the item "Use dynamic memory for this virtual machine" and Next.

5) Network setup. We skip this parameter (we will set up an Internet connection later) and click Next.

6) Connect a virtual hard disk. We mark the item Create virtual hard disk. So in the second paragraph Specify the location, we indicated the location of the virtual machine files on the D: drive, then by default the virtual machine will offer us to locate the virtual hard disk on the D:\Windows 7\Virtual Hard Disks\ drive.
Friends, the 127 GB size item does not mean that 127 GB will be “squeezed out” on your D: drive right away.
Note: A virtual hard disk can be created at the very beginning, that is, before you create a virtual machine, in which case you can choose which virtual hard disk to create, for example:
Dynamic(grows in volume gradually, according to the accumulated data, at first it takes several megabytes).
fixed size(immediately requires allocation for the required space, if you create a 120 GB disk, then you must allocate exactly that much space to it).A fixed size hard drive is considered to be more efficient.
See the end of the article for more details.

7) Installation options. Check the box Install the operating system later. Further.

8) Done

How to set up internet in Hyper-V
Now let's set up the network. In the main Hyper-V window, click on the Virtual Switch Manager button.

In the window that appears, select what type of virtual switch you want to create. I'll choose the type - External network. WITH create a virtual switch.

Choose an arbitrary name for the virtual switch. Wi-Fi network adapter on my computer manufacturer "Atheros", so I'll choose this name. Apply.


Choose Options

A window will open, in the left part of which you can see two sections with different parameters, if you select the parameter you need with the left mouse, then in the right part of the window you can configure it.
Network adapter. In the right part of the window, select our Atheros Virtual Switch, Apply And OK.

Installation on Hyper-V operating system
Now the actual question is how to install an operating system in a virtual machine. To install a Hyper-V virtual machine, you need to boot it from the Windows 7 installation disk located in the drive, or for this purpose you need to use an ISO image with Windows.
, then in the right part of the window using the buttons Up And Down set the boot of the virtual machine from what you need:CD- boot from the installation disk or ISO image.

Choose Controller 1 IDE and click on the plus sign, then DVD drive, if you want to boot the virtual machine from the DVD drive, check the item Physical CD and DVD drive: then insert the Windows 7 installation disk into the drive.
You can also use Windows 7 to boot a virtual machine and install an ISO image with Windows 7, in this case you need to check the item Image file and click the Browse button, in the explorer that opens, select the image with Windows 7 and click Open. Apply and OK.

Click Start and the virtual machine starts. Hyper-V is booting from the Windows 7 ISO image. Double-click the thumbnail of the Hyper-V virtual machine window,

a window will open in which we will work with you. Press any key, otherwise the Windows 7 installation disk will not boot. At the top of the window are the virtual machine settings buttons.

The familiar Windows 7 installer dialog box. Next, you can install the Windows 7 operating system on the virtual machine. The whole process is described in detail in our article.

So we connected the Hyper-V virtual machine to our operating system and installed Windows 8 on it, the Internet is present on the virtual machine. In the same way, you can install Windows 8 on it.


How to create a virtual hard disk in Hyper-V
Friends, a virtual hard disk in Hyper-V can be created not only in the process of creating a virtual machine.
In the main window of the virtual machine, select Create -> HDD


Select the disc format. You can choose a new hard disk format, but note that it is not supported by early operating systems prior to Windows 8

Select a disk type. You can create a fixed partition disk that is considered higher performance

Specify the location of the virtual hard disk, if you have little free space on the C: drive, then place the virtual hard disk on the D: drive. Click on the Browse button and select drive D:

Disk setup. If we create not a dynamic expandable virtual disk, but a virtual disk of a fixed partition, then we must specify the exact size of the disk, if we specify the size of 127 GB, then exactly how much our virtual disk will occupy on the D: drive. Make sure you have enough free space on your D: drive.
note per parameter Copy the contents of the specified physical drive, you can use it if you want to transfer your physical computer, along with all the settings, to a virtual machine!

The virtual hard disk has been created. When creating a new virtual machine in step Connect virtual hard disk we can mark the point Use an existing virtual hard disk, then click Browse and specify the location of the virtual disk -D:\New virtual hard disk.vhdx

Blue screen on creationvirtual switch in Hyper-V
Friends, several times I had to deal with the fact that in the new Windows 8.1 operating system in the Hyper-V virtual machine, when creating a virtual switch, the operating system went into a blue screen with an error:
The problem seems to be caused by the following file: fwpkclnt.sys UNEXPECTED_KERNEL_MODE_TRAP *** STOP: 0x0000007f.
I tried to solve the problem in various ways: by reinstalling the virtual machine, restoring system files, removing antivirus and firewall, updating drivers for all computer components, including the network card. Unfortunately, only changing the network adapter helped.
We talk about the goals, objectives and benefits of implementing virtualization based on MS Hyper-V
Hyper-V virtualization of physical servers, workstations, installation and configuration of Hyper-V for network virtualization, technical support - such tasks are often faced by Integrus specialists in their daily work.
Installing the Hyper-V hypervisor allows you to create an infrastructure for virtualizing servers, network segments, client machines, or individual applications. Thanks to Hyper-V virtualization tools, the work of the IT infrastructure becomes more efficient, security and fault tolerance increase, and maintenance costs are reduced.
Hyper-V hardware virtualization support allows servers to be concentrated on fewer physical machines(as experience shows, without virtualization, their resources are rarely used to their full capacity). An example from our practice - transferring a server to a Hyper-V virtual machine made it possible to deploy a server, terminal servers and databases on a single physical server at the same time, respectively, the customer managed to save money on the purchase of "extra" equipment and its operation.
The Hyper-V virtualization system will help create public cloud resources of the company and flexibly manage their use. For greater security and protection of Hyper-V virtual servers, there is a technology for shielding virtual machines (Shielded virtual machines).
One of the security measures can be considered use on Hyper-V client PCs, physical machine virtualization. At the employee's workplace, we transfer the physical machine to the Hyper-V virtual environment, deploy two virtual machines (VM) - work and personal. On the working one, we set up all the necessary access restrictions and security policies adopted in the company, and on the personal one, the user can do whatever he wants, while the company's data will remain completely safe, because. VMs are isolated from one another. Built-in support for Hyper-V virtualization is available in Windows 7, 10 Pro, or Enterprise.
Installing and configuring Hyper-V Server 2012 and a Remote Desktop Virtualization Host will provide users with personal virtual desktops - a ready-made working environment with access to it from anywhere in the world, will allow you to centralize administration and control all user data flows. And live VM migration tools will make it possible to migrate Hyper-V virtual machines almost imperceptibly to users.
You can use virtualization with Hyper-V to simulate physical computing environments in which the application should function. There is no need to buy and maintain all the hardware that would be needed if the environment was physically recreated, it is enough to install Windows Hyper-V and simulate all the necessary components.
Server Virtualization with Windows Server Hyper-V will help reduce the impact of downtime, since the virtual server is not tied to physical equipment that can fail. In the event of a failure, it can be quickly and easily run on redundant hardware (best if Hyper-V Windows networking is configured and a failover cluster of servers is in place).
The Hyper-V hypervisor is distributed free of charge, it can be downloaded from the Microsoft website, it is installed on any Windows or Linux server. They are easy to manage and simple to use.
Contact us for a free consultation. Call or write to us and we will tell you in detail:
Integrus specialists are ready to configure Hyper-V virtual networks, create or migrate a VMWare virtual machine to Hyper-V. The cost of work depends on the scale of the project.
Where to find and how to activate hyper-V. Create a virtual machine and install an operating system.
Each new release of Windows brings not only new features and ways of working, but also new challenges. One of these problems is maintaining compatibility with the usual older software.
Windows 8.1 Pro and Windows 8.1 Enterprise include Hyper-V virtualization technology. This technology is the latest Microsoft virtualization client ported from Windows Server. And it's powerful enough to make your legacy software work again.
However, virtualization also does not support compatibility with very old software, since it also has its own limitations based on software stability, updates for deployment, and providing customized production environments for users.
Attention. For hardware compatibility, Hyper-V is only available on 64-bit editions of Windows 8.1 Pro and Enterprise.
It should be noted that virtualization is an optional feature and is not used by regular users. This does not mean that you will harm or damage your Windows installation, but it is still worth being careful.
There are several reasons for using a virtual machine. And one of them, as mentioned above, is the use of outdated software. If you need to use software that works well in Windows XP but doesn't work in Windows 8.1, install a copy of Windows XP in a virtual machine and continue using that software.
The VM can be used to test scenarios. Let's say you want to patch or update your computer's programs, but you're not sure how they work with your existing software. To reduce risk and ensure software compatibility, first test it in a virtual machine.


Attention. Storing the virtual machine on a drive other than the Windows 8.1 installation excludes it from the backup image, reducing the total size of that copy. Another plus is the ability to “pick up” unaffected VM settings when reinstalling the system. However, placing the VM on the same partition as the installed copy of Windows also has its advantages, such as being included in the backup image.


For example, 512 MB of RAM is enough to install in a Windows XP virtual machine. However, if you plan graphics work in it, more memory will be required. If your computer has 4 GB of memory, you should not specify more than 1 GB for the virtual machine. If you have 8 GB, you can give away 2 GB.
And also there is the possibility of using dynamic memory. This feature will allow the VM to automatically allocate additional memory as needed. You may find this option useful as it is used only when necessary. Click "Next".

If you want to completely isolate the operating system, there is no need to configure the network adapter to work with the VM.
However, this will not only completely isolate the virtual machine from the outside world, but will also prevent you from opening files and documents on the computer. You will also not be able to get to the virtual machine using Remote Desktop.
Attention. At this time, you won't be able to add network connections because networks in Hyper-V must be configured independently of individual VMs. Virtual machines can communicate on individually configured networks that give them access to the Internet, to a local computer, or only to other virtual machines. In this case, when installing and configuring the virtual switch, you need to install integration services in the VM.


After starting the virtual machine, you will see a window with a virtual OS running inside it.
When you start the virtual machine, you will see a dialog box with connection options. Where you will be asked what screen resolution you want to use to run the virtual machine. The screen resolution is adjusted by the slider, up to your full screen resolution. This is useful for starting the VM depending on what you are doing in it, without resorting to changing the monitor resolution in the properties of the virtual machine. At the bottom of the dialog box, there is a "Show Options" button that includes basic settings, including audio for the VM.

So Windows 8 is officially presented and its active distribution begins. Accordingly, at least some of us will soon be faced with the question: is it worth updating the existing OS?
Indeed, pre-installed on a new PC (even the most ordinary, and not a modern hybrid-transformer), Windows 8 will certainly not cause much rejection, because its “desktop” part is not much different from Windows 7. The lack of a Start button can be easily compensated for with one from third-party utilities, many of which can almost completely hide Metro, so that you will rarely have to deal with a new interface (which I still find inappropriate on a desktop computer or a regular laptop). And some of the new features in Windows 8 are definitely useful: secure boot, improved emergency tools, a new task manager, differentiated wireless networking, and so on.
But from the point of view of the current Windows 7 user, the situation is far from clear. Yes, Windows 8 is more modern, a fraction or a few percent faster, it has some additional usefulness, but the transition to it will require not only money, but also time (which in many cases are the same thing) - to study, master new techniques, arrangement of the working environment, solving problems of compatibility of familiar software. In the forums, you can often find an opinion like that, they say, it's okay, you quickly get used to it - the question is: for what?
In fact, Windows 8 has some features that can please even the most conservative PC user. And this, of course, is not Metro at all, which (together with the WinRT API) is certainly the most fundamental change in Windows 8, but is relevant only for relatively small touch-screen devices, primarily tablets. There are more practical novelties, one of which is the built-in virtualization system based on the Hyper-V hypervisor.
Hyper-V technology came to Windows 8 from Windows Server. Formally, it is intended to replace the obsolete Virtual PC and XP Mode, but in fact it has a slightly different positioning and more differences than similarities. Hyper-V is simply referred to as a hypervisor, although the term (synonymous with virtual machine monitor, VMM) applies to all virtualization systems. Therefore, to avoid confusion, they are divided into two categories - Type 1 and Type 2. Hypervisors of the first type are also called bare-metal, i.e. running directly on the hardware, without a general-purpose parent OS. This includes Microsoft Hyper-V, VMware ESX/ESXi, Citrix XenServer, Xen, KVM. The second type, respectively, functions as an application within the parent OS and uses its various mechanisms. Examples are VMware Workstation/Player, Oracle VirtualBox.
Hypervisors of the first type are technologically more complex, but also more efficient in the sense that they provide a minimum of overhead costs, as well as maximum isolation of virtual machines (VMs). That's why they won recognition in the server environment. However, this does not mean that they will not find applications on the client PC. For example, as a typical scenario, they usually consider the use of two VMs - personal and work. In the first, the user does what he pleases, in the second, strict security policies and other restrictions are applied, since it provides access to company data. Isolating a VM virtually eliminates cross-infection with viruses, Trojans, etc. In the case of a type 2 hypervisor, for example, a cunning keyboard typing interceptor that has penetrated the parent OS can potentially steal information from the VM as well.
Therefore, the class of "client hypervisors" was formed a few years ago, as virtualization technologies improved, primarily hardware support. Its typical representatives were NxTop from Virtual Computer and XenClient from Citrix. Today, both technologies are owned by Citrix and combined in various solutions increasingly aimed at the corporate market. Why is it necessary to talk about a separate class of software? Because server solutions are not well suited for functioning on a PC and for use by ordinary users. After all, client solutions require not only support for mass equipment, but also specific interface solutions for working within a single PC, while the server model involves almost exclusively remote access.
Microsoft quite unambiguously calls the hypervisor built into Windows 8 Client Hyper-V, but its differences from the server Hyper-V are much less than, say, XenClient from XenServer. The fact is that while Citrix had to implement the interface part from scratch, as well as the virtualization of the video adapter, in order to provide 3D support in one of the VMs, Microsoft's task was much easier due to the originally peculiar Hyper-V architecture:
As you can see, the Microsoft hypervisor still assumes a parent, or root OS (sometimes also called a “partition”), in which it is actually built. This OS, accordingly, is in a special position, in particular, although it is partly virtualized (as can be seen from some characteristic features), it still has access to a video accelerator and many other equipment. For comparison, the XenClient architecture looks like this:

In fact, there is also a privileged VM here, designated as Control Domain, but it is specialized, designed only to organize access to other user VMs. In the case of Client Hyper-V, the root OS is assumed to be the main working one, since only it will fully operate the graphics accelerator and provide maximum performance.
A notable difference between client Hyper-V and server Hyper-V is its ability to work with wireless adapters. In a server environment, this feature is not in demand, and therefore is not supported, but for a client environment it is the norm. The complexity arises because the Hyper-V network infrastructure is based on a virtual switch, which differentiates packets based on the MAC addresses of virtual adapters. This scheme works great when organizing an internal network, as well as providing access to the outside through a wired physical adapter:

But packets with different MAC addresses cannot be transmitted over a Wi-Fi channel, so the standard scheme had to be slightly adjusted. More specifically, another intermediary in the form of a network bridge was added to it:
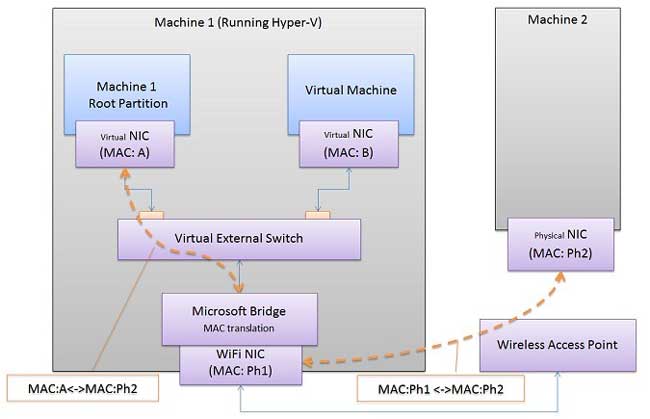
The bridge simply maps the IP address of the virtual network card to its MAC address, which ensures the correct routing of packets that come from the external network. Naturally, the bridge is created and configured automatically as soon as the user selects the appropriate settings.
Hyper-V is included with 64-bit Windows 8 Pro and Enterprise and is an optional feature. Accordingly, you first need to install it, after which it will immediately automatically activate (after a mandatory reboot):

For it to work, however, several conditions must be met. Formally, they talk about 4 GB of RAM, although it is quite possible that it will start on a smaller amount - the memory is needed not so much by the hypervisor itself as by virtual machines.
A truly fundamental requirement is a processor with support for virtualization and SLAT (Second Level Address Translation) technology. For a server hypervisor, SLAT is not a prerequisite and is only needed for RemoteFX to work. The latter technology is not supported in Client Hyper-V, but SLAT appears to be used to optimize overall performance in the absence of effective virtualization of the 3D accelerator in the VM.
All relatively new Intel and AMD chips satisfy this requirement, for example, almost all i3/i5/i7 - in their case, what they are looking for is called VT-x with EPT (NPT for AMD). You can check the presence of the relevant technologies in the processor specifications on the manufacturer's website, and this is where you should start when choosing the configuration of a new computer. However, keep in mind that they must also be enabled in the BIOS, while VT-x with EPT, for example, is often hidden under the general name "virtualization technology". Therefore, a more reliable check of compliance with all the conditions of an already finished system can be performed using special utilities.

In this case, VT-x with EPT does not seem to be supported (contrary to the information from the processor specification), but this is only a consequence of the fact that Hyper-V is already activated on this computer. This indirectly also testifies in favor of the fact that the root OS is still being virtualized. By the way, the fact that the virtualization technology is already enabled by the hypervisor makes it impossible to use another virtualization system in parallel - both VMware Workstation / Player and Oracle VirtualBox will report that the installation is impossible. On the other hand, VMware Workstation 9 allows the use of Hyper-V in a VM, although this scenario is not officially supported.
Perhaps the most universal way to find out the presence of the necessary virtualization technologies is Mark Russinovich's Coreinfo utility. It must be run with administrative privileges and with the -v switch.
In the absence (for any reason) of SLAT support, the Hyper-V Platform item in the list of optional components will simply be unavailable, and therefore Hyper-V will not be installed.
Intel has another virtualization technology in its arsenal - VT-d, but Hyper-V (both server and client) does not yet use it. Unlike, for example, XenClient, which needs it just to support 3D graphics in one of the VMs. But, as mentioned above, Microsoft achieves the same result in a different way.
After Hyper-V is installed, work in it is carried out from the Hyper-V Manager (Hyper-V Manager):

The server itself does not require special configuration, except that it is worth considering where the files of virtual machines and disks will be stored and, if necessary, adjust the location. This is done in Hyper-V Settings:

Some configuration is required only in the latter case - you need to select the correct adapter (if there are several) that will provide access to the local network or the Internet.

After that, you can create virtual machines. This process is controlled by a special wizard, which will guide the user through the main steps.


The process provides a minimum of settings, in addition, you need to pay attention that, unlike other virtualization systems, the type of future guest OS is not indicated. That is, approximately the same virtual equipment is offered for all occasions. However, it can be adjusted somewhat in the VM Parameters. Most often, you may need to add a "legacy" network adapter (for compatibility with some guest OSes), adjust dynamic memory settings (more on this below), add virtual processors, connect additional virtual hard disks, or change their type (dynamic ones are created by default, then both fixed provide slightly better performance, and differencing allow you to keep the original virtual disk unchanged).


Having configured all the necessary parameters, you can proceed to install the guest OS. Officially as the latest, Hyper-V supports all client and server versions of Windows starting from XP and 2003, respectively, as well as CentOS 6.0-6.2, RHEL 6.0-6.2, and SLES 11 SP2. It is assumed that all these operating systems correctly identify virtual hardware and, in addition, Hyper-V integration components are available for them, which provide a number of additional drivers and support for specific operations. This, however, does not mean that other operating systems cannot be installed. Some time ago, Microsoft gave the code needed to interact with Hyper-V to the Linux community and became one of the official developers of the free OS. Thus, today some distributions are already ready to work in the Hyper-V environment without additional efforts, in particular, this applies to the latest versions of Ubuntu (12.04 and 12.10 for sure), although in my case the IP parameters had to be set manually, get them via DHCP why - it didn't work. But then everything went absolutely smoothly:
There are two ways to work directly with a VM:
In the latter case, of course, you must first allow remote access in the guest OS. Unfortunately, as already mentioned, RemoteFX is not supported in Client Hyper-V, so graphics acceleration is only possible in the root OS. In the guest rooms, this drawback is partly compensated by the RDP capabilities, which provide support for some graphic effects, as well as sound transmission, USB device redirection, file exchange between the host and the VM via the clipboard, etc.

These features are fully revealed if Windows 8 also acts as a guest OS. In this case, a multi-touch touch interface will be supported (if the appropriate hardware is available), a menu with specific commands will appear.

Having migrated from the server environment, Client Hyper-V has lost some of the "corporate" features. In addition to the already mentioned RemoteFX technology, clusters, live migration, replicas, etc. have disappeared. Of the non-trivial functions, the ability to move a virtual machine to another location (for example, to a new hard drive) without having to turn it off remains:

Dynamic memory has also been preserved. This feature implies adjusting the amount of RAM of the VM depending on its current needs and settings. As always, a number of conditions must be met for its functioning. First, the guest OS must support hot-add memory. This is true for most modern operating systems, both server and client, in particular - for all Windows, starting with Vista SP1. Second, the integration components must be installed. Among the latter, the dynamic memory driver plays an important role:

It takes over the free amount of RAM and returns it to the hypervisor for subsequent redistribution.
Dynamic memory must be specifically enabled for each VM, and detailed settings can be configured:

In particular, the “memory weight” should be understood as the importance, value of a particular VM. The higher this parameter, the less likely it is that memory will be taken, and the sooner it will be added if possible. You can control the operation of the dynamic memory mechanism in various ways, for example, using a special tab in the Hyper-V Manager:
It is also worth paying attention to the possibility of saving the state of the VM, creating snapshots of the VM for a simple rollback to previous states. The import feature makes it easy to copy and transfer VM files, and then quickly connect it to Hyper-V.
Despite a number of limitations, client Hyper-V has the same scalability as server Hyper-V. In addition, virtual machines are fully compatible and are easily transferred. This, in particular, makes it possible to use a personal computer for testing and debugging VMs so as not to "clog" the production virtualized server.
The persistence of the architecture and overall organization of Hyper-V in Windows 8 also indicates that Microsoft's client virtualization is more focused on IT professionals and developers than on the average user. Unlike Windows 7's XP Mode, where publishing applications made it possible to almost completely hide the VM, in Windows 8 the user will have to work directly with the VM and understand its capabilities and limitations. By and large, the current Client Hyper-V does not quite fit the idea of client hypervisors. Still, this is a server technology, just slightly adapted for the PC.
On the other hand, the server origin of Client Hyper-V is also its strength. High scalability, support (unique for client solutions) of dynamic memory and some other technologies testify to well-functioning and a large "margin of safety".
VMware Workstation and Oracle VirtualBox are definitely more "client" than Hyper-V. Their advantages include 3D graphics in the VM (although Oracle's is not very good) and wider and more convenient support for USB peripherals. In addition, both products have more modest system requirements, in particular, they can work in 32-bit operating systems, although 64-bit ones are preferable in terms of memory management efficiency. Microsoft can fill most of the gaps with RemoteFX technology, but so far its intentions are unclear.
Nevertheless, even with all the caveats, Hyper-V as part of Windows 8 will be a pleasant “gift” for many and will certainly find many uses.


