For various reasons, sometimes you need to reinstall Windows. And sometimes, if you need to do this on a laptop, novice users may experience various difficulties associated with the installation process itself, installing drivers, or other nuances that are unique to laptops. I propose to consider in detail the reinstallation process, as well as some approaches that may allow you to reinstall the OS without any hassle at all.
See also:
Almost all laptops currently on sale allow you to reinstall Windows, as well as all drivers and programs in automatic mode. That is, you only need to start the recovery process and get the laptop in the condition in which it was purchased in the store.
In my opinion, this is the best way, but it is not always possible to use it - quite often, when I come to a computer repair call, I see that everything on the client’s laptop, including the hidden recovery partition on the hard drive, has been deleted in order to install a pirated Windows 7 Ultimate, with built-in driver packs or subsequent driver installation using Driver Pack Solution. This is one of the most unwise actions of users who consider themselves "advanced" and thus want to get rid of laptop manufacturer programs that slow down the system.
If you have not yet reinstalled Windows on your laptop (and did not call would-be wizards) and it has exactly the operating system with which it was purchased, you can easily use the recovery tools, here are ways to do it:
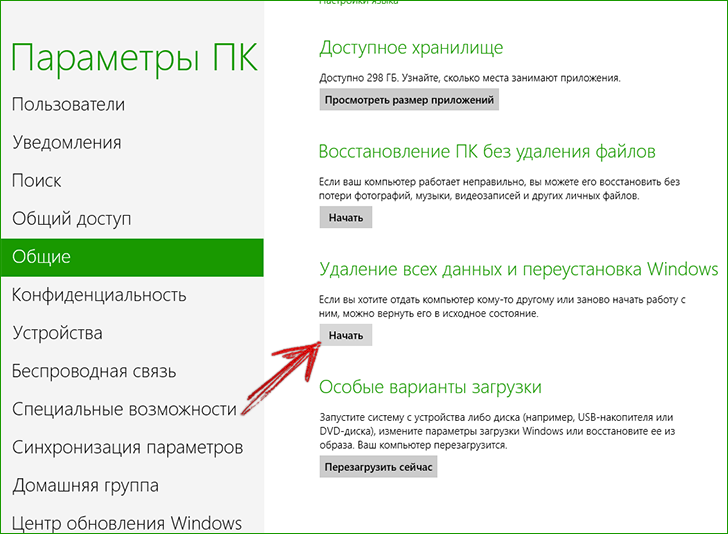
Thus, I recommend reinstalling Windows on laptops using the methods described above. There are no advantages to various builds like ZverDVD compared to the preinstalled Windows 7 Home Basic. And there are plenty of shortcomings.
However, if your laptop has already been subjected to inept reinstallations and there is no recovery partition, then read on.
First of all, we need a distribution kit with the required version of the operating system - a CD or USB flash drive with it. If you already have one, then great, if not, but there is an image (ISO file) with Windows - you can burn it to disk or create a bootable USB flash drive (see). The process of installing Windows on a laptop is not very different from installing on a regular computer. You can see an example in, which is suitable for both Windows 7 and Windows 8.

Upon completion of the installation, you will need to install all the necessary drivers for your laptop. In this case, I recommend not to use various automatic driver installers. The best way is to download laptop drivers from the manufacturer's website. If you have a Samsung laptop, then go to Samsung.com, if Acer - then go to acer.com, etc. After that, we look for the “Support” or “Downloads” section and download the necessary driver files, after which we install them one by one. For some laptops, the order in which drivers are installed is important (for example, Sony Vaio), and there may also be some other difficulties that you will have to deal with on your own.
And if you decide to install the "seven" on your laptop for the first time, be prepared for the fact that this version of Windows consumes much more resources than, for example, XP. That is, if the laptop previously worked under xp, then before installing the seven, you should compare the system requirements of this version of the operating system and the resources that your laptop has.
Now let's talk specifically about the reinstallation process itself.
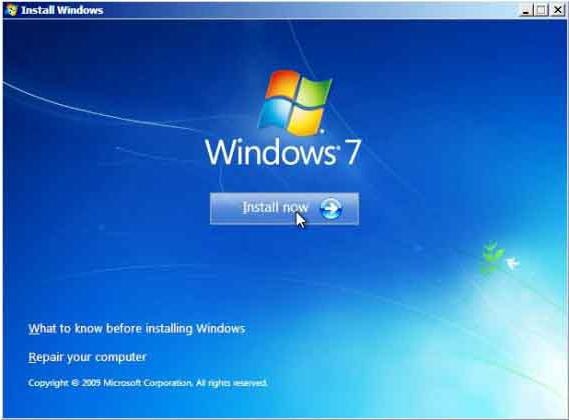
How to reinstall windows 7 step by step on a laptop? So, if you are a happy owner of a licensed "seven", then you just need to insert the disc into the CD-DVD drive and run the installer from it. When the license key is required in the process, we find it on the box from the CD or DVD with the operating system and enter it. And now we have a licensed version of the OS.

But what will we do if we do not have an installation disk? Use the old and cluttered with various "garbage", unnecessary files and viruses Windows further? Naturally not!
There is a way out of this situation. you just need to find and download the required version of the operating system from the Internet. It should be a boot disk image. It, in turn, should be run using a CD / DVD drive emulator program. It is quite easy to find it on the Internet.
After that, insert a blank disc into the optical drive. Using the emulator program, we write the image obtained on the Internet to disk. When the recording is completed, you will have your own installation disk for reinstalling Windows 7 not only on a laptop, but also on a computer.
All this can be done only if your laptop is in good working order and it has not yet been completely "killed" by virus attacks. If you can’t download the disk image or Windows doesn’t boot at all, then there is another solution to the problem - reinstalling through the BIOS.
How is windows 7 reinstalled on a laptop in this case? Here you should already perform some BIOS settings to boot from the installation disk. Further - everything is according to the instructions.
Press the laptop power button, insert the disk into the drive. At the same time, press the DELETE or F2 button several times in a row. If you do everything right, a blue Bios window should appear in front of you.
There we find the inscription Advanced Bios Features, go to this menu. Next, opposite the First Boot Device, we put CD-ROM. Thus, we select the device in the system that will boot first when the computer is turned on.

Most mobile computer manufacturers create backup storage for distributions of the seven or any other OS. Reinstalling Windows 7 on a laptop from these areas of memory is performed using the built-in utilities.
To start the reinstallation, restart the laptop and click:
After pressing the desired key, instead of the standard 7, the OS recovery interface will open:
After downloading the program, follow the instructions to restore Windows.
But remember that all settings will be reset, and data from the previous copy of the system may be deleted.
When reinstalling from a disk, remember that in order to restore a license, you need to use a distribution kit with exactly the same OS that was installed earlier. You can find out the version of the installed system on a sticker, which is usually located on the back of the laptop. By the way, the license key of your copy of Windows is also located there.

Remember that when reinstalling from a disk, a new operating system is deployed, and in order to avoid problems in the future, it is worth deleting the data of the previous Windows.
This is implemented by formatting the system partition, so take care in advance to transfer all the necessary data from the selected hard disk volume to install Windows. Installed programs are not desirable to be transferred, as this loses connection with the registry, and many of them may not start. Don't be lazy, install them again after changing the OS.
The distribution of the installation disk does not include drivers for all laptops, so download the drivers for your device in advance on the manufacturer's official resource. If this is not done, then after installation, the following problems are highly likely to occur:
If you reinstalled the OS without this, then to troubleshoot network equipment, you will have to download the driver distribution using another computer and transfer them using removable media, so before reinstalling, do not forget to play it safe and download drivers for the network card and Wi-Fi module.
To start the installation process, insert the disc into the drive and restart the laptop. After starting the computer, open the boot menu, where you should choose to boot from the DVD.

This dialog is called on most laptops using the F12 key, and on hp devices, the F9 + Esc combination is used.
Often this feature is not available on outdated computers, so you will need to open the BIOS and edit the boot priority yourself. To enter the BIOS on laptops, manufacturers use the following keys:
If the brand of your device is not in this list, then find out the actual key for it on the window that loads when you turn on the PC.

The BIOS interface from different manufacturers is not similar in appearance, but the sequence of actions for changing the boot priority is almost identical. Navigation through the windows of the running BIOS of all versions is carried out using the arrows on the keyboard and the keys Enter , Esc , + , - .
The sequence of actions for BIOS AMI:

The sequence of actions for BIOS Phoenix-Award:

Windows installation
After making changes to the BIOS and rebooting, a dialog will appear with the message: "Press any key to boot from CD or DVD".
Further installation of Windows 7 is not difficult, do the following:
Reinstalled Windows is ready to go. If you changed the boot priorities in BIOS, return the hard drive to the first place in the list, otherwise the computer will constantly try to start from the DVD.
Many compact PCs, such as netbooks, do not have a DVD drive. Therefore, the question arises of how to properly reinstall Windows 7 on them. The answer is simple - use removable media.
To reinstall from a USB flash drive, you need to download the Windows 7 distribution image in ISO format and burn it to this media using a special utility. Remember, in order to properly reinstall a licensed Windows system, you need to download a container with the same OS version. The flash drive itself must be at least four gigabytes in size.
Burning Windows to media using the most popular utility among analogues UltraISO performed according to the following algorithm:

The installation flash drive is ready, but in order to start the installation, you need to select " USB-HDD". How to configure the BIOS is described above, all actions are similar, only you should select another entry from the existing list. Further installation is no different from installing Windows 7 from DVD.
Often after reinstalling Windows does not work. To solve this problem, take a different OS distribution and repeat the installation process. In addition, many users ignore the need to format the partition and reinstall the seven on a disk that already has an installed copy of the system. Avoid this, because it can also cause problems.
This article has covered reinstalling Windows 7 in several ways. If there is no backup, then this procedure should be carried out from a disk on which exactly the same version of the OS is recorded. Some laptops do not have a CD-ROM, so reinstallation can only be done using external media, for example, from a USB flash drive.
How without a disk? This topic is relevant today. Especially as it concerns the new OS developments that have appeared not so long ago. And now in more detail! Windows 7, or simply "seven", is one of the latest operating systems from Microsoft, and at the same time the most successful of them. At least that's what many experts think.
7 without disk? installation of any operating system occurs from a hard drive. And besides the disk, a drive can be used as it. The option to install from a flash drive is quite reliable. As with a disk, the host system is installed at a lower level in the computer's software hierarchy. In other words, "from under the old system." In addition, this method of loading a new "OS" allows you to format the hard drive on which the old system was located. This will protect the OS from old programs that can be malicious, as well as from “undeleted” parts of files that are invisible at first glance, but remain in the system and interfere with its normal operation. Such "scraps" of unnecessary documents hinder the speed of the system. There may be malfunctions. You should consider how to reinstall Windows 7 without a disc and without a flash drive.
The standard installation method is not always possible. For example, if there is no disk, but there is an OS file on the computer or laptop itself. What to do in such a situation? How to reinstall Windows 7 without a disk and flash drive on a computer? The system file can be in the form of an image, an archive, or just an installer. To install the system from an image, you must run a special program. It is necessary for reading / writing exactly this kind of formats. For example DaemonTools. After running the image in the program, mounting it, you should select the installation file. If the OS is available as an archive, then you do not need to unpack it. How to reinstall Windows 7 without a disk and flash drive on a computer in such a situation? Click on the archive and select the installer file in It has the permission ".exe". This file is located mainly towards the end of the list of archive contents. The launch of the installer will be no different even if the operating system simply lies in a folder.

If you are installing a working system for the first time, you should consider some rules. You need to know them if you need to answer the question of how to reinstall Windows 7. Without a disk, this will be done or with it - it does not play an important role.
Firstly, the installation of a new OS may occur due to a virus infection of the computer. This is a useless process if it is not accompanied by formatting. The fact is that infected files do not disappear with this type of installation of the main working environment. They are stored in the previously installed system. Subsequently, they will simply switch to a new shell.
Secondly, the best, and most importantly, the safest way to install is still to use a hard drive. Reinstalling Windows 7 without a disc in such a situation is not difficult. It is enough to have a bootable flash drive. If it does not exist, then it is created using simple steps. Especially for this, there is a program that writes images to media. For example, Ultra ISO. Accordingly, if the files are not in the disk image format, it should be created. Usually, the same Daemon Tools are used for this.
How to reinstall Windows 7 without a disc on a laptop or computer? It should be remembered that when installing a new system, you should always use only verified files. The fact is that with modern progress, handicraft assemblies are found everywhere. Downloading Windows 7 from the Internet, no one can say with certainty that it is not "wired" with malicious software.
How to reinstall Windows 7 without a disc on a laptop or computer? Let's see how to do it in the simplest way. We find the folder with the operating system, run the installation file. This will open the installation window. It will display the option to configure the following options:
For our country, of course, everywhere you should choose the option with the Russian language.
After clicking the "Next" button, a window with the "Install" button opens. By clicking on the installation, go to Accept it by checking the box next to the corresponding inscription.
The installer can contain multiple system options. Most commonly used:
If you wondered how to reinstall Windows 7 without a disk and flash drive on a laptop or computer, then you should understand that this is an incomplete list of possible systems.

All programs of this type differ in their bitness, that is, 32-bit (X86) and 64-bit (X64). This parameter is specified after the system name. For example, Windows 7 Ultimate X86.
The choice of the category of the installed system should be done, guided by the power of the computer's resources. If the laptop or PC is relatively weak, it is recommended to install OS X86 (32-bit version). Installing Windows 7 X64 is best if the RAM size exceeds 4GB. The thing is that the 32-bit version is simply unable to "see" such a volume.
Let's get back to how to reinstall Windows 7 without a disc. The next window of the OS installer will offer a complete option for your computer and update. It is necessary to make a choice in favor of the full installation. Otherwise, only the upgrade of the pre-existing operating system will occur.
After selecting the preliminary parameters, a window appears with the option to select a hard drive. With this method, it will not be possible to format it. This is due to the fact that the installer was launched from a running system. If it is necessary to format the disk, which is desirable when installing the OS, then this moment can be bypassed. It happens in the following way. Until the installation of the new "seven", take any other partition of the disk and clear it of files (move it if you need it, and just don't touch it if you don't need it). After that, format the partition. You should not change the drive letter in this situation. When answering the question of how to reinstall Windows 7 without a disk and a flash drive on a laptop or computer, it should be borne in mind that when the new system is loaded, the drive letters will change automatically. A formatted partition should be selected for system installation.

If formatting is not necessary, you can simply select the disk to install the new system on and continue. In this situation, the old system will remain in the "Windows old" folder. It will be located on the "C" drive. It will also be possible to start and work from it. But it is not recommended to do this, since two identical operating systems on the same disk may “conflict”. This, in turn, will lead to a malfunction. The old OS can be removed or moved to another medium. There is another very significant point here to keep in mind when answering the question of how to reinstall Windows 7 without a disk on an Asus laptop, Lenovo, HP, etc.
If the partition on which the new OS is being installed does not have enough space for two operating systems, the installation process will fail to start. This is because the old shell is not removed and continues to take up space. It is important to remember that frequent reinstallation of the operating system leads to disk destruction. This can be avoided by using various types of defragmenters. For example, the program Victoria.
This problem is not so terrible for computers. There is nothing easier than buying a new hard drive and installing it. This is easy to do on your own. However, if the hard drive is broken on a laptop, then, in addition to the cost of the disk itself, you will have to pay for repair services. You should know about this if you are interested in the question of how to reinstall Windows 7 without a disk from a USB flash drive.
After selecting the disk (partition) for installation, click "Next", which will lead to unpacking and subsequent installation of the new Windows 7. This process is fully automated. It will last for 25-30 minutes, depending on the power of the computer (laptop). After completing the installation, you need to enter the following parameters:
If the input is incorrect, the system will tell you about it and ask you to correct the characters, indicating an error.

During installation, you will be prompted to assign a password and a hint in case you lose it. After that, a window pops up in which you should enter the key to activate the operating system. If it is not available, simply click "Next", after unchecking the box next to "Activation when connected to the Internet". Then it will be possible to activate the system in any convenient way. This is done as follows:
Let's return to the question of how to reinstall Windows 7 without a disk on a computer or laptop. The next step is the security settings. You can use the recommended service, or you can postpone the decision and configure later. Protecting your computer is one of the most important points in installing an operating system. The fact is that the security of the equipment will depend on how well you restrict access parameters from other people's devices. This menu is nothing more than a proposal for choosing a data protection set formed by Microsoft specialists. It should be understood that the recommended parameters are already provided and set in them. By skipping this point, many people forget to manually configure in the future, exposing their files to danger.
So, having decided on security, click "Next" and set the time and date (time zone, etc.) in a new window.
Next, the installer displays the network settings window. It can be either home or public. Due to this, the parameters in the browser properties change. As for the general understanding, the home network looks more conservative in terms of configuration. A public network, on the other hand, provides more access to the resources of a laptop or computer.

This was the last step, after which you will get an almost empty desktop of the newly installed Windows 7 operating system. Basic settings (for example, add the "My Computer" folder or user files to the desktop) can be done by left-clicking on the desktop space and by selecting the "Personalization" tab.
There you can also set a different background image, change the default theme (usually Windows 7 Aero), change the screen resolution and much more.
Standard 7 comes without additional programs. However, among the numerous assemblies, you can find options that include many additional items, software, and so on.
This article described how to reinstall Windows 7 without a disk and a flash drive. You will install it on a netbook, laptop, computer - it does not play a big role. The principle of the process of installing a new system is the same.


