If your cherished dream has finally come true, you have become the owner of the best iPhone, you will face the problem of how to move all contacts from Android to iPhone. There is nothing surprising. This is necessary to continue communication with all your relatives, friends, work colleagues. However, few people know how to transfer. Especially the minimum amount of information is owned by those lucky ones who had an old Android a few hours ago. There are no problems that cannot be fixed. We suggest that you familiarize yourself with the recommendations that will help you understand the sequence of actions that allow you to quickly and easily transfer contacts to a brand new iPhone.
Rules for transferring contacts from Android to iPhone.
When purchasing new devices, everyone experiences incredible joy from the fact that he became the owner of a “miracle technology”. However, I really want to have on the new iPhone all those programs that were previously installed on Android, since they are already used to them, they have repeatedly helped to solve various everyday tasks, and have been faithful companions in organizing pleasant leisure. Only at first glance, such a process may seem simple, but when it comes to the practical side, questions immediately arise. If all kinds of programs, utilities can be re-installed on an iPhone, in the same way you can install your favorite gaming applications, then hardly anyone will agree to say goodbye to the phone book that they have been collecting for years. It is for this reason that we recommend that you carefully study the instructions on how data is transferred, including contacts.
First of all, the transfer of contact data is carried out using the Google cloud storage. So, to start the main part of the manipulation that is important for you, do not forget to synchronize your Android with the Google Contacts service. If you have not managed to become the owner of a Google account before this time, do not be too lazy to create it and follow all our further instructions. The Google Contacts service will be the best assistant for you in the future, despite the fact that you are now. We suggest that you study the list of all the actions that you just need to follow sequentially:
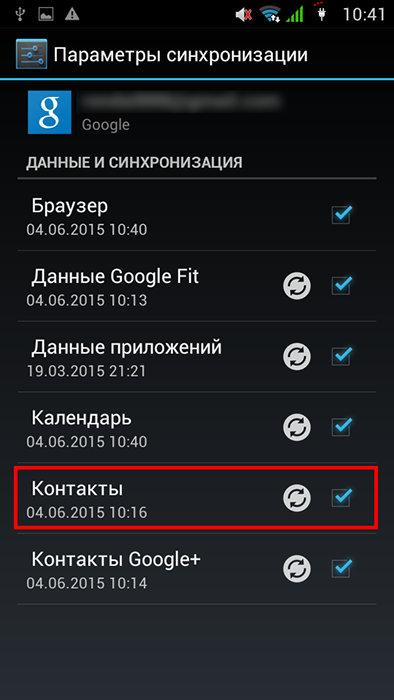
After performing such simple actions, the synchronization process starts and is carried out automatically. You just have to wait until it is completed. Now we pick up your iPhone, we also go to the “Settings” section, from there we move to “Mail, Addresses, Calendars”. Here you will find the "Add account" button, click on it and follow on by pressing the "Other" button and then "CardDAV account for contacts".
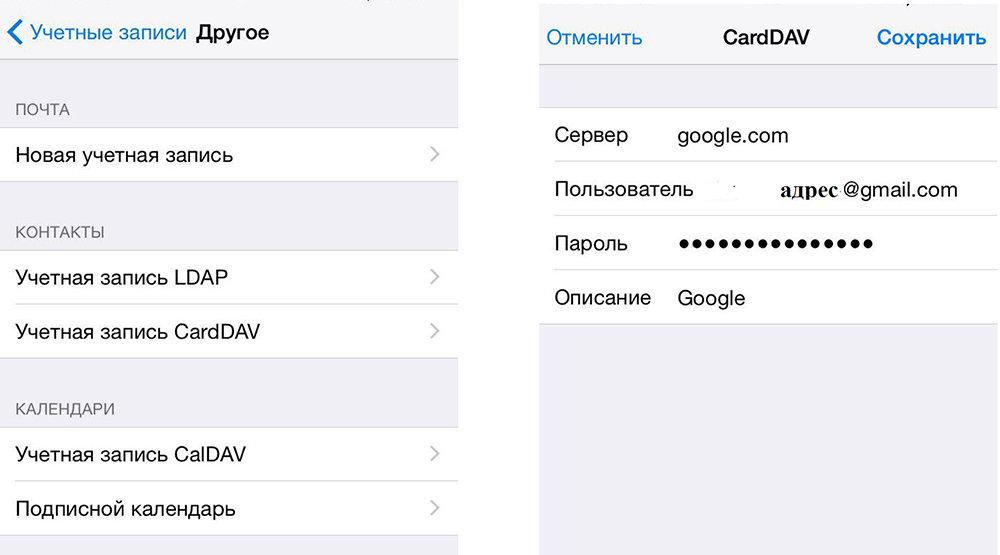
The system will require you to enter data, obey this and click the "Forward" button. Now, again, the moment has come when you need to be patient and wait for the completion of the running process. It's worth it, because after completion, all the contacts that were previously on your Android, you will find on your brand new iPhone.
A good assistant in solving such problems is the Move to iOS program, which allows you to easily transfer not only contacts from Android to iPhone, but also other data. To use this option, the Move to iOS app must be installed on both devices. Initially, we open it on Android. After launching the main menu, press the "Continue" button, perform all the actions that you will be prompted to, press three buttons in sequence:
Now take the device with iOS, on its screen at this moment the entry "" should be displayed. Once it appears, click Continue. In response, you should receive a code consisting of 10 or 6 digits. Even if at the time of waiting you find a message about the low quality of the network connection, just do not respond to it, but continue to wait patiently.
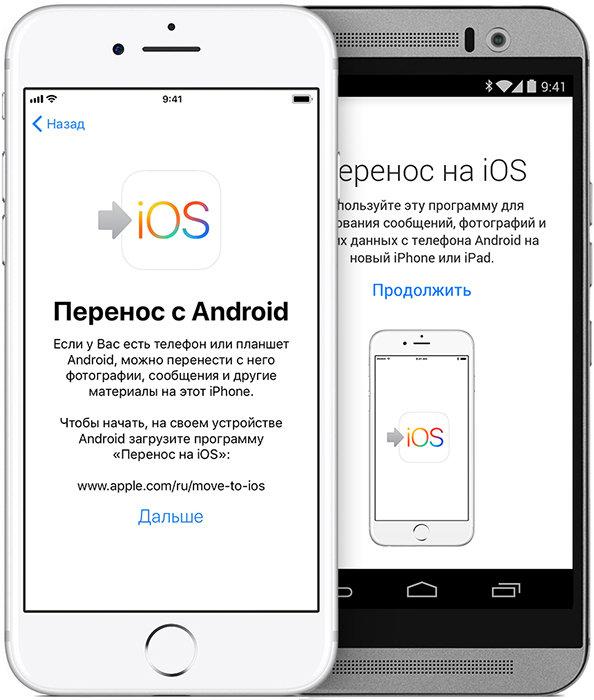
As soon as the code arrives, enter it in a special field on Android, then wait for the “Data transfer” to appear. As soon as this message appeared, consider that you have almost reached the goal. Select everything you need to transfer, click "Next" and wait. The transfer process can last for a different period of time, it all depends on how much information you instructed to transfer.
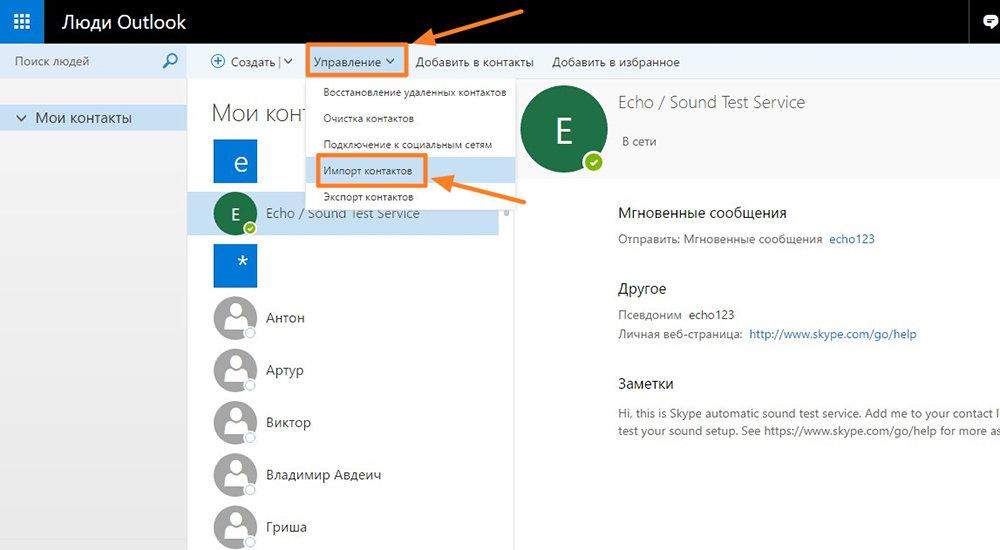
There are other options for transferring data, so if you are interested in how to transfer Android contacts to iPad, we will help you figure it out. So, if you need to transfer contacts from Android to iPhone, it is considered by many users as the best option. Of course, you first need to activate your account, then specify the "Outlook.com" service, and only after that start the synchronization process. Again, simple steps will make it easy to transfer contacts to your brand new iPhone.
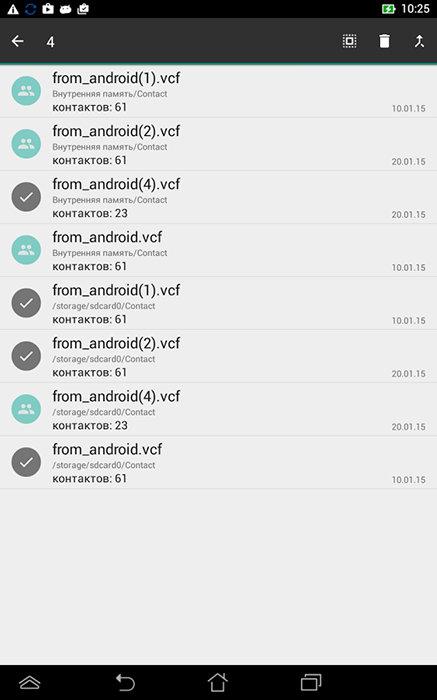
Everything that we have described above is somehow connected with the synchronization process. However, there are options for solving the task that do not provide for synchronization when transferring contacts to iOS. We note right away that both Android and iPhone easily work with files that have the .vcf extension. With this in mind, we suggest that you go to the "Contacts" section on your Android and find an option offering to import, and subsequently export. Before exporting, do not forget to specify on which specific drive you want to save the file. In this case, a .vcf file will be created and saved, acting as a reliable portable "storage" of all contacts. Note that the file with the .vcf extension is perfectly readable by programs installed on both Android and iPhone.
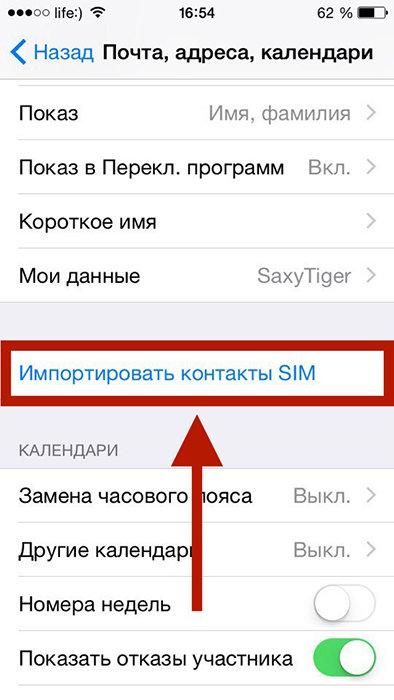
No need to think that you have to limit yourself only to transmission via Gmail, creating files with special permission. The possibilities of transferring contacts do not end there. You can also transfer Android contacts to iPhone 6 in this way, through iTunes. To do this, launch iTunes, connect your iPhone to your computer, find the "Information" button, and then go to the "Google Contacts" line. Next, the synchronization process will automatically start and you will be able to easily transfer all contacts. It will be even easier to solve such a problem if all contact details are stored on the SIM card. Grab your iOS device, go to Settings, go to the Contacts option, and select Import SIM Contacts. As you can see, transferring from a SIM card is not accompanied by any difficulties.
If you are interested in how to transfer contacts using third-party programs, we will suggest that, in addition to the official Move to iOS application, which we have already mentioned, there are other software features that make it easy to solve such tasks. The most common are:
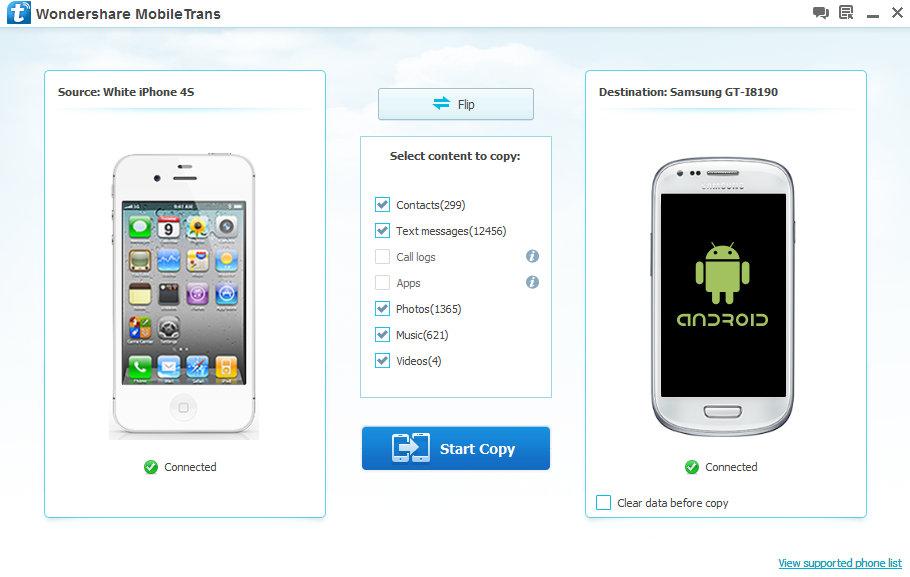
The program interface is quite understandable, so it will be easy even for a beginner to understand the principle of working with a particular application. It should only be borne in mind that many programs are not free applications, so you will have to pay for their use. If you don’t want to pay, look for free applications or use alternative methods that we have already proposed and reviewed.


