This happens for various reasons: the specifics of the work, the desire to learn new developments and other very diverse options. Therefore, in this article we will talk about how to properly install more than one operating system on a computer.
Perhaps we will consider a couple of the most popular OS bundles. I note right away that I will only give general description installation, without delving into its routine details. So let's go...
To set up such a link operating systems we need special software in the face of EasyBCD. If you just install these two operating systems, then the one that you installed last will boot. This is due to the fact that Windows simply “overwrites” the loaders of all operating systems that peacefully “lived” before it and leaves only one for “myself beloved”. Therefore, to begin with, we download the program Easy BCD (download ) and leave the installer on some neutral file disk, or you can download it after installing one of the versions of Windows. So, let's start installing the first version of Windows (7 or XP, no matter in what order). When the first version of Windows is installed, feel free to install the second. But, install it, preferably on a separate partition. After installing the second Windows OS, we boot and install the previously downloaded EasyBCD program into the system.
The program interface is quite simple and clear. A person who knows the basics in English can easily deal with this program.
When you start the EasyBCD program, you will see such a window in front of you (Fig. 1):

Fig.1
As you can see we have a bootloader Windows 7, which was determined by default, since this system was installed second and is the current one. Now we need to add a new entry to the bootloader so that when we turn on the computer, we can see the line with Windows XP and, accordingly, can boot from under it. To do this, click on the panel on the left "Add New Entry", then choose in paragraph Type required operating system this case this is Windows XP), and click, already on the right, Add Entry.

Fig.2
Everything, the entry in the bootloader has been added, and when you click on the item View settings, you will see that you already have two entries in the bootloader: Windows 7 and Windows XP. (fig.3)
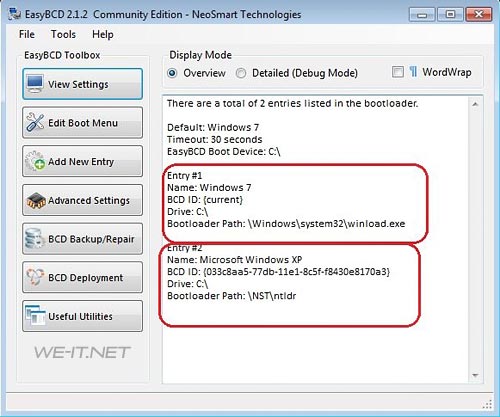
Fig.3
Now you can safely restart your computer and boot from under the desired operating system.
Such a “bundle” is quite common, since many people want to break away from the “windows” and feel the taste of a self-confident “penguin”. With this installation option, you can do without a third-party software, and use standard means namely Linux. To do this, we first install Windows, the good old-fashioned way and without any tricks. Then, the turn of Linux comes, we install it second, again for a reason uninstall Windows all "foreign" loaders. I would like to immediately point out the fact that in the process Linux installations, you will be prompted to "use the entire disk", you do NOT need to do this, unless of course your data is dear to you. It is necessary to "bite off" a separate section. After the installation is complete, Linux will create boot menu, where you can select any of the operating systems to boot. But no one deprives you of the right to install these two operating systems using EasyBCD.
With this option, the most convenient method will be, again, EasyBCD. Only in this case, we need to create an entry in Add New Entry, for each of the operating systems, following the example of creating an entry for Windows XP. On the various tabs of the program, you can proceed to create bootloader entries, for Linux and Mac Os. (Fig. 4). Also, if desired, you can add older Windows operating systems: 95.98, NT, etc.

Fig.4
Friends, I can explain to you in a nutshell why this happens, for example, you installed Windows 8 on one hard drive, and then Windows 7 on another, so Windows 8 commands the loading of both operating systems and all the files responsible for loading are in it, if You remove it or dismantle the disk on which it is installed from the system unit, then you will no longer boot Windows 7. Why? Because...
1. The partition from which the operating system is loaded is not active.
2. Or the partition from which the operating system is being loaded is active, but there are no operating system boot files on it. For Windows 7, 8, the bootmgr file and the Boot folder with boot configuration (BCD) files.
4. If you have permanently disconnected one HDD then restore the load remaining on the second Windows disk 7, 8.1, 10 is possible according to our article.
5. Also you can produce.
Note: The EasyBCD 2.0.2 boot manager is best used if you have two or three operating systems installed on the same hard drive.
Look at my working system unit, it has four hard drives and operating systems are installed on all hard drives, they all start and work being in the system unit together or one at a time. There are no special boot managers installed on any system: EasyBCD 2.0.2 or MultiBoot.
solid state SSD drive SiliconPower (120GB) - Windows 8 installed
SSD ADATA SSD S510 (60GB) - Windows XP installed
Kingston HyperX 3K SSD (120 GB) - Windows 7 installed
Western Digital Caviar Blue (250 GB) Simple Hard Drive - Installed Ubuntu Linux


The secret is simple, install any operating system on the computer, then simply disconnect the hard drive with this Windows from the system unit and connect another hard drive and install another operating system on it, if you have a third hard drive, do the same with it. And now the most important thing, when you install everything and connect all the hard drives to system unit how to manage the loading of operating systems?
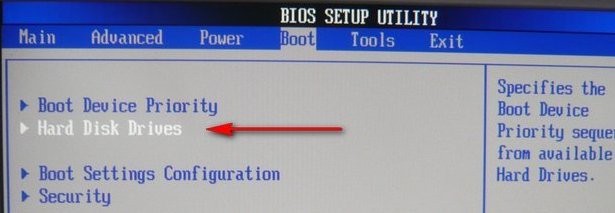
If there are multiple hard drives, a parameter appears in the BIOS (AMI) Hard Disk Drives,
And in BIOS (Award) parameter Hard Disk Boot priority,

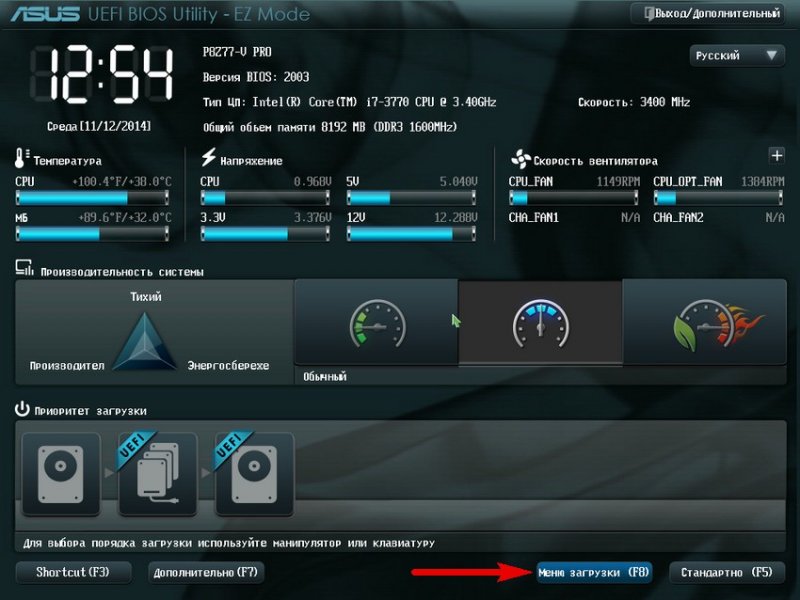
In BIOS UEFI option Hard Drive BBS Priorities, all of them are responsible for the supremacy or priority of hard drives in the system.

If in any of the above parameters the first is a certain hard disk, then the computer will boot from it first of all by default, since it is the main one. But for a quick change of priority hard drive it is not at all necessary to climb into the BIOS every time and look for these parameters, you can make everything easier.
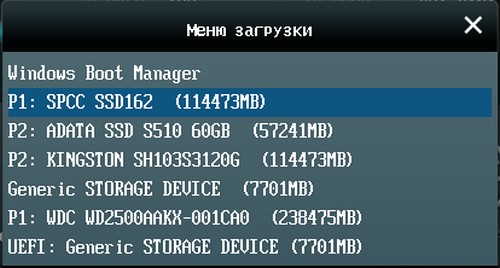
Press the Delete or F8 key at boot and enter the boot menu, then use the arrows on the keyboard to select the hard disk with the operating system you need and press Enter, the Windows you selected will load.
If you most often use a particular operating system, then you need to make it bootable by default.
Boot option number 1 is the hard disk the operating system on which is loaded by default in the first place. Click on the parameter with the left mouse

And in the menu that appears, select the hard drive with the Windows we need. For example, I will choose a SiliconPower SSD with installed Windows 8 as it is my primary operating system.


And Yes, the computer restarts and boots Windows 8 on the hard drive of my choice. SSD drive SiliconPower.

If during the day I suddenly need Windows XP, then I reboot, press Delete, enter the boot menu and select the hard drive with Windows XP installed and that's it.
How to remove system selection at boot What settings do you need to go to for this? Hello friends! This question is often asked on the site. For example, you installed a second operating system and when the computer boots up, a 30-second operating system selection menu immediately appears, of course, this menu will not be useful to everyone, since many do not need the old operating system and therefore many users try to get rid of unnecessary menu downloads.
How to remove the system selection in the boot menu in Windows 7 at boot
Start - Run


Another way to remove the choice of operating systems when loading Windows 7
Start-->Control Panel-->right click on "Computer" and select "Properties"

then "Advanced system settings",


Remove the checkmark from the item "Display a list of operating systems", click OK. Apply. OK.


Right click on Start menu and Run

Enter the command msconfig in the input field
In the window that opens, go to Download. We see two operating systems. The current default bootable operating system is second on the list. We do not touch it, go to the first one and select it with the left mouse, click on the Delete button, then Apply and OK.
That's it, now when you boot Windows 8 there will be no choice of operating systems.

Another way to remove the choice of operating systems when loading Windows 8
Right-click on the left corner of the desktop and select "Control Panel"

Then System and Security.

System,


Remove the checkmark from the item "Display a list of operating systems", click OK.
If you have two operating systems installed on your computer, then most likely after turning on the computer, a window constantly appears on the monitor where the user is prompted to select the operating system to start.

If we do not select within a few seconds, then the one that is selected is loaded by default. So, if we constantly boot the same system, then we have this window where we need to select the operating system to start and we don’t need it to appear. It takes only our time and makes us do unnecessary actions, and this is every time we start the computer.
In this lesson, we'll take a look at how to remove the list of operating systems that appear when we turn on the computer. Consider the simplest and fastest option.
click right click click on the icon on the desktop " My computer" In the list that appears, select the item " Properties».

In the window that opens, go to the tab " Advanced"And in the item" "click on the button" Options".

In the next window, we uncheck the item "" and click "OK».

Also note the point Operating system loaded by default. The one indicated there, now we will automatically boot after turning on the computer. That is, the system, booted from which we now made changes in order to remove the list of operating systems, will now be constantly loaded, I pointed to Windows example XP, and now it will load for me, and the list with the choice of OS will not appear.
If we want to remove the list of operating systems, but so that Windows 7 will always automatically boot then we need to boot from it and do the same.
We click on the icon " My computer"Right-click, and go to" Properties».


On the Advanced tab, click the Options button.

And uncheck the Display a list of operating systems”, here you can see that Windows 7 is the default, and now it will boot immediately after turning on the computer, and the list of operating systems will no longer appear during boot, click “OK" to save.

Everything is ready, so we figured out how to remove the list of operating systems at boot. This lesson is over!
The situation when, when booting a computer, the user is prompted to select a system to boot, despite the fact that only one version of windows is installed, is very common. This happens most often after reinstalling the operating system due to an outdated record of the previous windows version in the config file.
There are two simple ways to fix this inconvenience.
We go into the system properties by right-clicking on the "Computer" icon on the desktop or in the "Start" menu and select "Properties" in the context menu that opens.
Remove system selection at boot - properties windows systems
In the window that opens, select "Advanced system settings" at the top left. The following System Properties window will appear. In it, we are interested in the "Advanced" tab and the third button from the top "Parameters".

Windows system properties to disable the selection of the version of windows that is loaded

Remove "Display a list of operating systems" and "Display recovery options".
After that, click in all previously opened windows “OK”. That's all.
IN search line we type "MSCONFIG" (you can copy it). Right-click on the found icon and select "Run as administrator".

Run MsConfig as Administrator
In the window that opens, go to the "download" tab. Here, select the entry that is not marked as "Loadable by default OS" and click the "Delete" button.


