Modern technologies are developing more and more every year. The time has long come when one hard drive in a computer is indispensable. A huge number of people connect a second HDD to personal computer. The connection procedure has nothing fantastic and even a beginner can figure it out. Let's look at everything in more detail and in more detail.
There are two options for adding an additional hard drive:
The process of adding additional media to the system unit can be divided into several small steps. Let's consider each of them in more detail.
At the very first stage, it is necessary to determine the type of interface with which it interacts. HDD. It is worth noting the important fact that the prevailing number of computers have a SATA interface, therefore, it is desirable that second hard the disk was of the same type. The motherboard may not have an IDE bus, as it is considered to be very old, because of this, some problems may arise with installing obsolete hard drives.
The best way to determine the standard is to carefully consider the contacts.
SATA connector example

IDE connector example

Adding an additional drive is a simple process that goes like this:

By default, there are four holes on the motherboard for adding SATA drives. It should be understood that their numbering starts from zero. Namely, the priority of the hard drive directly depends on the slot number. You must use the BIOS to set the priority on your own. Each specific type of BIOS has its own special controls, as well as a special interface.
In the early version you need to go to the "Advanced BIOS Features" menu and start working with items such as "First / Second Boot Device". In modern versions, the path looks like this: "Boot / Boot Sequence - 1st / 2nd Boot Priority".
There are also cases when you need to connect an old IDE disk. Step-by-step instruction process looks like this:

If you need to carry out this procedure, then you will need the appropriate IDE-SATA adapter. An example of an adapter can be seen below:

Step-by-step instruction:
Sometimes it happens that after an additional hard drive has been connected, the system cannot recognize it. Do not panic, as most likely you did everything right. It's just that for the correct operation of the second hard drive, its initialization is necessary.
Connection external HDD convenient if the stored files are needed not only at home, but also outside. In addition, this method is the only correct one for laptop owners, since they simply do not have a special additional connector for a new hard drive.
In fact, everything is easy here, because external hard drive connects via USB, as well as any other devices (mouse, keyboard, flash drive, webcam and much, much more).
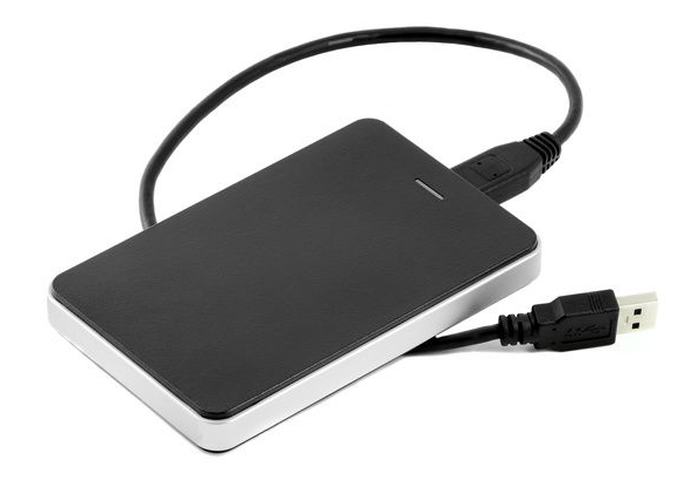
Winchesters that are installed in system unit can also be connected via USB. Here you will need an external case for hard drive or a special adapter. The bottom line is this: the necessary voltage is supplied to the HDD through the adapter, and communication with the Personal Computer occurs via USB. Different hard drives have their own wires, so you should always pay special attention to the standard that sets the dimensions.
On your own and without the involvement of a specialist, if necessary, you can connect an additional hard drive to your computer. Next, we will analyze installation diagram and subsequent connection of a new hard drive in the system unit. It should be noted that the actions are performed smoothly, clearly, without the use of force and abrupt actions.
First step need to de-energize the entire system unit, for this we turn off the power, and then disconnect absolutely all the wires. Next, the side covers are unscrewed and removed, as well as in the image.
For the hard drive, of course, there are their own compartments, which, depending on the model of the system unit, can be located in different positions and have a different position. 
According to the method of connecting the hard drive directly to the motherboard, they are divided into two types, and exactlySATAAndIDE. The second option, which has very wide cables and ports for connection, is considered obsolete and is now rarely used. Due to its irrelevance IDE variation will not be considered here.
If the SATA hard drive is already connected to the computer, then adding a second one can be quick and easy. An additional disk is inserted into the appropriate free cell and attached to the case. It is desirable that they are located at a sufficient distance from each other to avoid overheating. 
In order to connect a new hard drive to the motherboard itself, you need a cableSATA. Plug one end into the corresponding slot on the board, and the other to the hard drive. 
It should be noted that in each modern model of the system unit, there is a minimum twoSATA- connector.
The next step will require connect new hard drive
directly to the power supply. For this, it is applied special cable, the plug of which is slightly wider than that of the SATA cable. In the case when a single plug comes out of the power supply, you will need a splitter. It happens that a narrow plug in the power supply was not provided, then you should purchase an adapter. Examples are shown in the images: 
Having obtained all the above cables, you should connect the hard drive to the power cable.
The secondary media is now fully connected. You can then start the computer by attaching the covers, connecting the cables, and applying power. After that, will follow, if necessary, the stage system setting new hard drive.

So desktop computer the situation is much easier than with a laptop, so let's start with it. So, you already know what characteristics to rely on when buying, so we will leave this topic outside the scope of today's article.
Modern hard drives, motherboards and PSUs work with SATA connectors. However, if they are all already taken on the power supply, then take care to also purchase a Molex-to-SATA adapter to connect your second drive to a Molex-type power supply.
If you want to use the second hard drive with a connection to an “IDE” type motherboard, and the latter is new and no longer has such an input, then we buy an adapter from IDE to SATA.
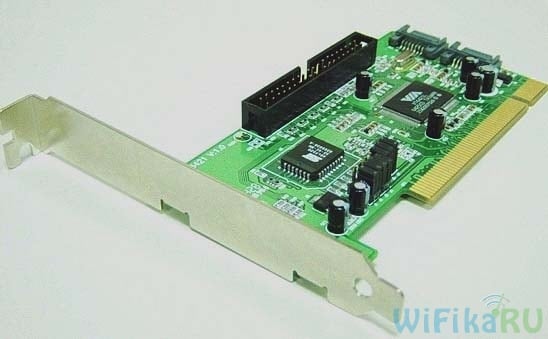
Another option to connect a hard drive to a computer that does not have a corresponding connector for it is to use a special IDE-SATA PCI controller. Its plus is that with it you can both connect an old IDE drive to a new board, and a new SATA drive to an old motherboard. It looks like an expansion card that is inserted into the PCI slot on the motherboard and adds support for working with IDE devices. Let me remind you that two disks or a floppy drive can be connected to a standard cable at once.
Suppose you have already figured out all your nuances, purchased a second hard drive and, if necessary, adapters, and now you need to install it in the case and connect it to the motherboard and power supply. First, we fix the hard drive in a special basket in the case, or we insert it along the guides and fix it with special fasteners or ordinary screws - depending on.

After that, we connect the “small” SATA to the corresponding connectors on the back of the disk and on the motherboard, and insert either an adapter connected to the cable from the power supply or the PSU cable with a SATA plug into a larger SATA socket (for power). We do this carefully so as not to break the socket on the hard drive, since there is no limiter below and you can easily break off a piece of the board with the contacts of this connector.
In the screenshot below, the green arrows indicate the wide SATA connecting the second hard drive to the power supply, and the red arrows are the narrow ones that go to the motherboard.

Yes, do not forget that all connections must be made with the PSU disconnected from the outlet, or with the power switch turned off, if there is one. As you can see, there is nothing complicated.
Is that even possible? Yes, today you can also increase the amount of space not only on a stationary PC, but also on a laptop. And for this it is not at all necessary to replace the standard hard drive that is already in the laptop, and therefore you will not have to face all the associated problems, such as transferring files and reinstalling Windows and all programs on the new hard drive.
The second hard drive in a laptop (let me remind you, 2.5 inches in size) is connected using a special adapter, which is installed instead of a laptop DVD drive and - you must admit, now almost no one uses this device. And if you need to view discs, you can always use an external, connected via USB.
This is how this adapter, invented (or copied?) by the Chinese, looks like:

In online stores, it can be found under the name "2nd SSD HDD HD Hard Disk Driver Caddy SATA for 12.7mm CD / DVD-ROM Optical Bay". Inside and outside this adapter there is a connector for connecting a disk and for connecting the adapter itself to the laptop board.
So, we insert the hard drive into the adapter. You may also have to screw the mount to the back of the adapter yourself, for which it will be screwed to the laptop case.


And in its place we insert the adapter and fix it in the same way with the same screw. After that, a new hard drive will appear in the "Computer" menu, which, after formatting, can be fully used.
Speaking about connecting a hard drive, one cannot but mention such a problem that users sometimes encounter when there is a need to install a hard drive or SSD 2.5 ″ in a computer, in the case of which there are mounts only for standard discs size 3.5″. In this case, there are also special adapters in which such a hard can be fixed and inserted into a regular place for larger diameter disks.

Another common problem that can be encountered with 2 hard drives installed is that the computer simply does not see one of them. First of all, if you are using an adapter, then it may be the case. use known-good adapters.
If you did not use it or your adapter is working, then the whole point is BIOS settings, namely, the controller operation mode is set incorrectly hard drives.
We reboot the computer, go into the BIOS and look for the “SATA Controller” item (or SATA ATA / IDE / Raid Config, Mass Storage Controll or something else like that to set the mode HDD work). If you have connected a disk with a SATA cable to the motherboard and at the same time a modern operating system is installed on the computer ( Windows Vista, 7, 8 and above), then the item AHCI, IDE, Native or Enchansed can be activated in this paragraph. Wherein
only in AHCI mode will the maximum data transfer rate from the disk be achieved.
If more old Windows, or if the hard drive was connected, then only IDE, Native or Enchansed.
The disk controllers themselves must also be enabled. Here are a couple of screenshots from different BIOSes with these settings:

If your computer has 2 hard drives (or a drive + DVD drive) and both of them are connected via IDE cables, then the problem may lie in their incorrect configuration with each other. If you have just such a connection and in the BIOS you see the following picture:
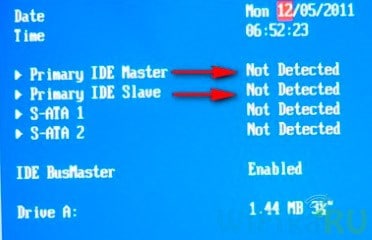
then this is your case. In this configuration (when both are connected via IDE), one disk must be Master, that is, the main one on which Windows is installed, and the other Slave, that is, secondary.
This priority is configured using a special jumper (jumper) installed on the contacts on the back of the case.

All possible positions of this jumper and their modes are usually described on a sticker on the disk case. They may vary from manufacturer to manufacturer.

From our table, we see that if Windows is installed on the disk and it will be our main (Master), or if it is used alone, then we put a jumper on the first 2 vertical contacts. If it is secondary (Slave), then we remove the jumper altogether.
We do this with our hard drives and go into the BIOS again. Now they are automatically determined by the motherboard and the following picture should be drawn:

Every year the amount of information stored on the computer increases. As a result, the computer starts to boot for a long time and periodically freezes. And this is natural, because all data is stored on a hard disk, the memory of which is limited.
Users solve this problem in different ways. Someone transfers information to various media, someone turns to the master and asks to increase the computer's memory, and someone decides to connect a second hard drive to the computer. Therefore, let's figure out how, without the help of a specialist - on our own - to connect a second hard drive to a computer.
To get started, you need to completely shut down the system unit: disconnect all cables and power cable. Now you need unscrew the side covers sistemnik. Expand it back towards you and unscrew the four screws on the sides. Slightly pressing on the side parts, move them in the direction of the arrow and remove.
Hard drives in the system unit are installed in special bays or cells. Such bays can be located in the back of the system unit at the bottom or in the middle, some hard drives are installed turned on their side. If your system unit has several cells for hard drives, install the second one not right next to the first one - this will improve its cooling.

Depending on the method of connection to the motherboard, internal hard drives are divided into two types: with IDE and SATA interface. IDE is an older standard, now all system units are designed to connect hard drives with a SATA interface. It is not difficult to distinguish between them: IDE has wide ports for connecting a hard drive and power supply and a wide cable, while SATA has both ports and the cable is much narrower.
If your system unit has a hard drive with a SATA interface, then connecting a second one will not be difficult.
Insert a second hard drive into a free slot and attach it to the case with screws.

Now we take SATA cable, through which data will be transferred, and connect it to the hard drive by either side. We connect the second plug of the cable to the SATA connector on the motherboard.

All system units have at least two SATA connectors, they look like the one shown in the picture below.

To connect to the power supply, a cable is used, the plug of which is slightly wider than that of a SATA cable. If only one plug leaves the power supply, you need to buy a splitter. If the power supply is not equipped with a narrow plug, you will need to buy an adapter.

Connect the power cable to the hard drive.

The second hard drive is installed on the computer. Replace the side covers of the system unit and secure them with screws.
Although the IDE standard is outdated, IDE-based hard drives are still found. Therefore, we will further consider how to connect a second hard drive via the IDE interface.
To get started, you need install jumper on the hard drive pins to the correct position. This will allow you to determine in which mode the hard drive will work: master (Master) or slave (Slave). Usually, the hard drive that is already installed on the computer works in Master mode. It is he who is the main one and the operating system is loaded from it. For second hard disk that we are going to install, you need to select the Slave mode. On the hard drive case, the pins are usually signed, so just put the jumper in the right position.

The IDE cable through which data is transferred has three plugs. One is located at the end of a long piece, blue, connected to the motherboard. Another one is in the middle, white, connected to the slave drive (Slave). The third, at the end of a short segment, black, is connected to the master disk.

Insert hard drive to an empty cell. Then secure it with screws.

Choose free power supply plug and insert it into the appropriate port on your hard drive.

Now insert the plug which is located in the middle of the plume, to the hard disk port for data transfer. In this case, one end of the cable is already connected to the motherboard, the other - to the previously installed hard drive.

Connecting a second hard drive via the IDE interface is now complete.
As you can see, we did nothing complicated. Just be careful, and then you will definitely be able to connect a second hard drive to your computer.
And also watch the video
To increase the amount of permanent memory of the computer, it is recommended to connect an additional hard drive. The choice of hard drive depends on the characteristics of the PC motherboard.
The SATA cable has the same connectors. One connector leads to the motherboard, the second - directly to the hard drive. Wrong connection of SATA drives - impossible operation;
SATA drives do not have jumpers - the connection is very simple.
Find the corresponding connector on the motherboard;
Connect the connecting cable;
Connect to hard drive
Connect the power cable to the hard drive (you will need the special cable that came with the hard drive). Sometimes in comes with adapter.


