The time has come when one hard drive in a computer is no longer enough. More and more users decide to connect a second HDD to their PC, but not everyone knows how to do it right on their own in order to avoid mistakes. In fact, the procedure for adding a second disk is simple and does not require special skills. It is not even necessary to mount the hard drive - it can be connected as external device if there is a free USB port.
The options for connecting a second hard drive are as simple as possible:
Determining the type of HDD
Before connecting, you need to determine the type of interface with which the hard drive works - SATA or IDE. Almost all modern computers equipped with a SATA interface, respectively, it is best if the hard drive is of the same type. The IDE bus is considered obsolete, and may simply be absent on motherboard. Therefore, with the connection of such a disk, some difficulties may arise.
The easiest way to recognize the standard is by contacts. This is what they look like on SATA drives:

And like this in the IDE:

The process of connecting a disk is very easy and takes place in several stages:

SATA boot priority
The motherboard usually has 4 connectors for connecting SATA drives. They are designated as SATA0 - the first, SATA1 - the second, etc. The priority of the hard drive is directly related to the slot numbering. If you need to manually set the priority, you will need to go into the BIOS. Depending on the type of BIOS, the interface and management will be different.
In older versions, go to the section Advanced BIOS Features and work with parameters First boot device And Second boot device. In new BIOS versions, look for the section Boot or Boot Sequence and parameter 1st/2nd Boot Priority.
In rare cases, there is a need to install a disk with an outdated IDE interface. In this case, the connection process will be slightly different.

Connecting a second IDE drive to the first SATA drive
When you need to connect an IDE drive to an already working SATA HDD, use a special IDE-SATA adapter.

The connection diagram is as follows:
You may need to purchase a 4-pin (4 pin) power to SATA adapter.
OS disk initialization
In both cases, after connecting, the system may not see the connected drive. This does not mean that you did something wrong, on the contrary, it is normal when the new HDD is not visible in the system. To be able to use it, initialization of the hard disk is required. Read about how to do this in our other article.
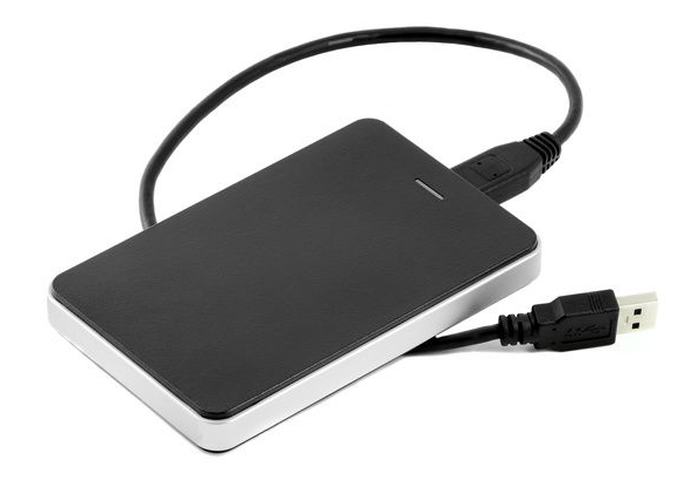
Often users choose to connect external HDD. It is much easier and more convenient if some of the files stored on the disk are sometimes needed outside the home. And in the situation with laptops, this method will be especially relevant, since there is no separate slot for a second HDD.
An external hard drive is connected via USB in exactly the same way as another device with the same interface (flash drive, mouse, keyboard).

A hard drive designed for installation in a system unit can also be connected via USB. To do this, you need to use either an adapter / adapter, or a special external case for the hard drive. The essence of the operation of such devices is similar - the required voltage is supplied to the HDD through the adapter, and the connection to the PC is via USB. Hard drives of different form factors have their own cables, so when buying, you should always pay attention to the standard that sets the overall dimensions of your HDD.


If you decide to connect the drive using the second method, then literally follow 2 rules: do not neglect the safe removal of the device and do not disconnect the drive while working with the PC in order to avoid errors.
We talked about ways to connect a second hard drive to a computer or laptop. As you can see, there is nothing complicated in this procedure and it is absolutely optional to use the services of computer masters.
Instruction
The second hard drive allows not only to get additional space for files, but also to significantly increase the reliability of data storage by duplicating important files on . Before you start installing the hard drive, be sure to make sure that the computer is disconnected from the network! Then unscrew the screws holding the left (when looking at the front) side cover with a screwdriver. Let us note that different models cases, the procedure for removing the cover may differ - for example, you may need to remove the bezel first. Remove the screws and carefully remove the side panel. You may need to pull it back a little to do this.
Having removed the panel, you will see the computer motherboard, power supply, various wires and cables. And, of course, the hard drive, usually located at the front of the computer. Pay attention to how it is installed - the second hard drive will need to be installed in the same way, in a free niche. Such niches can be found above or below the main disk. If possible, do not place disks immediately one above the other - you should leave a gap between them, this will help them cool better. Important point: Hard drives have special jumpers that set the operating mode. On the main disk, it must be set to the "Master" position. On the second - to the "Slave" position. The jumpers are very small, you may need tweezers to install them. After placing the jumper, carefully install the disk in the place chosen for it, tighten the retaining screws. They are usually not included with the hard drive, so a couple of short screws should be found in advance - they should fit the threaded holes on the left and right sides of the hard drive.
The disk is installed, it remains to connect power and a data transfer cable to it. To connect the power, you may need an adapter to a SATA drive. It is best to open the computer even before buying a hard drive and see if the adapter is worth it on the existing disk, and if so, buy the same one. When connecting, pay attention to the shape of the connectors and the color of the wires of the main disk suitable for them - the new disk must be connected in the same way. To connect the adapter, use any free connector with wires of the desired colors. The power is connected, the whole process is very simple. And most importantly, do not apply force - all connectors are equipped with special protrusions that do not allow them to be installed incorrectly.
The power is connected, now you need to connect the data cable. When buying a disc, make sure that the cable is included in the kit. If not, then purchase it. Usually it is a flat red wire with connectors at the ends, its width is within a centimeter. One end of the cable is connected to the hard drive, you can easily find the right connector. The second is connected to the corresponding socket system board. To find it, look where the cable of the main drive is connected - the socket for the second (and often also the third and fourth) should be nearby.
Everything, the disk is connected. We put the cover back in place, turn on the computer. If everything is connected correctly, the computer will start to boot. After loading, open "My Computer" - a new disk should appear in the list of hard drives. If you don’t like the letter assigned to it by the system, go to: Start - Control Panel - Computer Management. In the "Storage Devices" section, select "Disk Management". Clicking a new drive right click mouse, select "Change drive letter or drive path." A window opens, select "Change" and set the desired drive letter.
Modern technologies are developing more and more every year. The time has long come when one hard drive in a computer is indispensable. A huge number of people connect a second HDD to a personal computer. The connection procedure has nothing fantastic and even a beginner can figure it out. Let's look at everything in more detail and in more detail.
There are two options for adding an additional hard drive:
The process of adding additional media to the system unit can be divided into several small steps. Let's consider each of them in more detail.
At the very first stage, it is necessary to determine the type of interface with which the hard drive interacts. It is worth noting the important fact that the vast majority of computers have a SATA interface, so it is desirable that the second hard drive be of the same type. The motherboard may not have an IDE bus, as it is considered very old, because of this, there may be some problems with installing outdated hard drives.
The best way to determine the standard is to carefully consider the contacts.
SATA connector example

IDE connector example

Adding an additional drive is a simple process that goes like this:

By default, there are four holes on the motherboard for adding SATA drives. It should be understood that their numbering starts from zero. Namely, the priority of the hard drive directly depends on the slot number. You must use the BIOS to set the priority on your own. Each specific type of BIOS has its own special controls, as well as a special interface.
In the early version you need to go to the "Advanced BIOS Features" menu and start working with items such as "First / Second Boot Device". In modern versions, the path looks like this: "Boot / Boot Sequence - 1st / 2nd Boot Priority".
There are also cases when you need to connect an old IDE disk. Step-by-step instruction process looks like this:

If you need to carry out this procedure, then you will need the appropriate IDE-SATA adapter. An example of an adapter can be seen below:

Step-by-step instruction:
Sometimes it happens that after an additional hard drive has been connected, the system cannot recognize it. Do not panic, as most likely you did everything right. It's just that for the correct operation of the second hard drive, its initialization is necessary.
Connecting an external HDD is convenient if the stored files are needed not only at home, but also outside. In addition, this method is the only correct one for laptop owners, since they simply do not have a special additional connector for a new hard drive.
In fact, everything is easy here, because external hard drive connects via USB, as well as any other devices (mouse, keyboard, flash drive, webcam and much, much more).
Hard drives that are installed in the system unit can also be connected via a USB connector. Here you will need an external hard drive case or a special adapter. The bottom line is this: the required voltage is supplied to the HDD through the adapter, and the connection with personal computer happens via USB. Different hard drives have their own wires, so you should always pay special attention to the standard that sets the dimensions.
Hello friends! When assembling or upgrading a PC, it may turn out that one hard drive, even an impressive volume, is not enough, so you have to use two such parts. Connection, although it has some features, differs little from mounting a single hard drive.
Do not worry that if you connect incorrectly, you can break your computer. Not at all, however, some unpleasant surprises may lie in wait here - for example, slowing down the device or even refusing to launch the user.
In today's publication, I will tell you how to connect two hard drives to one computer at the same time - what should be considered and how to do everything right.
As we agreed with you earlier (did you remember?), we will assemble PCs from modern components, therefore, all HDDs will be SATA.
Their installation in the appropriate pockets does not differ from a similar procedure when assembling a computer with one hard drive: carefully put the parts in their seats, without bumps and shaking, and fix them with screws, screwing them into the sockets intended for this.
The mutual position of the disks does not affect anything: put them in the way that suits you, but consider the length of the data cables and the fact that they should reach the motherboard, namely, to the ports for connection.  I want to clarify that you can use both 3.5-inch hard drives from a desktop PC and 2.5-inch hard drives from a laptop. Fixation can be problematic if there is no pocket of the appropriate size, so I recommend purchasing a special sled for this purpose.
Everything you need and even more, you will find in this popular online store, and the prices will surprise you unexpectedly.
When connecting data loops, you should consider which of the hard drives the operating system will be installed on. It must be connected to the SATA port with serial number 0 (or 1 if there is no zero), and all other devices are already in ports with serial numbers higher.
In addition, when you first turn on the assembled system unit in the BIOS settings, the hard drive with Windows installed must be designated as the main boot device.
As a rule, ATX and Mini-ITX motherboards have no problem with the number of SATA ports - there are at least 4 of them, with the exception of the cheapest models, where there are fewer such slots. In the "cut down" versions of mAtx, you can often see only two SATA ports. This is inconvenient already because we may also need to connect an optical drive.  In this case, I recommend using a special adapter that plugs into the PCI‑E port. Depending on the model, it may have as a couple of additional SATA interfaces, and a slot for connecting IDE devices.
This can be useful if you need to copy from an ancient non-working computer to new files dear to your heart: a family photo archive or a collection of German short films.
Please note that there are no splitters to connect a pair of SATA devices to one port on the motherboard, in principle. Not because they are not in demand, just the architecture of the computer does not allow data to be transferred in this way.
When assembling a computer, if you are not careful enough when choosing components, there may be problems connecting all energy consumers to the power supply, namely, there may not be free SATA plugs.
In this case, I recommend using special Molex / SATA adapters, that is, their four-pin connector to a regular Sat one.  And even if there is no free Molex, then you can already use a splitter to power two devices from one connector. Directly with the connection, no problems should arise: on any Sat device, there is only one connector for connection.
The second is the date interface, and due to the difference in size, it is difficult to confuse them.
As you can see, connecting two hard drives is only a little more difficult than connecting one. For further assembly (and we haven’t finished yet?), I advise you to read and.
And that's all for today. If you have read up to this point, I ask for one more courtesy: share this publication in in social networks- I would be very grateful.
Friends, I can explain to you in a nutshell why this happens, for example, you installed Windows 8 on one hard drive, and then Windows 7 on another, so Windows 8 commands the loading of both operating systems and all the files responsible for loading are in it, if You remove it or dismantle the disk on which it is installed from the system unit, then you will no longer boot Windows 7. Why? Because...
1. The partition from which the operating system is loaded is not active.
2. Or the partition from which the operating system is being loaded is active, but there are no operating system boot files on it. For Windows 7, 8, the bootmgr file and the Boot folder with boot configuration (BCD) files.
4. If you have permanently disconnected one HDD then restore the load remaining on the second Windows disk 7, 8.1, 10 is possible according to our article.
5. Also you can produce.
Note: EasyBCD 2.0.2 Download Manager is best used if you have two or three OS installed on one hard drive.
Look at my working system unit, it has four hard drives and operating systems are installed on all hard drives, they all start and work being in the system unit together or one at a time. There are no special boot managers installed on any system: EasyBCD 2.0.2 or MultiBoot.
solid state SSD drive SiliconPower (120GB) - Windows 8 installed
SSD ADATA SSD S510 (60GB) - Windows XP installed
Kingston HyperX 3K SSD (120 GB) - Windows 7 installed
Western Digital Caviar Blue (250 GB) Simple Hard Drive - Installed Ubuntu Linux


The secret is simple, install any operating system on the computer, then simply disconnect the hard drive with this Windows from the system unit and connect another hard drive and install another operating system on it, if you have a third hard drive, do the same with it. And now the most important thing, when you install everything and connect all the hard drives to the system unit, how to manage the loading of operating systems?
If there are several hard drives in the system, the BIOS (AMI) parameter appears Hard Disk Drives,

And in BIOS (Award) parameter Hard Disk Boot priority,

In BIOS UEFI option Hard Drive BBS Priorities, all of them are responsible for the supremacy or priority of hard drives in the system.

If in any of the above parameters the first is a certain hard disk, then the computer will boot from it first of all by default, since it is the main one. But to quickly change the priority of the hard drive, it is not at all necessary to climb into the BIOS every time and look for these parameters, you can make everything easier.
Press the Delete or F8 key at boot and enter the boot menu, then use the arrows on the keyboard to select the hard disk with the operating system you need and press Enter, the Windows you selected will load.
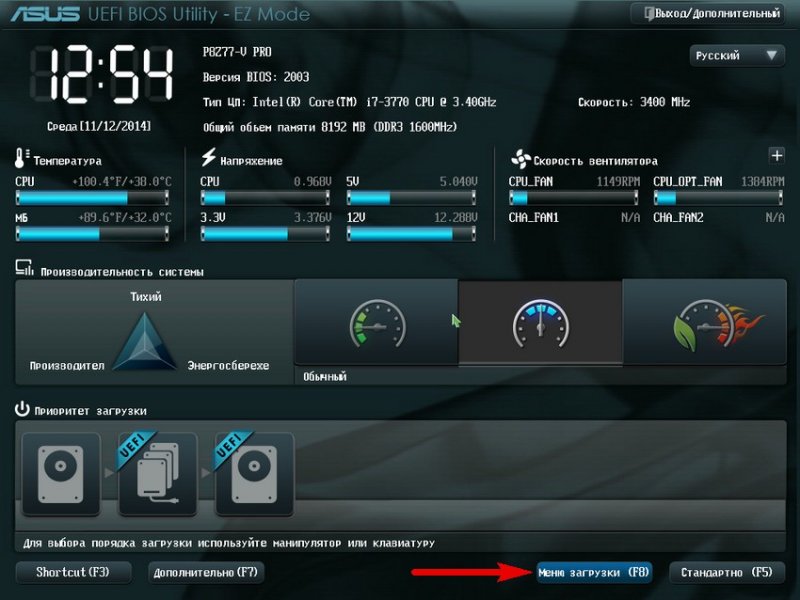

If you most often use a particular operating system, then you need to make it bootable by default.
Boot option number 1 is the hard disk the operating system on which is loaded by default in the first place. Click on the parameter with the left mouse

And in the menu that appears, select the hard drive with the Windows we need. For example, I will choose a SiliconPower SSD with installed Windows 8 as it is my primary operating system.
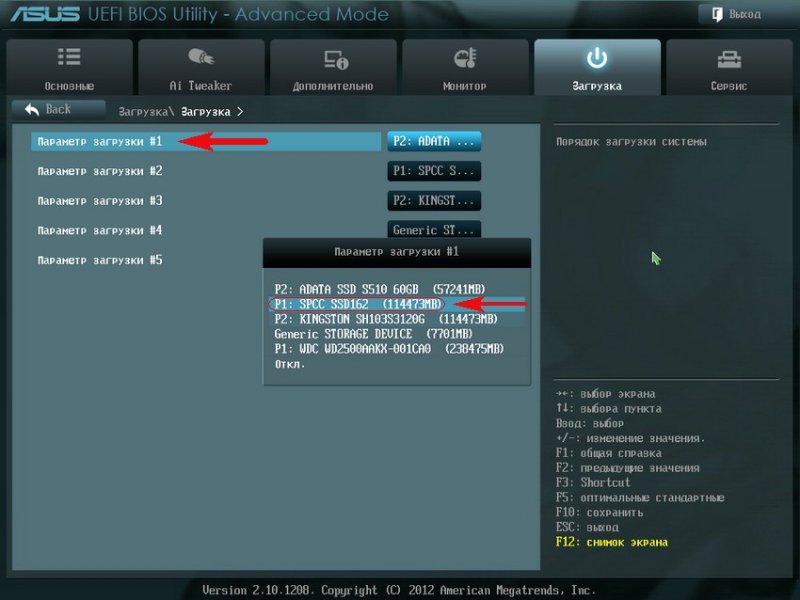

And Yes, the computer restarts and boots Windows 8 on the hard drive of my choice. SSD drive SiliconPower.

If during the day I suddenly need Windows XP, then I reboot, press Delete, enter the boot menu and select the hard drive with Windows XP installed and that's it.


