Easy Image Modifier is a free program designed to reduce the size of images in batches. With the help of the program, it will be possible to reduce the size of several photos at once with preset settings. Naturally, it will be possible to reduce the size and change the properties of the image one by one, processing only one specific photo in the Easy Image Modifier program.
You can also enlarge images in Easy Image Modifier. Just keep in mind that when you increase the size of the image, the quality of the photo may suffer.
Resizing an image is necessary in many cases. Much more often you may need to reduce the size of photos than, for example, enlarge images. Uploading images to the Internet, sending images via e-mail, all this requires reducing the weight of the photos.
To reduce the size of an image, you can use the simple, tiny, free program Easy Image Modifier. You can download the Easy Image Modifier program from the official website of the developer.
Easy Image Modifier download
At free program Easy Image Modifier has an older paid version - Easy Image Modifier Plus, in which some options have been added to the program (saving in JPG2000, PDF formats, more advanced editing).
The Easy Image Modifier program has support for the Russian language and does not require installation on a computer. After downloading the program to your computer, you will need to unpack the archive with the program. To run the program, you will need to open the folder and run the file "EasyImageModifier" (type - application).
Since this program is portable, you can run Easy Image Modifier from any place convenient for you on your computer or, for example, from a USB flash drive. For ease of launch, you can create a shortcut to the program on the desktop.
After starting, the main window of Easy Image Modifier will open. Under the menu bar on the left are sections with buttons to perform certain actions. On the right are the buttons "Upload image", "Upload folder", "Process". Under these buttons is the working area of the program.
Using the "Upload images" and "Upload folder" buttons, images are added to the program for processing.
To add a photo to the Easy Image Modifier program, you will need to click on the "Upload Images" button. An Explorer window will open, in which you can select the desired images to add to the program. You can add only one graphic file or select several images to add.
Files can also be added by dragging them into the program window.
After that, in the "Uploaded Images" area, which is located in the central part of the program window, you will see a list of added photos. You can process a single image or add multiple photos to the program to resize the photo.
The added image will be displayed in a special window, which is located close to the main program window.

You can start editing one photo or add more to this list graphic files for batch processing.
If you do not want to edit some images anymore, you can remove them from the Easy Image Modifier program by first selecting these photos using the "Delete Selected" button. If necessary, you can delete all photos added to the program by clicking on the "Clear List" button.
To add the contents of a folder to Easy Image Modifier, you will need to click on the "Load Folder" button. All images in the folder will be added to Easy Image Modifier, including those folders inside the selected folder.
Then you can proceed to editing by selecting the appropriate item in the "Editing" section.
In this review, I added one image to the program. When batch reducing photos, exactly the same actions are performed. In most cases, it will be enough just to choose the size for the images, the format in which the images will be saved, select the folder to save. After that, you can start the process of processing photos.
To reduce or increase the size, you will need to click on the "Resize" item on the left side of the program window. In the new window of the program, you will need to activate the item "Activate resizing". In the corresponding fields, you can change the size of the image by selecting the numerical sizes suggested by the program.
You can set the corresponding fields for resizing the image to your own values. Images can also be changed in percentage if you activate the corresponding item. The photo will be resized to a percentage of its original size.
By default, the item "Keep proportions" is activated in the program. Depending on what exactly you will be doing, you can uncheck the box next to the “Reduce” or “Increase” items.

If you need to rotate the image or make a mirror image, then click on the "Rotate / Flip" button.
Next, activate the item "Activate reorientation". After that, you will need to select the appropriate setting from the drop-down list to rotate by the desired number of degrees, or select mirroring horizontally or vertically.

In a special window, you can observe the changes that are displayed immediately after the settings have been made.
Using the "Add padding" item, you can fill the background around the image with some color by choosing the color and size of the background. This is a kind of photo frame.
You can apply a watermark to an image to prevent others from copying and using your image on the Internet. To do this, click on the "Add watermark" button, and in the window that opens, activate the "Activate watermark" item.
In the "Watermark" field, enter the desired entry or the name of your site.

Then click on the button opposite the "Font" item (the button displays the font type and size). After that, the "Font" window will open, in which it will be possible to select a font for applying a watermark. You can choose the type of font, its style, size, character set.
After setting the font, click on the "OK" button.


Finally, using the buttons with a drop-down menu, you can select the location of the watermark on the image.
If you will post your images on the Internet, then you may be advised to remove the metadata (EXIF) that is stored in the images. To do this, in the "Advanced" section, click on the "Edit file properties" button.
In the window that opens, activate the "Delete metadata" item. Here you can, if necessary, also change the date of the file by activating the item "Change file date".
 <
<
In the "Save" section, you will be able to select the format for saving the image. In the default program, images will be saved in JPG format.
The following formats are available in Easy Image Modifier for saving images:
After activating the “Quality” item, you can additionally, if necessary, adjust the image quality by moving the slider along the quality adjustment scale.

After clicking on the "Rename" button, if necessary, you can activate the item "Activate name change" to rename images.

After clicking on the "Set Destination" button, in the window that opens, you can select a location to save the processed images. Here, by default, the “Activate Destination” item is activated so that the processed photos are saved elsewhere and do not replace the original files.
A folder is selected in the program to be created on the desktop. You can choose to save to any other folder on your computer.

Finally, in the main window of the program, click on the "Process" button to start the image conversion process. Next comes the process of converting the file or files if the photos are processed in batch mode.

After the image processing is complete, you can open the folder and look at the result.
Batch photo editing in the free program Easy Image Modifier allows you to reduce the size of images, select the display method, add a watermark, remove metadata from the image.
Easy Image Modifier - batch image processing (video)
A few years ago I told you about one very useful free computer program that allows you to massively change the size of images, their quality, name ... Today we will talk about a similar (also free) program, but with much more functionality.
This miracle program is called - ImBatch. With her batch photo processing will be fun for you, not tedious work.
Today, almost everyone has a phone (smartphone) with a built-in camera, and therefore the number of digital photos on a computer disk is constantly increasing exponentially. How to manage to change all of them in size, name, quality, convert them and apply various filters to them?
The free (for non-commercial use) computer program ImBatch will help you with this, which is designed specifically for batch processing of many photos.
Working in this program is very easy, simple and even pleasant, thanks to the many built-in skins (covers) ...

There is nothing complicated in ImBatch - we add a photo (you can even add a whole folder at once) ...


... select one image, several or all at once ...

... and assign a task (of which there are a large number in the program) ...


As you can see, you can batch crop photos, resize them, flip, rotate, change tags or delete them, rename all photos, adjust colors, contrast, and do many other operations. It makes no sense to list them all - you yourself will see everything by running the program ...

After you decide on the tasks, you can safely poke on the magic button (top left of the program window) to start the process of batch processing photos ...

Don't "skip" warnings - read them...


You will find a more detailed description of all tasks for batch processing of images in the ImBatch program. on her official page. There are also video tutorials - I recommend watching them.
By the way, under the "Tools" button you will find several useful utilities - a context menu editor, a script editor, an EXIF and IPTC tag editor, as well as a monitor for new files in specified image folders ...

The image cropping feature is present in many viewers. But mostly single file processing is supported. And if there are a lot of images, it is necessary to deal with each one in turn. To save a lot of time, you can use the program for batch (that is, mass) cropping images. In this article, we will figure out where to download the desired program and how to work with it ...
So the program is called FastStone Photo Resizer. On the official website of the developer, you can download the English version of the program.
Please note that the program is not only for cropping images. You can also resize, rotate the image, adjust the color depth, make various adjustments, add text and watermarks, create a frame for the image.
Download, install and run the program. First, add a folder with images. To do this, click on the button " Source” and find the folder on the computer.

When the images are ready, take a look below. Select the extension (parameter " Output Format"), in which the future image will be saved. You can choose the original format, or specify any other. Setting output options (the button to the right of the list of formats) for the best image quality:
It is not necessary to make changes, here as you wish!
Next, select the folder in which the processed images will fall. You can uncheck the option to have the program save images to the original folder. You can also disable file replacement confirmation. True, this is necessary if you save to the original folder, with the original name and with the original format. Turn on advanced processing options and click on the button " Setting«.

In the advanced options window, go to the " Frame” and check the activation option. Below we enter the new size (width and height) of the image.
To help you understand how the program performs cropping, I will give a simple example. Let's assume the size of the original image is 604 (width) by 378 (height). I enter a new size - 400 by 300. If you calculate, 204 pixels will be cut off in width, and 78 pixels in height.
Initially, the main point is in the center, cropping is performed at the edges. In this case, 102 pixels (204 divided by 2) will be cropped from each edge in width (204 divided by 2), 39 pixels (78 divided by 2) will be cropped from each edge in height. You can also set the coordinates of the upper left corner point. Only cropping will be performed a little differently. And click on the button OK to close the advanced options window.

Now run (button " Transform") processing of added images.

After some time (depending on the number of images), processing will be completed. Click on the button " Ready«.

All images are cropped! It only remains for me to post an example of the original and processed image:


Be sure to consider other features of the program, maybe they will be useful to you too!
In the era of digital cameras, nothing is easier than taking a ton of photos. In the blink of an eye, you can find yourself with a mountain of pictures that now need to be parsed, edited, etc. It doesn't matter what you decide to do with the , but before you do, you'll probably have to do some extra work with them. Some of the most common image edits are resizing, renaming, format conversion, color fixes, and so on. You might be intimidated by manually editing so many photos. Don't waste your time, just download one of the free tools below and start batch editing!
The powerful tool XnConvert is not only a cross-platform product, but also a cross-functional one. What do I mean by this? While most of these tools only allow you to resize an image, or only batch rename files, XnConvert manages to do it all at the same time. However, for all its power, XnConvert remains a very easy to use application.
Drag and drop your image into the Input tab and add actions from the Actions tab. This can be anything from image resizing, rotation, watermarking, to adding watermarks, filters, borders, and playing with the color palette. XnConvert does it all. In the "Output" tab, you can create new filenames (XnConver does batch renaming as well), select a folder to save the processed images, set the file format, and much more. Download from office. Website: www.xnconvert.com

Although PhotoMagician is not as powerful as XnConvert, it offers its users several unique features. PhotoMagician's main feature is batch resizing, but you can also use it to add some basic effects and for files in some popular formats. All you have to do is select a start and end folder and then apply one of the available resizing profiles or create your own.
PhotoMagician includes resizing profiles for many popular devices such as the iPhone, iPod Nano, Sony PSP and a few others. In the Conversion Settings tab, you can add simple effects like sepia or grayscale, change the angle of the image, and more. A nice feature of the program is the ability to select images by image size, file size and file modification date.
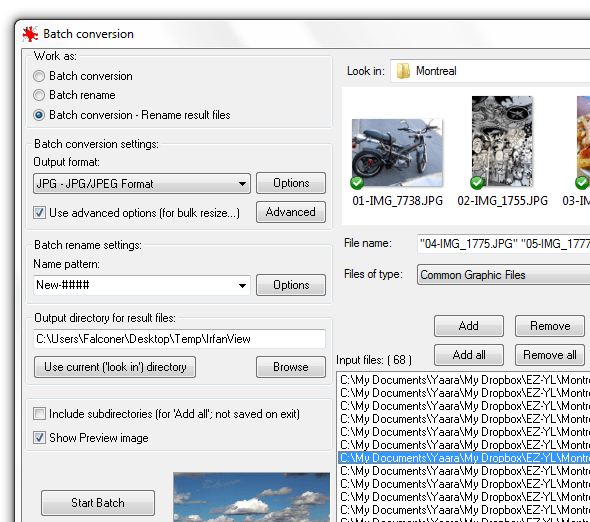
IrfanView is an excellent image viewer and editor that I have been using for many years, including a very stylish batch editing tool for some time now. IrfanView's batch editor can help you resize, rename images, convert and adjust multiple files at once. There is, however, one drawback. All these features are not easy to find. Luckily, you have this article to turn to for help.
Once IrfanView is installed and running, go to File –> Batch Conversion/Rename…. This will open an editor where you can start working right away. Look at your images at the top of the window and drag them to the bottom area. You can also choose between batch converting and batch renaming, or both. Click on the "Advanced" button to access additional options. In general, IrfanView's batch tools are quite powerful, so you can use them to fine tuning image colors. Of. Website: www.irfanview.com

I use FastStone Capture as my main one, now that FastStone Photo Resizer is out I'm thinking about installing it on my work computer. Unlike Capture, Photo Resizer is completely free and, despite its name, can do a lot more than just resize a photo. Photo Resizer includes two main tabs: Batch Convert (batch conversion) and Batch Rename (batch rename). Unfortunately, you can't get FastStone to do these two things at the same time (at least I couldn't get it to do it), which makes communicating with the program a little awkward.
In the "Batch Convert" tab you can easily customize the format of your final files, and by clicking on the "Advanced Options" button you will be taken to a menu with additional features. Here you can resize, rotate the image, adjust the color, add text and watermarks, and pretty much anything else you can think of.
After selecting all the options, you can save the settings to a file so that you can use them again without manual setting. If you want to rename the file, then you will have to reload your edited photos into the "Batch Rename" tab and go through the process of changing names already in it. Of. Website: www.faststone.org

If you're using Picasa as your photo viewer and downloader, then there's nothing easier than doing some file editing, especially if you're already in it. There are several batch editing options here, but not all of them come from one place.
To batch resize, batch resize, and batch add a watermark, select the photos and select "Export" at the bottom. After that, a dialog box will open in which you can perform all the necessary operations. For some batch filters, like rotate or rename, you need to click on “Photo –> Batch Edit”. Whatever you check here will be applied to all selected photos. Offsite: picasa.google.com


This is another program in a series of hidden installers, but unfortunately (or fortunately?) it hides a rather powerful batch processing tool inside, which you should definitely check out if you are Windows user. When installing BatchBlitz, be very, very vigilant, as the installer will try to "shove" an additional Babylon program and confuse you with Registry Cleaner. Just dismiss all those extra goodies and get a clean image editor.
BatchBlitz is very comfortable to use: start by opening a new Blitz session, via “File –> New”, find the required image at the top and add it to the main window. Then switch to the "Actions" tab to make changes such as resizing, renaming, converting to another format, auto-contrast, rotation and many others. After adding actions, you can double click on each of them for further customization.
At any time you can save the session and use it again and again. In general, the program works great. Offsite: www.sunlitgreen.com
Need to download music from VK?
04/07/16 4.9KIn this article, you will learn how batch photo processing and how to apply it to multiple images.
We'll create a Photoshop Action that changes the length of our images to 1000 pixels, and then we'll apply this action to multiple images at the same time. Photoshop automation features such as actions and batch processing have been available for a long time, so you can complete the tutorial in Photoshop CS3 and newer versions:
Images for processing « Distressed Paint Overlays for Your Graphics»
First, let's create a new document sized 2000 by 1500 pixels. This will give us working space to create an operation for batch processing photos in Photoshop:
Go to the menu Window> Operations (Window> Actions) to open the action panel. Click on the folder icon Create a new set» (Create New Set ) at the bottom of the Actions Pane and name the set « Resizing Actions". You can move sets and operations on the panel by clicking and dragging them:
Click on the created set to select it. We will be creating our operation within this set to save it for later use. You can't save actions outside of Photoshop and open them on another computer unless they're in a preset.
Click on the button " Create a new operation» ( Create New Action) and name the operation "1000PX Wide" (" Width 1000px»):
Press "Record" ( record) to start recording your operation in this batch photo editor. Everything you do now will be recorded step-by-step for later use in batch processing. Go to menu Image > Image Size and set the width to 1000px. Make sure the checkboxes next to the " Scale Styles» ( Scale Styles), « Keep proportions» ( Constrain Proportion), "Interpolation" ( Resample Image).
Set the resampling drop-down menu to " Bicubic automatic» ( Bicubic Automatic). Click OK. Don't worry about the document size settings, as the operation only writes the values for the labeled fields, the width value we changed, and the resampling settings in the dropdown menu:
Now we need to save our image to the operation we are recording. Otherwise, we would not write down the Save As command ( Save As) in operation, but batch processing requires it to export the correct file type. Go to menu File > Save As and save the blank document as a jpeg. Check the box " Embed color profile» ( Embed Color Profile). Click Save ( Save).
It doesn't matter where you save the image during the recording of the operation, because we will define the destination folder where the image package will be saved later, but you must definitely click the "Save" button to determine the file type in the operation for photoshop batch processing photoshop:
Go back to the action panel and click on the "Stop" icon ( Stop). Our operation is ready! See the image resizing and saving steps we followed? It's simple:
Go to File > Automation > batch processing to open the batch processing window. Select " Resizing Actions” from the drop-down menu “Set” ( set) And " 1000PX Wide from the Operation menu ( Actions):
Press Select ( Choose) under "Source: folder" ( Source: Folder) and select the Distressed Paint Overlays folder where you saved it. We will be resizing these images:
Leave the field " Ignore "Open" commands» ( Override Action “Open” Commands) unchecked because we didn't open any files during the recording of our operation. Field " Include all subfolders» ( Include All Subfolders) also leave it unchecked as the stock package we are using does not have any subfolders.
Fields " Suppress file open options dialogs» ( Suppress File Open Options Dialogs) And " Disable color management messages» ( Suppress Color Profile Warnings) must be checked so as not to confirm parameter changes for each image in the batch.
Most JPEG images will have an embedded sRGB color profile, which is Photoshop's default working RGB, so there shouldn't be any color management system warnings anyway. If the image doesn't have an embedded profile, Photoshop can set the working profile to sRGB . It is important that there are no pop-ups during batch processing of photos. dialog boxes, otherwise all automation targets will fail:
Create a new folder on your desktop. Name it Batch Process Images Resized . Go back and in Photoshop's batch processing window, set it as the destination folder. Make sure the field " Ignore "Save As" commands» ( Override Action Save As Commands) is marked.


