Backup is one of the most important factors in the safety of your data, be it your website files or your email archive. In this guide, you'll learn how to back up your email using three popular email clients.
Quick navigation:
Before starting this guide, it's worth expanding your knowledge a little about incoming mail protocols and the differences between them. There are two mail protocols: IMAP and POP3. The main difference is that IMAP allows you to synchronize your emails with multiple devices, while POP3 does not have this feature.
Another big disadvantage of POP3 is the inability to export outgoing emails to an email client. Therefore it is recommended to use IMAP protocol, if your email provider allows it. For a more detailed explanation of the difference between IMAP and POP3, take a look at.
Before we start this guide, you will need the following:
First, you need to get information about your mail server. In the Hostinger control panel, it can be found in a special section. To obtain it, follow these steps:


Once you have obtained the necessary mail server data, you can continue with setting up your mail client and creating backup copies of your emails. Below you can find 3 options on how to backup your email using different email clients.
Let's start by adding your account in Outlook. In this tutorial we will be using Outlook 2016. For instructions on how to complete this process in more detail. earlier versions Outlook take a look at this guide.


Backing up your emails in Outlook is a fairly easy process and only takes a few minutes.
Launch Thunderbird and enable the Set Up New Mail Accounts Wizard. If this is your first time running Thunderbird, the Setup Wizard will appear automatically. You can also call it by pressing the button Mail:


You may have noticed that Thunderbird is not showing any of your messages right now. To download your messages from the server, click the button Receive messages.

You have successfully configured your Thunderbird client. Now let's move on to backing up your emails. This can be a little tricky since Thunderbird doesn't have a built-in message export feature. However, there is a workaround:


You have successfully completed the backup of all your incoming emails and saved them on your computer.
MacOS users can back up their mail using the Mac Mail client. Follow these steps to add your email account to Mac Mail:


Process Reserve copy emails in Mac Mail is very simple:


That's it, you have successfully backed up your mail using the Mac Mail client. Format mbox supported by most major email clients. Therefore, you should not have any problems if you decide to transfer your emails to other email clients.
In this tutorial, you learned how to back up your email using 3 different email clients. You also gained knowledge of the main differences between POP3 and IMAP.
Postal Mozilla program Thunderbird makes working with correspondence and newsgroups much easier if you configure it correctly. The procedure is simple and will not take much time from the user, but will help optimize the workflow in the future. From this instruction you will learn how to customize Mozilla Thunderbird as efficiently as possible in order to use the full potential of this tool.
Profile – information that is generated during the operation of the email client, but does not relate to executable files programs:
By default, Mozilla Thunderbird creates a profile called default immediately after installation. It will also be used by the program in the future, unless you specifically create a new one using the Profile Manager.
When creating a profile, a name like xxx.yyy is assigned, where xxx is 8 numbers randomly generated by the program, and yyy is its display name. IN different versions The OS location of the profile files is different. To quickly find a profile,
You should click on the main menu button of the program and follow the path “Help” - “Information for solving problems”. Opposite the “Profile Folder” item there is a “Open Folder” button. By clicking on it, you will be taken to the target directory, where you will see the required files.


To create backup files Mozilla Thunderbird profile, you should follow a simple algorithm:
You can store the backup copy either on your computer’s hard drive or external media– optical disks, flash drives, file sharing services and cloud servers.
To restore a Mozilla Thunderbird profile, simply copy the folder to the target directory and replace the files. If the procedure is carried out after reinstalling the OS and the default profile is given a different name after reinstalling the program, you should not copy the folder, but only the files contained in it.
During the Mozilla Thunderbird setup process, most settings are set to automatic mode. Manual settings are required only in cases where the Email provider is not included in the program’s automatic configuration databases or non-standard email account parameters are used.
All that is required from the user in this case is an email address, an account password and a username. All other parameters are security protocols, domain names and the ports used, Mozilla Thunderbird will download from the server from the configuration database.
The configuration proposal is issued by the program during the first launch after its installation. If the user skipped this step for any reason, Mozilla Thunderbird mail settings can be called up at any time through the main menu (“Create” - “Get new mail record”).

In the dialog box that appears, Mozilla Thunderbird will prompt you to create a new mailbox. You can refuse this by clicking the appropriate button.

In the next window, you must fill in the fields provided and click the “Continue” button.

All that remains to be done is to select the appropriate protocol (IMAP or POP3) and click the “Finish” button.

The program will redirect the request to mail server(in this particular case, it shows how to set up Mozilla Thunderbird for Gmail), where you should log in and give it access to your account.


If the correct data is entered and everything is done correctly, the email client will connect to your account and download all correspondence.
Note! In the case of Gmail, letters and notifications are not sorted by category (Social Networks and Promotions), as when entering the mailbox through a browser. In Mozilla Thunderbird they are presented in the form of a list, which is not always convenient to use.

Another aspect that you should know about how to set up Mozilla Thunderbird mail concerns the transition of an account from POP3 to IMAP. POP3, as an older protocol, is no longer used almost anywhere, and all major email providers have long ago switched their servers to IMAP.
If your provider does not support IMAP, but you want to take advantage of all the benefits of this protocol, it is recommended to change your service provider and set up forwarding of correspondence from the old mailbox to the new one.
It is enough to create a new IMAP account, moving all the necessary correspondence from the old one:

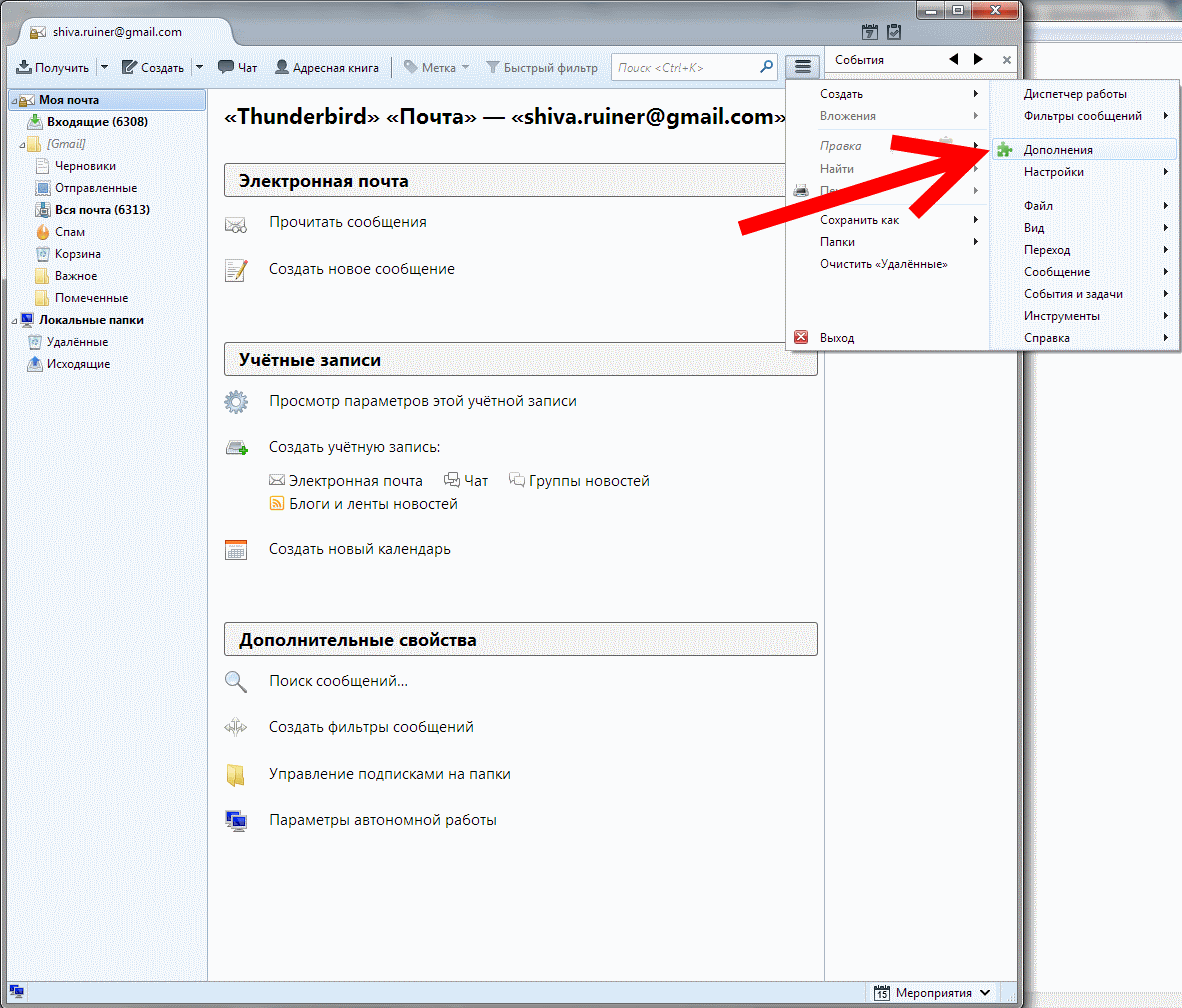
In Mozilla Thunderbird, themes are presented as separate themes that must be downloaded from the Internet. This can be done without visiting third-party resources right in the program window. To do this, click on the “Add-ons” item in the main window.
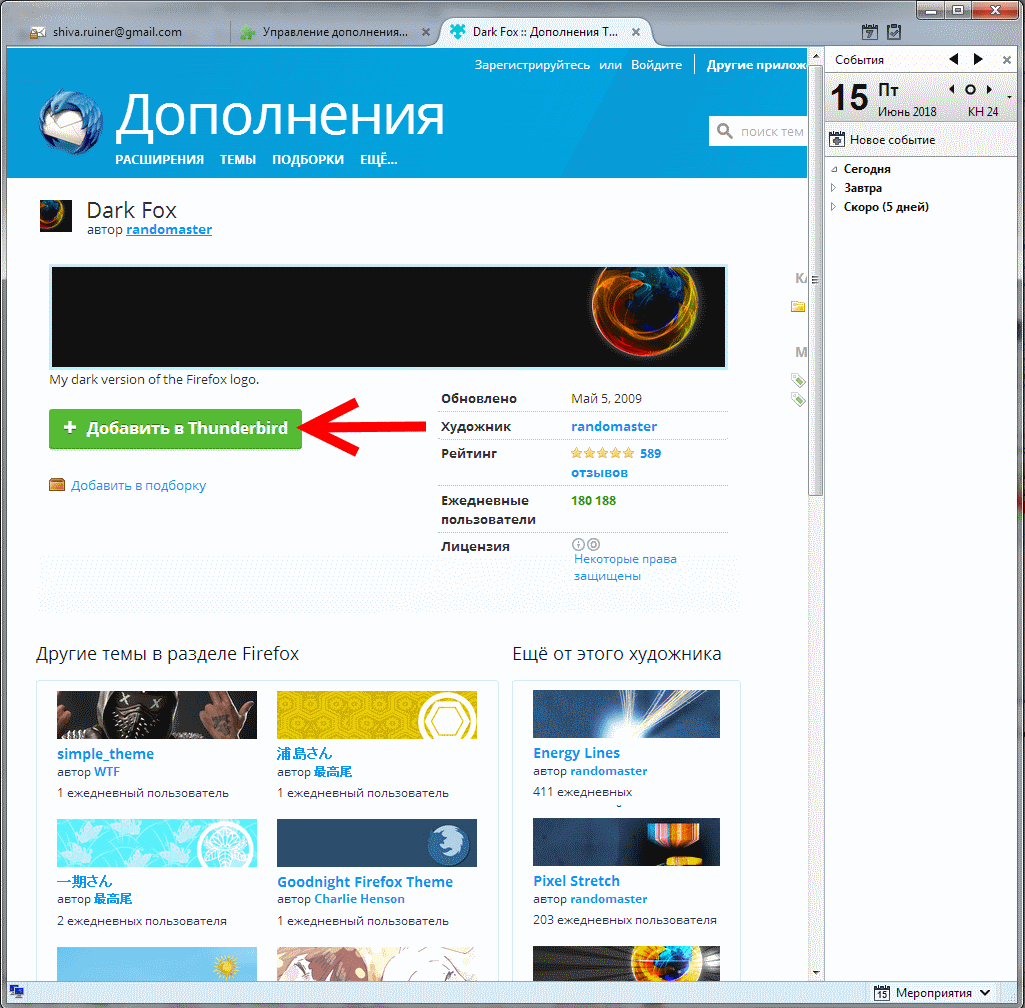
Scroll down the contents of the “Get Add-ons” tab and opposite the “Favorite Topics” item, click on the “Show All” link.”

Having found a suitable theme, click on its name and on the next page click the “Add to Thunderbird” button. Don't forget to also click the "Allow" button in the pop-up window.
The downloaded theme is applied automatically. If you have downloaded several themes, to switch between them you need to go to the “ Appearance» add-on management menu and click the “Enable” button next to the name of the theme you want to apply.

In the same menu, you can remove Mozilla Thunderbird themes that you no longer like.
In Mozilla Thunderbird, you can install one or more filters to automate actions with received or sent correspondence. Filters work in the order in which they are located in the user's list. To create a new filter, go to the main menu of the program and select “Message Filters”. In the window that opens, you need to select the account to which the filter will be applied and click the “Create” button.

The filter settings menu will open. All key filtering parameters are set by selecting the appropriate option from the drop-down list.

Using this tool, for example, you can filter out spam by a specific word in the body of a letter or set up saving correspondence from a specific counterparty in a separate folder.
This feature will be needed if you are on vacation or absent for several days. You can configure it using a simple algorithm:

Setting up an autoresponder in this way is easier and faster than setting parameters for each connected mailbox. The main thing is to remember to turn off or remove the filter when you return from vacation.
In Mozilla Thunderbird Mail settings allows you to customize a response using a template not only for all incoming letters, but also, for example, for specific counterparties or by keywords.
Setting up filtering for unwanted or fraudulent mail in this program is much easier than filters. To do this, go to the “Settings” item through the main menu.
The following actions are available in the “Protection” tab:

Sound notification settings can be found through the main menu in the settings in the “General” tab. To signal the receipt of mail, you can use both standard accompaniment from the operating system sound circuit and an audio file that is stored on the computer’s hard drive. If the function is not needed, it can be disabled by unchecking the corresponding box.

In email correspondence, it is considered good form to include all contact information at the end of the letter so that the recipient can contact the sender at any time. in a convenient way. To avoid entering this data manually each time or copying it from text file, you can create a ready-made template based on which to generate new outgoing messages.
The first step is to make the signature itself. To do this, create a new message using the Ctrl+N key combination and type (or copy) contact information. Then, in the message creation window, select “File” - “Save As” - “File”, select a storage location on your computer and set a name.
Then in your account settings you need to find the “Insert signature from file” option, check the box and set the path to the saved file.

The signature text can also be placed in the appropriate field in the account settings. In addition, you can attach a business card - for example, an image, animation or short video.
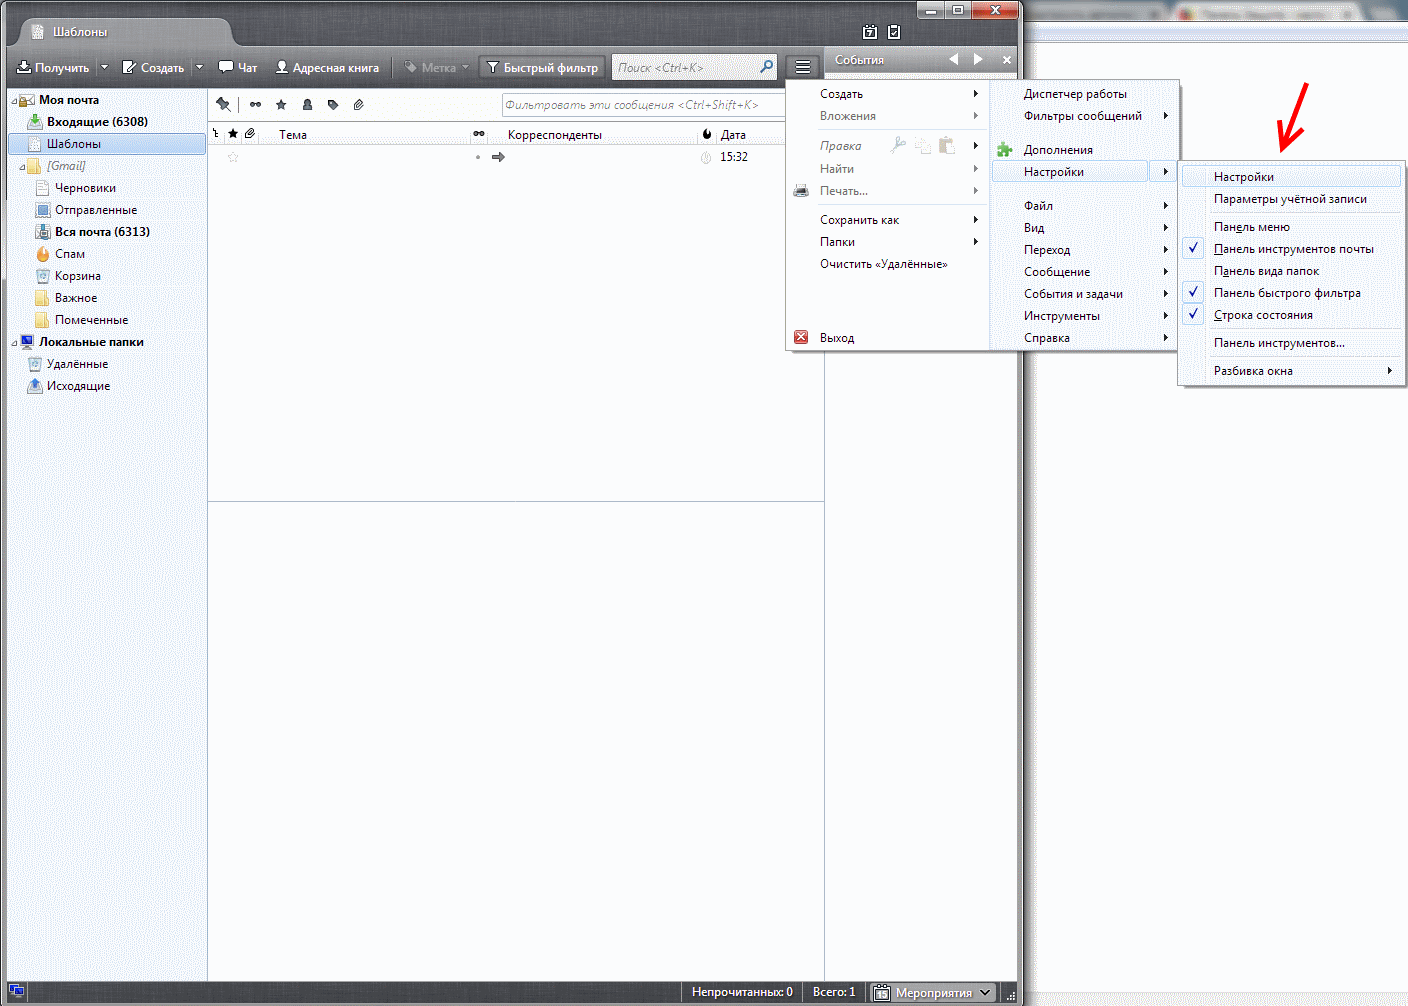
To edit these values, you need to right-click on the account name, select Settings and in the window that opens, go to the “Server Settings” tab.

Here it is recommended to adjust the mail checking interval and actions with deleted letters, but do not change the key parameters of the program - the port used, security and authentication methods, since incorrect settings there may be problems with Mozilla work Thunderbird.
Since the program is cross-platform, all work data can be moved between different operating systems– for example, Windows and Linux in any direction. The account also belongs to this data, therefore it is stored in the same place as all other profile files (where exactly, see above). Exporting a Mozilla Thunderbird account is similar to transferring settings: just copy these files to the target computer. You can use not only physical drives, but also move them using remote access– for example, using Team Viewer or Radmin.
Parameters required for correct work with by Gmail, shown in the example above. Conveniently, setting up Mozilla Thunderbird for Mail ru or Yandex is no different: these popular providers have been using the IMAP protocol for a long time, so the configuration is loaded by the application automatically.

It just so happened that in this email client at the time of writing, the function of automating the backup of emails using built-in tools is not implemented. Of course, it is possible to add letters to the archive, but this must be done manually, which is not so convenient, especially for the admin, who, if something happens, will remain the last one. There are many other email clients whose built-in functionality allows you to set up automatic backups, but they are usually paid. Without taking into account this small drawback, the Mozilla Thunderbird email client is generally quite good and functional, especially since it is completely free. Fortunately, you can deal with the problem that has arisen very simply; you only need to install an extension that fills in the missing functionality of the email client. And extensions such as Awesome Auto Archive and AutoarchiveReloaded can help us with this. Using the latter as an example, since it is Russified, we will show how to set up automatic archiving of letters.
1. Launch Mozilla Thunderbird and expand the drop-down menu.

2. Select the “Add-ons” menu item

3. In the search, enter the name of the extension. In the resulting list, select the one you need and click “Install”.

4. You will need to restart your email client.

5. After the restart, open the menu again, select “Add-ons” and in the “Extensions” tab we find the newly installed AutoarchiveReloaded. Click the “Settings” button to set archiving conditions.

6. Check the box “At startup” and “extended log”, if required.

7. The remaining settings are made in the account settings. There are two ways to access the account settings menu. Via the "Tools" menu

or by placing the cursor on the account name, call up the context menu with the right button and select “Options”.

8. In the window that opens, first select the “Copies and Folders” section, then click the “Archive Settings” button.

9. Here we select the desired folder structure for the archive that we want to create.

10. And finally, in the “Auto-archiving settings” section, select the conditions that the archived letters must satisfy.

This completes the setup of the email client.
To protect the archive from users, which will be updated every time it is launched, it would be a good idea to create a script that will copy the archive folder to another location. And in the planner Windows jobs You can set a schedule for running this script. After you complete these simple manipulations, you can be sure that all your letters or letters from other users are in local network are securely hidden, and getting a lost letter, if necessary, will not be difficult.
How to transfer mozilla thunderbird to another computer. Last time I told you how to transfer Firefox. Today we’ll look at transferring the Thunderbird email client, with all the settings, from Windows to Linux. Although this option is universal and, by analogy, you can transfer mail with all settings between any systems.
For this post, I created a test mailbox on Yandex and will show everything using it. We will transfer the thunderbird profile with all settings, addresses and letters. First you need to copy your current profile. On Windows it is located here by default:
C:/Users(users)/User(username)/AppData/Roaming/Thunderbird/Profiles/oyxt8jon.default
Instead of - "oyxt8jon.default" there will be the name of your profile, the numbers and letters will be different. If you don't remember where the fundbird is installed. Here, just like forefox, you can see in which folder the thunderbird profile is located. Click the settings button. Hover your cursor over Help. From context menu Select Troubleshooting Information.

A page will be displayed on which a lot of information is displayed. But we are interested in the "Application Information" section. Find the "Profile Folder" column and click the button called "Show Folder".

The profile folder will open. You need to copy this folder completely. For convenience, you can create an archive. Then copy this folder, for example, to a flash drive. And copy to any convenient folder to the computer where you transfer your mail. Close the program before copying.
How to install icedove on Debian. She happens to be complete analogue Funderbird. Therefore, I will not repeat myself. So. I copy the archive file to my user’s home directory and unzip it. Now open the Icedove program folder. It is located in the home folder and is hidden. Open file manager nautilus. To display it, press the key combination “Ctrl+h” or on the control panel, click the down arrow button and check the “Show hidden files” option.

The folder is located at this path:
Home directory/.icedove/md9m3wcw.default (profile name)
Your profile name will, of course, be different. Open it and delete all contents. Then open the folder that we are transferring from windows and copy its contents to the icedove profile directory in Debian. If the program was in Russian, then Russification may fail. In this case, reinstall the icedove Russification package.
Backup of mail messages is a way to protect your mail from loss. And if an accident occurs with your email client or computer, you can restore all your mail in 1 click.
MozillaThunderbird is a popular email client that many email users have chosen. However, the problem of lost mail messages has not escaped them either. The fact is that none mail program, with the exception of highly professional ones, cannot boast of the presence in its interface of such an important function as mail backup.
Thus, like all other email users, Mozilla Thunderbird users have to look for a solution to back up email messages and other information stored in their email client. If you are faced with similar problem, then we hasten to please you: today there are a lot of simple and reliable solutions for copying popular email clients, including Mozilla Thunderbird mail.
http://www.handybackup.ru/email-backup.shtml
In order to choose the optimal solution, it is worth taking a closer look at the functionality of mail backup programs. Let's start, of course, with the function of choosing an email client. Your mail backup program must support Mozilla Thunderbird's copy feature, only then is it truly suitable for you. That is, it is important to clarify exactly how the backup program works with this particular email client. Ideally, the program should have a separate preset for Mozilla Thunderbird backup.
This means that the user simply needs to select the Mozilla Thunderbird backup option in the program menu and all data from this email client will be automatically backed up, including messages, addresses, contacts, calendars, settings, and everything else.
In addition, the Mozilla Thunderbird mail backup program should be able to archive and encrypt Mozilla Thunderbird backups, because you do not want to lose the most valuable information in the process of saving it to media or transporting it to a remote server.
The issue of saving backup copies is also not unimportant. The integrity of the data ultimately depends on where you store Mozilla Thunderbird backups, because if they are lost, the data will have to be restored and it all depends on the reliability of your Mozilla Thunderbird backup program and the quality of the media.
In many cases, it is appropriate to save Mozilla Thunderbird backups to remote FTP servers or remote computers over a network. Although copying to optical discs such as CD, DVD, HD DVD, Blu-ray - also good way. The main thing is not to copy Mozilla Thunderbird backups to local HDD, otherwise the backup loses all meaning.
As for the process of copying Mozilla Thunderbird mail itself, it should be carried out regularly according to a predetermined schedule. Only such copying can guarantee that not a single message will be lost as a result of a breakdown hard drive or other trouble. Good program Backup has a flexible task scheduler with the ability to run a Mozilla Thunderbird mail backup task every day, week, month and many other features.


