So, we are faced with the task of creating a bootable USB flash drive for the subsequent installation of Windows xp into it. Later versions of this OS are installed with Flash with a bang, but with xp there are a lot of installation problems, especially on older computers. Therefore, this article will show a method that works in particular on new and old PCs.
Although this OS is considered obsolete, it is still in demand due to old working configurations, for which there are practically no alternatives other than Linux and Xp. So while the old iron is working, there will be demand.
WinSetupFromUSB - free program allowing you to create a bootable USB Flash drive (flash drive) to install all versions of windows. Download latest version programs can be on the Of Site. After downloading, extract the archive, and run WinSetupFromUSB.exe or x64, depending on the bitness of your OS.
After starting the program, you need to select the flash drive we need. After that, you need to click on " RMPrepUSB".
In the window that opens, select the following options:
boot sector- XP/BartPE bootable.
File system and options - Fat32, Boot as HDD (C: 2PNTS).

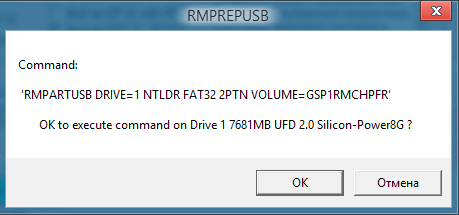
Click " Prepare Disk"As a result, the flash drive will be formatted. Two confirmation windows will appear, click" OK ".

In a black window (command line) you can observe the preparation process in%. At the end, it will close itself, you need to close the remaining window by clicking the "Exit" button.
Next, in the main menu of the program, check the box "Windows 2000/XP/2003 Setup" and specify the folder with the installation files. To do this, you will need to first unzip the installation image to a location convenient for you. You can unpack with archivers 7zip or W inrar, or programs for working with images, for example DAEMON Tools or UltraISO.

After you have selected the files, click on "GO". The process of copying files to a USB flash drive will begin. It takes 5-10 minutes depending on the amount of data.
To start installing windows, you need to set our flash drive as bootable in the BIOS settings. To do this, while turning on the PC, in the first seconds of loading, press the "Delete" or "F2" key on laptops, and look for boot partition or something like that.
If everything is done correctly, then the next time you reboot, you will see such a window, just press "Enter".


Chose 3 items. Installation will begin operating system. Further, after the first reboot, a window will appear again, in which you will already need to select item number 4 to continue the installation. That's it, the article is over.)

I will lay out here the method of preparing a USB-flash drive and then installing Windows XP from it.
Let's get started. First, we need to download the actual program itself.
It is desirable that the Windows XP disc is not geno-modified. It is also recommended to use Windows XP with SP3 installed.
Download and extract WinSetupFromUSB somewhere. Let's create a folder into which we will copy the contents of our Windows XP CD - say, As a result, this folder should look something like this:
We connect the USB-flash drive to the computer and run WinSetupFromUSB:

In the "Add to USB disk:" field, check the "Windows 2000/XP/2003 Setup" checkbox in advance and point to our folder with the copied Windows XP distribution kit -
Now we need to format our USB drive. In WinSetupFromUSB, press the "RMPrepUSB" button, we get into the formatting program window:
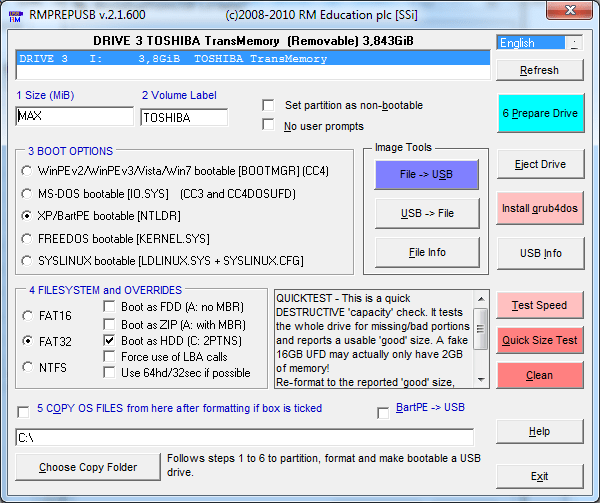
We arrange the daws, as in the above screenshot, press the button "6 Prepare Drive" - ATTENTION! ALL INFORMATION THAT WAS ON THE DEVICE WILL BE LOST OF COURSE!
Once the formatting is complete, all we have to do now is press the "GO" button. 
The installation process of Windows XP in our case is slightly different from the standard one. When we first boot from a USB-flash drive, we get into the menu GRUB4DOS:
We are interested in the second point. We select it, we get into the following submenu:
1. Back to Main Menu
2. First part of Windows XP setup from partition 0
Select item number 2 - "First part of Windows XP setup ...". Further, the installation process continues as usual, until the reboot. After the reboot, you should boot from the USB flash again. Back to the menu: GRUB4DOS:
1. EXPERIMENTAL - Start PLoP boot manager
2. Windows XP/2000/2003 Setup
Again, select item number 2, again we get into the submenu :
1. Back to Main Menu
2. First part of Windows XP<ваша версия Windows>setup from partition 0
3. Second part of 2000/XP/2003 Setup / Boot first internal hard disk
but here we already choose point number 3 - Second part…
After that, finally, Windows XP will be finally installed.
Making a bootable flash drive
The program for a bootable flash drive WinSetupFromUSB + a sequence of actions in pictures. Download WinSetupFromUSB 1.0.
 I have not been using an optical drive for quite a long time, I remember it only when I drive the ubiquitous dust over the components. So today, having noticed this “suitcase”, I thought about it - is it needed in a modern PC? What actually prompted me to write about what I use without noticing - a USB bootable USB flash drive with Windows. Next, we will talk about how to hammer the last nail into the coffin with optics - how to create a bootable USB flash drive that works the first time. So, what we need: a USB flash drive, a Windows image, WinSetupFromUSB 1.0 program for a bootable USB flash drive and a little careful patience ....
How to make a bootable Windows flash drive from A to Z in pictures.
For those who came to mind creating a bootable UltraISO flash drive, I will say this - there is such an item, but I do not advise it. With UltraISO, you will create a bootable USB flash drive, but at least you will get - txtsetup.sif is damaged or not found, and with it additional problems. So we discard these thoughts, and then we are only interested in specials. WinSetupFromUSB 1.0 bootable flash drive program (for installing Windows XP / Vista / 7 / 2003 / 2008).
Actually, with her direct participation, using the example of the Windows XP image, we will create a bootable USB flash drive from iso. So, step one - a program for a bootable USB flash drive WinSetupFromUSB 1.0 - download WinSetupFromUSB.zip. The program does not require installation, unzip the archive and WinSetupFromUSB is ready to create a bootable USB flash drive.
Step two - when WinRAR help unpack the Windows XP ISO image. bootable flash drive was created on the basis of a stable image of Windows XP Pro SP3 Rus, performance was checked many times. For those who do not want to mess with creating an image, I advise - download uTorrent 3.1.3, with the corresponding torrent Windows XP Pro SP3 Rus. Well, we will continue to find out - how to make a bootable USB flash drive with Windows.
Bootable flash drive step three - connect USB-Flash, drive into My Computer, click right click mouse on the flash drive label, left click - format. What and how to choose, look at the picture. A minute's work and now we are ready to create a bootable USB flash drive from iso.

Creating a bootable flash drive step four - run the WinSetupFromUSB 1.0 program, in the window that opens, select - Bootice.

In the next WinSetupFromUSB window, click - Perform Format.

In the third window, select the item - USB-HDD mode (Single Partition), at the bottom press the button - Next Step.

In the fourth window of WinSetupFromUSB 1.0, select - NTFS, click - OK.

We agree with all requests, we are waiting for the completion of the process. Well, then the actual creation of a bootable USB flash drive. We minimize all secondary windows, only the main WinSetupFromUSB window remains. The next sequence of actions is shown in the picture. Put a tick, select the folder with the unpacked way Windows XP Pro SP3 Rus.

A bootable Windows flash drive is a step away from you, we press the button - GO, in the same place you will see a progress bar. The program for creating a bootable USB flash drive WinSetupFromUSB 1.0 has entered the final phase, have a cup of tea.

When you return, a window will be waiting for you - Job done. I hasten to congratulate you - a bootable USB flash drive from iso Windows is ready, and now you know how to create a bootable USB flash drive with Windows.
Reinstalling the operating system is the most popular way to solve all computer problems. People prefer to install the OS on a new one, instead of dealing with its problematic moments on their own and spending long hours editing the registry, manipulating command line and so on. It’s hard to blame them for this, because a simple reinstallation of the system is sometimes much easier and faster than its manual “treatment”. Especially considering the fact that there are many that automatically write the image of the operating system to a USB flash drive and other removable media.
One of the most popular programs developed for such purposes is WinSetupFromUSB. In this article, we will consider this program in as much detail as possible - from downloading it (we will dwell on this point in more detail) to the additional functionality that it has.
The WinSetupFromUSB program is not as simple as it might seem at first glance, because the difficulties begin already at the very first stage - at the download stage. If most programs can be easily found using a search engine by typing in their name, then this is a completely different story. If you download a program from a dubious site, then at best you will get its outdated and outdated beta version, and at worst - a lot of unnecessary additional software and viruses.

So if you want to download the most current version utility that does not contain malware, then do everything as described in the instructions:

On a note! New versions of the program may appear from the moment of writing the article until you read it, so click on the very top list to download the latest one. The expanded list also contains information about updates.
So, you have downloaded the latest version of the program, which does not contain viruses and other unwanted software. Now let's move on to the installation. Follow the steps below to install "WinSetupFromUSB" on your computer:


On a note! If you have an operating Windows system 7, then there may be difficulties with sorting this folder - for example, if you set sorting by date of modification in a folder, this does not guarantee that it will be the first in the list.
After installation and launch, you will see the main program window containing many buttons. In addition to its main task - writing an operating system image to a USB drive, "WinSetupFromUSB" has a number of additional features, but about them a little later. First, let's take a quick look at the interface of the program. For convenience, the main window was divided into five fields, each of which was numbered. Remember the numbers of these fields - we will refer to them more than once.

On a note! In field No. 4 there is also a button "DONATE", with which you can transfer money to the developers of the program, thanking them for their efforts. Remember that they release their products for free.

The main task of the WinSetupFromUSB utility is the operating system on a USB flash drive. Therefore, below we will tell you how to do it.
So, if you want to create a bootable USB flash drive using this program, then follow these steps:

As you can see, it turned out to be even easier to burn the OS on a USB flash drive than to find a normal link to the program. Also during the recording you will have access to additional options, which were mentioned earlier (field No. 4). Let's consider them in more detail:

On a note! The additional features that are included in the "WinSetupFromUSB" program are not intended for beginners. Therefore, if you do not understand what all these complex terms and abbreviations mean, then it is better not to touch them at all. However, there is nothing to worry about - for the main function of the program (creating a bootable USB drive), they are not really needed.
As mentioned earlier, in addition to simple creation bootable flash drive has a number of additional functions located in field No. 2. Let's consider them in more detail:

So, we examined in detail the WinSetupFromUSB program and dealt with each stage of its use - from downloading to creating a bootable USB flash drive. As you can see, it is much more than it seems. Indeed, in addition to writing an OS image to a USB flash drive, you can do many other useful things with it.


