When your PC stops booting from its hard drive, you may find yourself in a stalemate if you haven't created a bootable rescue disk or device.
The recovery disc doesn't just start the PC, it also includes tools to help fix what's wrong with the system. Creating a recovery drive takes minutes.
There are various ways to create offline, emergency, bootable recovery disks. When Windows usage 7 and 8 create good rims recovery is quick and easy. Vista and XP also provide the means to create recovery discs, but the process will take a little more effort.
There are also numerous third-party boot disks - both paid and free - that work with all versions of Windows. The best of them have recovery and return to work capabilities that are far superior to their own. Windows tools.
Of course, you can boot your PC using the original Windows installation CDs or DVDs, and they provide some basic recovery tools. But most PCs now come with installation files located in a special section on the hard drive. Such files will not be available unless you take the time to create a rescue boot disk. In other words, the recovery partition will be useless for you in an emergency in which the PC cannot be booted!
Even if you've taken the trouble to back up your system image, you may still need a rescue disk on hand to restore the most recent image.
In part 1 (and there are two in total) of this article, I will cover a long series of emergency recovery discs for XP, Vista, Windows 7 and Windows 8. I will start with Windows features 8 and will move back to XP. I'll also start with the built-in Windows tools and then mention some excellent third party products - most of them are free!
Next week, in Part 2, you'll learn how to use these discs to boot your PC and how to get to the recovery tools they contain. I will also share some advanced tips and tricks.
Windows 8.0 and 8.1 both include built-in Recovery Media Creator. This tool allows you to easily make a bootable recovery disk from a flash drive or external USB device. You can also create bootable CDs or DVDs using Windows 8.0 tools.
The standard recovery device (or CD/DVD) from Windows 8 contains a bootable recovery image - a simplified custom version of Windows 8 - that will start the PC. It also includes tools to repair and restore core Windows 8. It may also include tools to reset or update the system based on a system image, such as those provided by computer manufacturers.
If your PC contains a factory-installed recovery image available for use (usually in its own dedicated partition), Recovery Media Creator (RMC) can also add the image to the recovery boot disk. If necessary, you can completely restore your system exclusively from the recovery disc. (You can even put a custom recovery image on a recovery drive. I'll cover that in Part Two.)
The Create Recovery Disc tool is very easy to use. And here's how much:

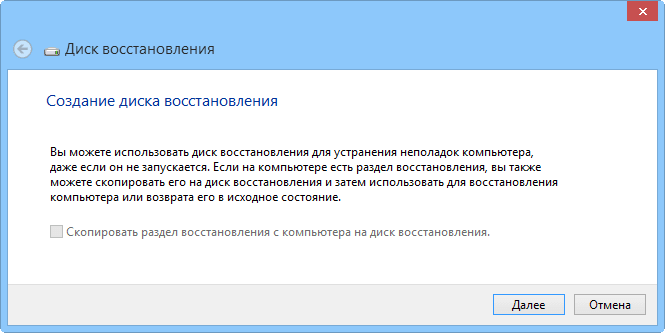
Figure 2. Creating a recovery drive in Windows 8 is a step-by-step wizard that is easy to use.
If the checkbox Copy the recovery partition from the computer to the recovery drive(Copy the recovery partition from the PC to the recovery drive) is displayed in black and responds to clicks, you can burn the recovery image provided by the manufacturer of your PC to the recovery disk. Just check the box to enable this option.
If this checkbox is greyed out and doesn't respond to a click, then you obviously don't have the option to burn the factory image to a recovery drive. However, don't worry, the recovery disc you create will still contain a bootable, stripped-down recovery Windows image 8, as well as a standard array of recovery tools.
For more information on the Create Recovery Disc tool included with Windows 8, visit the Microsoft Support page - .
Windows 7 was the first Windows system to come with an automated tool for creating a bootable rescue CD or DVD. The tool doesn't do as much as the Windows 8 version - you can't add an OEM recovery image, for example - but it's just as easy to use. Just a few clicks and your recovery disc is ready!
And here's how much:

Figure 3. Backup and restore
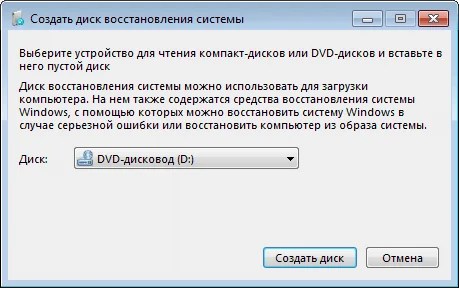
Note: If Windows 7 can't find the files it needs, it will prompt you to insert a disc Windows installation.
For getting additional information Microsoft offers a video tutorial on its Windows 7 page.
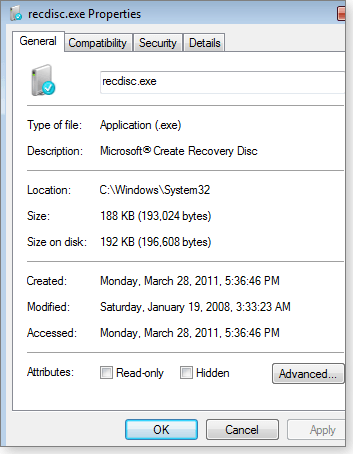
The beta version of Vista SP1 came with a great utility Create Recovery Disk (Create a recovery disk) (recdisc.exe) (see figure 5). But for reasons known only to Microsoft, the utility was cut in all manufactured versions. File recdisc.exe still exists in Vista, but it's not functional!
Nevertheless, enthusiasts liked the working version of the utility. So they cooked up the files and made them available for download - along with how-to's. This is not an officially sanctioned solution, but it has been openly discussed and recommended by Microsoft MVP on the Microsoft Answers forum. For example, see the Microsoft Answers topic " " (Creating a System Repair Disc for Windows Vista).
Get recdisk.exe not difficult, but the steps are too long to detail here. A thread on a third party "VistaForums" forum called " " (How to create a Vista recovery disc) has the best how-to instructions that I know of. The only thing I would add to the practical guide is the standard remark: before doing any system changes, make a backup.
If all this is beyond your ability, try using a third party boot disk as described below.
XP does not have the built-in ability to create a bootable rescue disk.
For years, the best alternative has been UBCD4Win(stands for "Ultimate Boot CD for Windows"). But creating that boot disk is a long and complicated process that requires some technical skill and access to a full XP installation CD.
UBCD4Win is still in use, and still free, but I don't recommend it anymore. Now there is a better remedy.
Hiren's BootCD includes an amazing array of free tools - about 100 in total ().
The CD itself is based on Linux, but you don't need to know Linux; The text view application has simple menus for selecting the tools you will launch. (See figure 6.)

Figure 6. Hiren's BootCD includes an array of approximately 100 free repair and repair software.
Oddly enough, Hiren's BootCD also contains a stripped-down "Mini XP" based on the gray system. It is intended as a disaster recovery tool for use by owners of licensed, paid copies of XP - not as a replacement for purchasing a license or a standard installation of XP. Within its limited scope, it works great. When your regular (licensed and paid) Windows XP system won't boot, MiniXP with Hiren's BootCD can help you get it up and running again.
You can get Hiren's BootCD on his . But finding a working download link can be tricky - the page contains several distracting alternative download links for inappropriate tools.

If the built-in Windows tools aren't available or don't work for you, there are plenty of free alternative bootable recovery discs. Like Hiren's BootCD, most of them are made with Linux based and comes with a wide range of preconfigured maintenance and recovery tools.
Here are four of the best:
Tools Easy Recovery Essentials from NeoSmart Technologies deserve a separate discussion. They are favorably mentioned in almost every Internet forum dedicated to restoring Windows.
This is partly because the tools are quite good and can work in all Windows versions- XP, Vista, Win7, Win8, Windows Server.
But the popularity of these tools grew in part because they were free. While many online discussion forums still list NeoSmart drives as free, they are now commercial products. US pricing starts at $20 for Easy Recovery Essentials home edition and ends at $75 for Server edition. You can find a list of all versions and prices for .
For a really modest price, you get a bootable iso image that you can download and burn to a CD, DVD, or USB device. Once launched, Easy Recovery Essentials enables highly automated recovery capabilities. In fact, many complex recovery operations can be launched with one simple click without requiring any further user input.
To get an idea of how easy it is to use these tools, check out the NeoSmart demo video. NeoSmart also offers a money back guarantee.
I suggest you, if possible, start with the tools available in Windows. They handle most common tasks and maybe everything you need. They provide the performance of familiar operations, as well as a few unusual ones. Hey, you already paid for them!
If the Windows tools don't provide what you need, try the free bootable recovery discs at Linux-based. While the Linux environment may be unfamiliar to most Windows users- especially command line tools linux strings, - there is usually enough documentation to help you overcome any rough edges.
If neither the built-in Windows tools nor the free Linux-based tools work for you, commercial tools may be ideal. NeoSmart's Easy Recovery Essentials tools in particular work well, are very easy to use, and come with a money-back guarantee.
Next week: you'll learn how to use these recovery discs to boot your computer and access the tools they contain. I will also offer some additional tips and tricks. Stay with us!
Mar 3 2015
How to restore the Windows 7 system on a laptop, a black screen comes up on boot, the recovery environment does not work, I deleted all the hidden partitions, there is no original disk with Windows 7.
I spent a lot of time, tell me what to do now or at least how to insure myself against such situations in the future, preferably without using paid programs Reserve copy data.
Unfortunately, there are enough reasons for this trouble, ranging from incorrectly written drivers, the harmful effects of a virus, file system errors and ending with our erroneous actions when working with a computer, you don’t need to be afraid of such problems, you need to learn how to deal with them effectively.
Let's think about how to restore the windows 7 system, as well as insure ourselves for the future from possible troubles using the backup and recovery tools built into the operating system.
We will learn how to restore Windows 7 without using third party programs for backup even when System Recovery Options does not load and the F-8 button is useless.
It has in its arsenal quite powerful and good tool-> Recovery environment, which is created automatically when you install Windows 7 in a hidden partition and contains five other tools that solve numerous malfunctions and problems.
Note: If you learn how to use the right tools Windows recovery 7, and this is not difficult, then you can do without additional and paid data backup programs.
You can start the recovery tool by pressing the F-8 button on the keyboard immediately after starting the computer. After that, a menu of Additional boot options will open in front of you: Troubleshoot your computer, then Safe mode, Safe Mode with Boot network drivers etc.
Small digression: Before choosing the item Troubleshoot your computer, try the easier option - Last Known Good Configuration - in simple words, the operating system always remembers the last successful boot of the computer and enters this information into the registry.
In case of problems with booting, Windows can remember the registry settings and driver settings that were used the last time the system was successfully booted and use them if you select the Last Known Good Configuration option.

If this tool does not help, select the first -> Troubleshoot your computer,

Next, we get to the Recovery Options menu Windows systems 7, we need it, it is here that we can choose the System Restore Tool we need, there are five of them in total, let's take a closer look at how they all work.
The first thing to do is apply Startup Repair (Automatically fix problems that prevent Windows from starting).

Required digression: After pressing the F-8 button when the computer boots up, you may not have an item > Troubleshoot your computer, but only Safe Mode and so on, the question arises why.
When installing Windows 7, a recovery environment partition is created automatically and is located at the root of the drive (C:) in the Recovery folder. You can also see in the Disk Management window - a separate, hidden partition of the hard drive, its volume is only 100 MB, it is used for storage boot files boot configuration (BCD) and system boot loader (bootmgr file).
You can see it Computer-> Management-> Disk Management. In no case can you delete this partition (many people delete it out of ignorance), otherwise you will not start the recovery environment, that is, you will not have the Troubleshoot computer item, and in more severe cases you simply will not boot the system.

On the bottom screenshot, you can see another hidden partition, with a capacity of 9.02 GB, this is a hidden recovery partition with the factory settings of my laptop, you can have it more or less. It is also better not to delete it, if necessary, you can always restore Windows 7 from it.

What to do if you do not have a partition with the recovery environment and when you press the F-8 button, in the Advanced boot options menu, the Troubleshoot your computer item does not appear? How then to restore the Windows 7 system?
The installation disk with the Windows 7 operating system can save here. You can start the recovery tool by booting from the original installation disk Windows 7 by selecting System Restore at the very beginning.
If you don't have an installation disk, then you can use the Windows 7 Recovery Disk (you can make one in any running Windows 7) in five minutes, then you can also boot from it and do the same.


So, we still got into the System Recovery Options, either using the F-8 button and the Troubleshooting item, or the Windows 7 installation disc or the Windows 7 Recovery Disc.
In the System Restore Options menu, select the first one:
Launch Recovery-> there will be an analysis of faults that interfere with the normal Windows boot 7 and further fix them for normal loading and functioning operating system.
In the process, we may be warned that problems have been found in the boot options, click Fix and restart.


System Restore-> using this function, we can select a previously created system restore point, if we have it enabled, and roll back to the time when our Windows 7 worked fine and loaded, everything is simple here.


Restoring a system image-> I personally use this tool, with skillful use it can be replaced paid programs on data backup, if interested, read on.

Why is he good? It will help when you don't have the original Windows 7 installation disc and you have deleted the hidden partition with the factory settings of your laptop, but that's not all.
Sometimes there are situations when, for various reasons or due to the actions of a virus, you will not be able to load the operating system at all, or many people ask How to restore the Windows 7 system, even if the menu with Additional boot options is also unavailable. Reinstall the operating system again?
Therefore, immediately after installing Windows 7 on your laptop or computer, we create using this function -> Restore the system image, archival image our Windows 7 on the hard drive, take care of it.
Be sure to create a Windows 7 Recovery Disc (read below), it will help you use the System Image if the Advanced Boot Options menu does not load.
Go to Start -> Control Panel -> Backup Computer Data.

Select "Create a system image".

In my case, the Local Disk (E :), if you have system unit some hard drives, then of course backup is better place on the hard drive where the operating system is not installed.

By default, the data backup program will automatically select the partition with the Windows 7 operating system, if you wish, you can add Local drives for archiving yourself, as long as you have enough space.

Note: You can see that I have two operating systems installed on my laptop, so the backup program chose two Local drives.

Click Archive and the process of creating an archive with our Windows 7 will begin.
Created, it will look like this.

Now, you can deploy the archive with Windows 7 to your computer, if necessary, in 20-30 minutes. It would be better if you copy the archive with the system additionally to a portable hard drive, this will double your safety.
Let's pretend that we can't start Windows 7 and deploy the backup we created, let's do it together.
We launch the Windows 7 Recovery Tool by pressing the F-8 button on the keyboard immediately after starting the computer.
The Advanced Boot Options menu opens, select Troubleshoot your computer.

Restoring a system image


Use the latest available system image.


Of course, all our data on the Local Disk, where the operating system is now being restored, will be deleted, so you can pre-boot from any Live CD and copy what you need.
How else can you restore your Windows 7 system? Of course with the help of the Windows 7 Recovery Disk.
Let's create, which can be used to boot the computer, it will contain recovery tools with which you can repair Windows 7 boot problems, as well as restore the operating system from the backup copy that we created in advance.
Important: The bitness of the system is important for the recovery disk, you can use a 32-bit recovery disk for any 32-bit Windows 7, and a 64-bit recovery disk for any 64-bit Windows 7.
Again we go Archiving computer data.

Create a system recovery disc, insert the DVD into the drive, click "Create Disc".


When boot disk Windows 7 recovery is ready, put it in a safe place.
In order to restore Windows 7 from the Recovery Disk, in principle, no operating system is needed at all.
You will only need to change the boot priority to the drive in the BIOS of your computer, insert the recovery disk into it and restore your Windows 7 using the archive.
Many here can draw an analogy with data backup programs, and rightly so, they work on the same principle, but their functionality is of course more convenient.
Restoring Windows 7 from the Recovery Disk. I show you how to do it. Suppose we are in trouble, we cannot start Windows 7, when we press F-8 on the keyboard, nothing happens immediately after starting the computer.
We cannot get into the menu with Additional boot options and an error message is displayed. In this case, the system archive on the hard disk is not available to us. It was precisely such a nuisance that happened to our reader Ilya, who wrote us a letter asking for help.
In this situation, many reinstall Windows 7 from scratch, but not us, because we have a System Recovery Disc.
We insert it into the drive and reboot, put it in BIOS boot from the drive, as I said the disk is bootable, the System Recovery Options program is launched.
Press Enter until the offer to boot from disk is gone.


The automatic recovery tool running from the disk will try to repair Windows startup 7.


If all else fails, select any tool, try for example Recovering a computer using a previously created image of the operating system.


We use the latest available system image.


There is another little-known way to restore Windows 7 boot after a crash, and I'll tell you about it. At first glance, it will seem difficult to many, but nevertheless it often helps me out.
The fact is, friends, that a very large part of the problems due to which you cannot boot Windows 7 lies in registry errors. And Windows 7 wouldn't be Windows 7 if it didn't have a mechanism to protect registry files. Such a mechanism exists and creates archive copies of the registry in the RegBack folder every 10 days, regardless of whether you have system restore enabled or not.
If you can't fix problems booting Windows 7, you should try replacing the existing (and apparently corrupted) registry files from the Config folder. archive files from the RegBack folder. To do this, we will have to boot the computer from the Windows 7 installation disc or the Windows 7 recovery disc.
We boot into the recovery environment, select the command line.

We type in it - notepad, we get into Notepad, then File and Open.

We go into the real explorer, click My computer. Now we need system disk C:, attention, the drive letters can be mixed up here, but the system drive C: I think you can recognize by the system drive inside Windows folders and Program Files.

We go to the C:\Windows\System32\Config folder, the current registry files are located here, we specify the File type - All files and we see our registry files, we also see the RegBack folder, in it every 10 days the Task Scheduler makes a backup copy of the registry keys.

So, we will replace the existing registry files from the Config folder backup files registry from the RegBack folder.
So, first of all, let's delete the SAM, SECURITY, SOFTWARE, DEFAULT, SYSTEM files from the C:\Windows\System32\Config folder, which are responsible for all registry hives (my advice is to copy the registry hives somewhere before deleting just in case).

In their place, copy and paste files with the same names, but from a backup copy, that is, from the RegBack folder.


Note: You cannot delete the SAM, SECURITY, SOFTWARE, DEFAULT, SYSTEM files all together, delete them one by one. Then copy the same files from the RegBack folder in their place.
Friends, if this does not help, apply integrity restoration Windows files 7, in case the operating system does not boot, it is done in the same way as in Windows 8.
What else do we have left of the Windows 7 recovery tools?
Memory Diagnostics 7-> checks system memory for errors. Command line -> with it you can delete files that interfere with loading Windows 7.
I hope our article on how to restore a Windows 7 system helped you.
Description Reviews (0) Screenshots
Acronis True Image 2016 is a utility that allows computer users to take advantage of advanced data security and important information against theft or inoperability of your computer by creating and storing a complete image of your system in a secure remote storage. In other words, this is a program for Windows recovery 7.
Using the best local backup options on connected portable USB media data, users of their computer can be one hundred percent sure that a complete system image, including all data, applications, files, bookmarks and settings, will be securely protected.
The simple and easy-to-use interface of Acronis True Image 2016 allows users to back up and restore Windows 7 much more easily using previously saved data. User data and backups will be available and restored anytime, anywhere, for absolutely any computer.


Once you download the above application, you will forever get rid of the fear that your operating system will fail. If you liked this program, we advise you to pay attention to .
Backup is the most important procedure that every PC user should carry out. Unfortunately, most of us remember about backup only when important data is already irretrievably lost.
If you store on hard drives your computer not only entertaining content, but also important documents, work projects or databases, then you need to think about their safety. You should not forget about system files and settings, as damage to them can deprive you of access to your account, and therefore to data.
Acronis True Image is one of the most widely used and powerful backup, recovery and storage software. Acronis can create copies individual files, folders and entire drives. In addition, it includes an arsenal of tools for system security, boot repair, rescue media creation, and disk cloning.

The user is given space in the cloud on the server of software developers, which can be accessed, as well as program management, not only from a desktop machine, but also from a mobile device.
Aomei Backupper Standard is slightly inferior in functionality to Acronis, but it is also a very efficient tool. It includes utilities for cloning and creating boot disks on Linux and Windows PE, has a built-in task scheduler and a function to notify the user when e-mail about the results of the next reservation.

This is another combine for creating backups. Macrium Reflect allows you to mount copies of disks and files on your system to view the contents and restore individual elements. The main distinguishing features of the program are the functions of protecting disk images from editing, checking the file system to detect various failures, as well as integrating into boot menu operating system.

This program, in addition to backing up files and folders, allows you to synchronize the contents backups and directories on local and network drives. Windows Handy Backup can also launch selected applications when starting or completing a backup procedure, send notifications by e-mail, and work through the Windows console.

Windows Repair is a comprehensive software for restoring the health of the operating system. The program performs "treatment" of the system in case of failures in the firewall, errors in service packs, restrictions on access to system files viruses, and also restores the performance of some ports. To improve security, there is a disk cleaning function with flexible settings.

All software from the above list is designed to restore the system from backups created. Only Windows Repair stands out from the overall picture, since the principle of its operation is based on identifying and eliminating errors in file system and registry.
Most of the presented programs are paid, but the price of important information stored on disks can be higher than the cost of a license, and it's not just about money. Make backups in a timely manner key files And system partitions, to protect yourself from unpleasant surprises in the form of disk failures or hooliganism of malicious applications.


