15.06.2019
Often, restoring the operating system or rolling it back allows you to quickly and effectively get rid of many serious problems that, for example, appeared after installing updates. Unlike previous variations of Windows, version 10 offers five ways to help restore the graphical shell to working.
Often, personal computer users resort to system recovery after receiving new updates for the OS. Unfortunately, despite the quality of the operating system itself, Microsoft often releases "crooked" updates. After installing them, there can be two development options:
A more common reason why you need to perform an OS recovery is that the software. For example, if the user installed any drivers, after which the programs stopped functioning properly, then the best option The solution to the problem will be exactly the restoration.
More advanced PC users often try to make some changes to the system registry. This is a common practice, but in inexperienced hands it can be pointless and cause a lot of harm. Since in system registry contains information about all applications, their data, including the data of the system itself, then you should not make any adjustments here. If, after the changes, the PC stopped working as before, it is necessary to use OS recovery.
It should be noted that if the PC began to work somehow differently, errors of an unknown kind appear, you can always use the recovery function. It will not harm the operation of the device, but will remove all changes that were made after the date the restore point was created.
Microsoft Corporation latest version The OS has given users many options to restore the OS. The choice of one method or another directly depends on the capabilities of the user, as well as the state of the device itself. Let's consider three options:
One of the most useful features operating room Windows systems 10 - restore point. It was present in previous versions, but did not involve storing many variations of the state of the OS. As a rule, a restore point was created either automatically after making changes to system files or drivers, or manually by the user. Now, if errors occur in the operation of the device, you can always use the optimal rollback point.
Restore points still contain only information about the changes made. As such, there is no operating system image in this case. This means that if you did not create restore points yourself, then only those dates will be displayed in the list when changes were made to critical and system OS files.
First, the user needs to log in to the recovery settings section of the Windows 10 operating system. This can be done as follows:
In the panel, click the "Create a restore point" button
Change the restore point settings for the selected hard disk partition
Activate the function of creating a restore point and specify the amount of memory that will be used for this purpose
Upon reaching the specified amount of memory, old restore points will be deleted and overwritten with new ones.
To use existing restore points, follow these steps:
Select the appropriate restore points: recommended or custom
All points created by the user are displayed in the list, from which the appropriate option is selected
To create an OS restore point yourself:
This feature is a kind of novelty, since in previous versions of the Windows 10 operating system, the only thing the user could do was to reinstall the OS on their own. At the same time, the presence of the corresponding CD or image was mandatory.
This is not required for Windows 10. The system will use the data stored on the hard disk executable files for installation. In this case, the reset procedure itself will take from 20 minutes or more (directly depends on the configuration of the device).

The same can be done without entering the graphical shell on the user selection screen. Hold Shift button and at the same time press the "Restart" button in the lower right part of the window. A special window will appear in which you will need to use the "Diagnostics" tool, and then select "Revert to original state".
As an analogy, one can also use new feature, which appeared in Windows 10, called "Start over". This process is practically no different from the option described above, except that a clean installation of the operating system will be performed. It starts in a few clicks and can take up to 20 minutes depending on the computer. A distinctive advantage of this function is that, compared to a standard reset, additional software that was installed after the purchase of the device (antiviruses, programs from the manufacturer, and much more) will not be restored.
To take advantage of this feature, do the following:
In the "New Start" section, click "More Information"
To activate the function, click the "Get Started" button
Activate the "Start over" function to start a clean Windows versions 10 and confirm its execution
The File History feature first appeared in the Windows 8 operating system. It can be very useful, especially for non-professional users. This feature will come in handy if you accidentally deleted an important file or directory, incorrect changes were made, or the data of any program was affected by malware. In all these cases, the user can use the "File History" function, which allows you to restore the previous, healthy state.
It is worth mentioning that this possibility has own settings. If the user has not made any changes, the system will automatically back up such folders as "Desktop", "Documents", "Pictures", "Music" and "Videos". Retention periods are also configurable, but by default, the data of these files will be stored indefinitely.
To launch settings and view this function, use standard search Windows 10 by specifying in the "File History" field.
In the "History storage" section, the user will see the hard disk partitions and the drives used, as well as the status of the function itself. To activate it, just select the appropriate section and click on the “Enable” button.
Turn on the file history recording feature on the computer
If you want to change the saving options, use the "More Options" button. Here you can set the period of time after which the files will be saved, as well as the period of their storage.
Change the settings according to your needs by selecting the storage interval and storage time for files
To use the restore function through the "File History", open the directory where the necessary information was stored. In the "Home" tab, you will see the "File History" icon, which is required in this case.
Go to the directory to restore the file and activate the entrance to the "File History" section
To restore files and data, just enter the "File History", select the appropriate document and click on the restore button, after which it will reappear in the catalog. The procedure itself is completed in minutes.
Select the file you want to restore and confirm the procedure
Some problems that any user may encounter personal computer, are very serious and lead to the fact that the graphical shell does not load at all. In such cases, you may not be able to use the methods described above.
Fortunately, Microsoft has provided for this scenario and added several functions that will allow you to return the computer to a working state in cases where you cannot log into the OS.
Recovery disk - standard remedy to return the system to a working state. Do not pay attention to the name itself: not only a CD or DVD drive can act as a disk, but also an ordinary flash drive.
The only drawback of this method is that the user needs to write information about the operating system to removable media in advance and thereby create this recovery disk. In any case, you can use another computer or the help of friends.
The recovery disk involves saving to removable media the most important information about the operating system (files and directories). This will allow them to be used to replace damaged components in the future.
To create a disk, do the following:

An installation disc or other drive that contains an image of the Windows 10 operating system is very useful. For example, in the case when the OS does not want to boot, using such a drive, you can easily and quickly solve the problem.
If you do not have such a disk, use the built-in operating system tools to create it. This can be done like this:
In the "Control Panel" select the "Recovery" option
In the list of options, select "Create a recovery drive"
Select the appropriate drive from the list of installed drives and use it to create a drive
The last step is to change the boot order of the PC components through the BIOS.
Activate the built-in environment when the device boots using the Del button (button combinations vary by manufacturer) motherboard). Go to the Boot Configuration Features tab. Here, change the boot order of the components so that either the optical drive or USB is installed as the first one. It depends on which drive was used to create boot disk.
It is very important to remember the loading order of the elements, especially if you are a novice user. Otherwise, after making changes, the system will not boot correctly.
Exit the BIOS and wait for the OS installation window to appear. Here you can do in any convenient way:
A common problem that PC users may encounter when restoring is error 0x80070091. If it appears, you will not be able to use the device again, and the recovery process will not be completed.
It is necessary to warn in advance that it is extremely difficult to get rid of this problem and the user must be aware that all measures to which he resorts are carried out at his own peril and risk. Probably, some manipulations can lead to other problems.
The reason for this error is the contents of the Program Files folder, namely WindowsApps. Usually a malfunction appears after the next OS updates.
The solution to the problem is very simple. To do this, just delete the directory itself and subsequently use a restore point. How to create and use it was described above.
Type in the command to rename the folder
Turn on the display of hidden files and folders through the "Explorer Options"
Open the Edit WindowsApps directory option and change its name
During the first installation and activation of the operating system, the key specified by the user is automatically assigned to the device. It can also be saved to a personal account, which can be useful when, for example, you are going to install the same OS on another computer.
Nevertheless, no one is immune from the fact that after the next updates, the license key will simply fly off, and your version of Windows 10 will no longer work properly.
Restoring it is pretty easy. This is where the function will help us, in which the key is literally attributed to the account. To restore the key, do the following:

The entire further process of working with this option is described above.
Note that upon completion of the procedure, the license key will return to its place, but some information will still be deleted. This will depend on the recovery method that has been chosen.
After reinstalling the operating system or restoring it, the screen resolution often becomes non-standard. For example, if you previously used 1920 × 1080, then it will probably change to something else after these procedures.
The problem is solved in two ways:

If you have set a password to log into your account on your computer, but for some reason forgot it, use the recovery tools. The procedure directly depends on the type of account used (local or Microsoft).
Reset account password Microsoft records performed online. It can be done even with a mobile phone.

If everything was correct, follow the instructions on the screen. So you can easily and quickly regain access to the computer.
Second possible way fixing a pressing problem - using the built-in administrator account. This option is most useful if you have forgotten your local account password.
An important feature of this option is the need to use a recovery disk. How to make and use it was described above.
Change the boot options for computer components through the BIOS, as described above. When the language selection window for installation appears, use the key combination Shift + F10. List the commands here one by one:

Remember the name of the hard disk partition on which the directory with the operating system is stored, it will be required later. Enter the exit command to exit the diskpart utility.
Also in the "Command line" enter the following commands:

If the operations are completed without errors, exit and change the boot options in the BIOS.
It remains only to return to the account selection screen and in the section accessibility select "Command Prompt". Specify the following information in it: net user username newpassword. So you can change the password and use it to enter the graphical shell.
There are many recovery tools for the Windows 10 operating system, most of them can be used even if the user does not have the opportunity to log into the graphical shell of the computer. You can also resort to additional funds as special programs, created by third-party developers, but it is better to use standard set tools in the system.
BIOS- a set of utilities that are installed on the motherboard, which make it possible to turn on the device to install the OS. With its help, Windows boot 10, storage media selection, thermal sensor range is indicated, various parameters are configured. If the system stops booting, errors fly out and perform a recovery in a standard way fails, you can through the BIOS.
But this method can only be used if you have an installation disk or flash drive with a distribution kit of a licensed operating system with the version and bit depth that you have installed, without external drive this option not possible.
First of all, you need to start with BIOS settings to read the disc immediately when you start your computer.
If the preparation of automatic recovery does not make it possible to restart the computer normally, you need to do it forcibly, holding down the shutdown buttons for 10-15 seconds, as soon as the system starts to boot, you must press one of the keys: F1, F4, F3, Delete, F8 (exactly what it is you who needs to click cannot, as it depends on the model of the motherboard on your device).
In the instructions for the computer or on the manufacturer's website, you can look for which key you need to enter. Most PCs use the "Delete" button, laptops can use the "ctrl+alt+esc" key combination.
After the BIOS starts, go to the Boot section.
You need to find the "1st boot device" parameter, which can be located in the "Boot Device Configuration", "Advanced Features", "Boot", "Boot Sequence. There you will need to set the parameter for the CDROM or PXE UND I disk to boot from a USB flash drive:

Press "F10" to save the result, insert the disk into the drive or connect the USB flash drive on which the distribution is stored, then reboot the device.
After the computer boots up, it will appear start menu system installation, where you will need to click on the "System Restore" button.
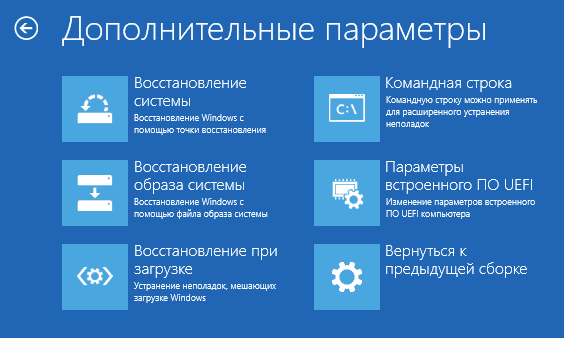
The "Select actions" menu will open, you need to select the "Diagnostics" item.

Then go to the item "Advanced options".

After clicking, a window will open with a choice of a restore point.

The Startup Repair feature scans your computer for errors and fixes them as they are found. You can try to run the utility, but in most cases, after the search, it usually displays a message that the computer could not be restored.
If you had a rollback and your Windows was successfully restored after the specified actions, then the field of this will need to go into the BIOS and return the hard disk boot priority back to the first place.
How to restore Windows 10 via command line.
If you did not create a checkpoint, restore Windows systems 10 you can try to execute through the command line. To do this, you will also need a boot disk or USB flash drive with the Windows operating system installed on your computer.
In the "Advanced Options" section, select "Command Prompt"

In the window that opens, type "fixboot".

Then the action must be confirmed by pressing the "Y" key.
After restoring the Windows 10 bootloader, the system needs to be checked for corrupted system files.
If you do not want to restart your computer, you can restore the system through the command line from Windows. To do this, you will need to insert the disc into the DVD-ROM while the PC is booted. Then launch the command prompt by pressing the hot key combination "Win + R" and in the search row of the "Run" window, enter "sfc / scannow" and click "OK". After that, the broken system distributions will be copied from the boot disk automatically. System restore, rollback is quite fast and hassle-free.
If you are interested in restoring Windows 10, then you have come to the right place.
Let's figure out how to get Windows 10 back up and running without using third-party programs.
This option will help fix errors that appeared after installing software, Windows updates, registry changes, and similar actions.
The Resume feature allows you to return registry settings and protected system files to a previously saved state, one of the checkpoints that Windows creates automatically.
The user's documents are not affected.
Regeneration points in "tens" are created before installing programs, drivers, system updates, or just once every 7 days. In addition, the user can create them manually.
Procedure

Resuming the system is also available when Windows 10 does not start. If the download fails, instead of the welcome window, you will see the following:

By clicking the "More recovery options" button, you will be prompted to select an action. Here you need to click on the "Diagnostics" item.


After that, a familiar window will open asking you to select a control point. Follow the instructions and wait for the wizard to finish.
This option will help you deal with errors that the System Resume feature does not fix, or when there are no suitable checkpoints or are not being created.
Restoring Windows 10 to its original state can be done:
Important! On computers and laptops where Windows 10 was installed by the manufacturer, a third option may be available - restoring to factory settings. In this case, not only data and user settings are deleted, but also the contents of non-system partitions of the hard disk.
Restoring to the factory state without saving personal information is used as a last resort - an alternative to reinstalling the system in case of hard-to-remove failures, as well as before selling the computer or transferring it to another user.
Order return Windows 10 to original state


After about 40-60 minutes, Windows 10 will be back in service.
This method is available only to those who installed the "ten" in the order of updating the previous OS - "seven" or "eight". And it is possible only within a month after the update.
This will save the user's files in personal folders, drivers, software and settings of the previous system, and everything that was in Windows 10 will be deleted.
To roll back to the original OS, launch the Settings app from the Start menu, open Update and Security, then Recovery, and select Revert to Windows 8.1 (7).

If this item is not in the list of parameters, then the function is not available. It will also be unavailable if the user has deleted the Windows.old folder from the system partition of the hard drive.
This option will be useful for those who have previously created a regeneration disk. It saves a backup copy of the system with workable parameters.
To create a recovery drive, do the following:

Ready media with backup a copy of Windows must be stored in a safe place and not used for anything else.
How to restore Windows 10 from a backup
If the system boots, open the Settings app -> Update & Security -> Recovery and Reset this PC.
After rebooting into the recovery environment, select the "Diagnostics" section and "Restore the system image".

Windows will be automatically restored with saving user files, software and settings. The system state will be the same as when the backup was created.
The mid-summer of 2015 was marked by the release of the highly anticipated Windows 10 operating system. Consumers were able to get it by downloading free update. Which offers every computer with Windows 7 and 8.1 installed. A new version identified itself as the most reliable. But like any mechanism, sooner or later it can fail. Older versions suggested various ways bug fixes. Windows 10 is no exception. How to return it to working condition or fix errors is described in this article.
Herself operating system offers users a wide range of recovery options. To begin with, you will need to diagnose the alleged problem with Windows 10. For example, if the computer does not boot up or freezes badly, then you should use the troubleshooting tools that are present on installation discs. If the operating system still loads, but it does not work well or often freezes, then you can use the means of the system itself to return to working condition.
There are three main methods of system recovery, each suitable for different situations based on the diagnosis of the problem itself. All of them are known and are similar to the methods that were in older versions of Windows:
The most common and does not require much knowledge in information technology The way is to use restore points. To use this method, the user needs to click on the notification tab, then select the items in sequence: "All settings" - "Update and security" - "Recovery".
Also get into this menu You can even without fully loading the OS. To do this, after the welcome screen appears, where the computer prompts you to enter a password, you need to click on the power icon and hold down the Shift key. After a couple of seconds, a window will appear in which you need to select the "Diagnostics" item and go to the "Return to original state" tab.
To start troubleshooting in Windows 10, you need to click on the “Start” button in the “Reset to its original state” item. After that, a dialog box will appear that will offer two options for reinstalling the OS:
This method deletes all old owner data and Windows settings 10. After that, all the necessary drivers and the operating system itself are installed. All actions take place in automatic mode- this prevents the occurrence of errors that may occur due to human error.
The disadvantage of this method is that it will not be able to resurrect the OS if there is damage to the hard drive. This will require other methods.
The method returns the computer to its original form, but at the same time retains all the owner's data. This fix does not format files stored in the users folder (sections such as Documents, Pictures, Downloads, and so on). But at the same time, all programs that were previously installed will be removed. 
This method has been used for many years by the Windows company. System points for fixing a non-working OS are known to many, but few people know how to check or enable them. They help the owner of the computer to get it working in case of unsuccessful installation of the driver or other programs that led to the breakdown of Windows 10.
To make sure that the program creates such points on a schedule, the user needs to go to the "System Settings and Restore" menu. To do this, right-click on the "Start" button and select the following items in turn: "Control Panel" - "Recovery" - "System Restore Settings". 
As a rule, the creation of points occurs automatically according to the schedule, and this feature is enabled by default. But the owner can always change most of the parameters on his own by clicking on the "Configure" button.
All restore points are created automatically when any important changes are made. software settings and parameters, as well as various services, installing programs, etc. In the case of experiments or other dangerous moments, the owner can create a record of the system state himself.
If Windows 10 does not work well after installing a program or driver, then by going to the appropriate item, you can return to its original state. To do this, select the "Start System Restore" section, where the user can select the date the point was created. After agreeing to the changes, you should click the "Continue" button, after which the OS will return to the state that was saved earlier.
The developers have left a feature to create a complete OS recovery image on a hard drive (built-in or external) or on multiple optical DVDs.
The difference from the previously used option is that the process creates a complete reflection of the operating system, including all installed programs, necessary drivers, individual settings that are relevant at the time the image is loaded. IN previous version the user could only get the OS installation file and save personal data.
It is best to create such a file immediately after complete installation OS, all drivers and necessary programs when the computer is fully configured and not littered with unnecessary files and applications.
To burn this image, go to the "Control Panel" menu, here we open the "File History" item. In the lower left part of the window, select the line "Backup system image", then "Create a system image". Alternative way: go to the "All Settings" menu, select "Update and Security", then the line "Backup Service", in the window that opens, click "Activation and Recovery (Windows 7)", then "Create a system image".
In the menu that appears, the user can independently specify the path where you want to save created file: options will be offered on HDD, on DVD or in network folder, select the required one, and you can also mark the items and sections on the disks that you want to include in backup, and which ones to remove from it. Most often, this is a partition occupied by the OS itself and the software parts of the disk. 
Subsequently, the resulting file can be used in order to quickly return the computer to the state that is needed. Run this function you can from the image itself from the disk on which it is saved, or select the "Recovery" menu in the program. To do this, go to the "Diagnostics" window, select the line "Advanced options", and then "Restore the system image".
Resuscitation work can be carried out both from a bootable CD / DVD disk, and from a USB flash drive.
In older versions of Windows, a specialized disk with a set of repair utilities was used. In a modern OS, this is a full-fledged disk with Windows 10 and various recovery programs.
For security, the user can create such a disk using the built-in tools of Windows 10. To do this, go to the "Create a recovery drive" menu.
This feature is also useful for quick system setup. To do this, select the item that makes a backup with a complete copy of all program files.
To start such media, you need to restart the computer and first, before loading the OS, go to bootmenu and select the desired disk. Or such a function can be configured in the BIOS, indicating from which media the boot will be loaded.
After saving the settings, a welcome installation window should appear. Here, you need to select the system restore item, then the "Diagnostics" section. This will enable the user to fix the system in several ways: 
Having such a device, the user can protect himself in many matters. An advantage can be fast installation Windows 10, with already available drivers on board.
As you can see from the above, Windows 10 offers a very big choice in fixing system errors. Even an inexperienced user can master them. They have the simplest and most convenient mechanism for interacting with a person.
Many may argue that there are currently a large number of products aimed at fixing the OS. They also have a convenient and intuitive interface. The flexible data saving algorithm is more perfect than in the operating system itself. All this gives the green light third party programs. But, as a rule, they cost a lot of money. Therefore, it would be good for the owner to know how to revive Windows 10 using the system itself.
In contact with
The Windows 10 recovery image is an official tool that will help you restore your OS if something goes wrong with it. You have two ways to get a look. The first way is to download the Windows 10 recovery image from the Internet. The second way is to create this image yourself, when your system is still running as stable as possible. Ideally, if you choose the second method. It is best to create an image at the moment when you just installed the OS. At this point, your system is as close to a clean state as possible.
You cannot download a recovery image for your computer. You can only create a personal image yourself, because it is unique. Of course, the image is created even at that moment, until you have any problems. Experts recommend creating images regularly. For example, every six months or a year. The image should always be at hand. After all, a computer can be disabled at any time. If you do not have a ready-made image, and the computer is broken, then you will need a second device on which you will create a Windows 10 recovery image from Windows image 10. Of course, for this you must read the instructions,
When the laptop starts to slow down terribly due to a bunch of installed and incorrect remote programs, system junk, many temporary files and other unpleasant things, the most logical solution is to roll back the system to its original state. In this article, we will figure out how to return a laptop to factory settings, using the example of all major manufacturers.
Many users will object that it is easier to reinstall Windows. But it has the same consequences as reinstallation, but it is much faster and does not require a boot disk. In addition, users are freed from the need to search for and install drivers - after returning to their original state, they only need to reinstall.
Each laptop manufacturer equips its devices with branded ones. However, work with them is carried out according to one scheme and requires compliance with a number of rules:
So, if you want to get the system in the state in which it was when buying a laptop (without brakes, freezes, extra programs and files), then choose a laptop from your manufacturer and follow the steps described.
Let's start with one of the most famous laptop manufacturers - Asus.

You don’t need to press or enter anything else - the recovery utility will figure out how to return the ASUS laptop to factory settings.

By the way, pressing the F 9 key when you turn it on for the first time will not lead to anything, since by default in ASUS laptops the "Boot Booster" function is activated. It needs to be disabled in BIOS. To do this, in paragraph " Boot", Move the value of the parameter to the position" Disabled».
Let's continue our study of the topic with a story about how to return Acer laptop to factory settings. You can perform this procedure from a running Windows (the utility is called Acer Recovery Management) or through recovery tools.

On Windows 8.1, the interface of the recovery utility changes. Here you will have to select the item in the "Diagnostics" section "revert to original state". The rollback procedure is not much different, besides, all the steps are described in detail in Russian, so you will quickly figure out how to return the Eiser laptop to factory settings.
To understand how to return a Lenovo laptop to factory settings, you first need to find a small OneKey Rescue button on the laptop case, which is responsible for launching the recovery utility.


Wait for the rollback procedure to complete and be sure to restart your computer for the new configuration to take effect. The answer to the question how to return lenovo laptop to the factory settings, received, but there are other manufacturers, so let's move on.
It was the turn of the South Korean manufacturer and the answer to the question of how samsung laptop return to factory settings.

You figured out how to reset a Samsung laptop to factory settings, so you can forget about the need to reinstall the system.
It's the next manufacturer's turn: let's see how to reset an HP laptop to factory settings.


Now you know how to reset your HP laptop to factory settings. It remains only to wait until the factory reset procedure is completed, and start using the laptop again.
Do you want to know how to return MSI laptop to factory settings?

That's all you need to know about how to factory reset an MSI laptop.
Now let's figure out how to reset a Toshiba laptop to factory settings. In recent models, starting the recovery utility is quite simple.
The program for resetting the parameters to the factory state will appear on the screen - you need to follow all the instructions of the recovery wizard.
But how to return a Toshiba laptop to factory settings if you have old model? Here you will have to use the "Troubleshooting" section, which can be selected in the menu of additional boot options (F8 key when turning on the computer).


After a short wait, you will see the system again in original factory condition.
If you are looking for how to reset your Dell laptop to factory settings, you can follow the instructions above (through "Troubleshooting").


The recovery program is completely Russified, so you can easily figure out what to do. Following the above step by step instructions, you will surely positively resolve the issue of how to return a Dell laptop to factory settings.
In this article, we have discussed the topic of restoring a laptop to factory settings of all the most famous laptop manufacturers.
When a laptop starts to slow down terribly due to a bunch of installed and incorrectly removed programs, system garbage, a lot of temporary files and other unpleasant things, the most logical solution is to roll back the system to its original state. In this article, we will figure out how to return a laptop to factory settings, using the example of all major manufacturers.
Many users will object that it is easier to reinstall Windows. But rolling back the system has the same consequences as reinstalling, but it is much faster and does not require a boot disk. In addition, users are freed from the need to search for and install drivers - after returning to their original state, they only need to reinstall the programs they need to work.
Each laptop manufacturer equips their devices with proprietary recovery utilities. However, work with them is carried out according to one scheme and requires compliance with a number of rules:
So, if you want to get the system in the state in which it was when buying a laptop (without brakes, freezes, unnecessary programs and files), then choose a laptop from your manufacturer and follow the steps described.
Let's start with one of the most famous laptop manufacturers - Asus.
You don’t need to press or enter anything else - the recovery utility will figure out how to return the ASUS laptop to factory settings.

By the way, pressing the F9 key when you turn it on for the first time will not lead to anything, since the Boot Booster function is activated in ASUS laptops by default. It needs to be disabled in BIOS. To do this, enter the BIOS, in the "Boot" item, set the parameter value to the "Disabled" position.
Let's continue our study of the topic with a story on how to return an Acer laptop to factory settings. You can perform this procedure from a running Windows (the utility is called Acer Recovery Management) or through recovery tools.

On Windows 8.1, the interface of the recovery utility changes. Here you will have to select the item in the "Diagnostics" section "revert to original state". The rollback procedure is not much different, besides, all the steps are described in detail in Russian, so you will quickly figure out how to return the Eiser laptop to factory settings.
To understand how to return a Lenovo laptop to factory settings, you first need to find a small OneKey Rescue button on the laptop case, which is responsible for launching the recovery utility.


Wait for the rollback procedure to complete and be sure to restart your computer for the new configuration to take effect. The answer to the question of how to return a Lenovo laptop to factory settings has been received, but there are still other manufacturers, so let's move on.
It was the turn of the South Korean manufacturer and the answer to the question of how to return a Samsung laptop to factory settings.

You figured out how to reset a Samsung laptop to factory settings, so you can forget about the need to reinstall the system.
It's the next manufacturer's turn: let's see how to reset an HP laptop to factory settings.


Now you know how to reset your HP laptop to factory settings. It remains only to wait until the factory reset procedure is completed, and start working with the laptop again.
Do you want to know how to reset MSI laptop to factory settings?

That's all you need to know about how to factory reset an MSI laptop.
Now let's figure out how to reset a Toshiba laptop to factory settings. In recent models, starting the recovery utility is quite simple.
The program for resetting the parameters to the factory state will appear on the screen - you need to follow all the instructions of the recovery wizard.
But how to reset a Toshiba laptop to factory settings if you have an old model? Here you will have to use the "Troubleshooting" section, which can be selected in the menu of additional boot options (F8 key when turning on the computer). 

After a short wait, you will see the system again in original factory condition.
Recovery - what kind of program is this? Translated from in English into Russian "recovery"- This "recovery". Recovery is a program preinstalled by the manufacturer on the hard drive of a laptop or during internal memory smartphone, which allows you to roll back the device (laptop, phone, tablet) to its factory state. In smartphones, this program is launched from the off state by simultaneously pressing and holding the power button and the volume button for a few seconds (usually "up", but sometimes "down" or both at once). For laptops, this monotony is not provided.
After turning on the laptop, we begin to feverishly press the keys:
F3– MSI recovery;
F4– Samsung. Under OS it is possible through Samsung Recovery Solution;
F8 Fujitsu Siemens. In general, it often allows you to get on other laptops (through troubleshooting) into the proprietary utility for Recovery.
F8- Toshiba recovery;
F9- ASUS recovery;
F10- Sony VAIO. Under OS it is possible through VAIO Recovery Utility;
F10- Packard Bell;
F11- HP recovery;
F11- LG recovery;
F11-Lenovo recovery.
Alt+F10- Acer recovery. Before that, select Disk-to-Disk (D2D recovery) in the BIOS;
Ctrl+F11- Dell Inspiron;
F8 or F9- Dell XPS.
clamp- Rover
In the main WinSetupFromUSB window, select the name of our flash drive.
Put a tick in the box Auto format it with FBinst and tick the FAT32 item,
Check the box Vista/7/8/Server 2008/2012 based ISO and click on the button that opens the explorer window.
Explorer opens, find on the computer ISO image Live CD AOMEI PE Builder and select it with the left mouse, click "Open".

We press "GO".


"Yes"

The creation of a bootable USB flash drive Live CD AOMEI PE Builder begins.

bootable flash drive ready.

"OK"

We boot the laptop from the bootable USB flash drive Live CD AOMEI PE Builder. Our flash drive is universal, from it you can boot a laptop with a UEFI interface, as well as with a regular BIOS.

Press "Enter" on the keyboard.

The desktop Live CD AOMEI PE Builder is loaded, which is a regular Live CD on Windows base 8.1.
Connecting a portable hard drive to a laptop USB disk or a regular USB flash drive with a capacity of 16-32 GB.

Click on Windows button Disk Management.

Disk management shows three drives connected to the laptop.
Disk 0. Laptop hard drive with all partitions:
The first hidden partition without a letter, 450 MB, contains the Windows 8.1 Recovery Environment.
The second hidden section without a letter, the volume is 100 Mb, with systemic EFI partition(contains the boot configuration store (BCD) and operating system boot files).
Section (C:) with installed Windows 8.1 that won't boot.
Partition (D:) with user data files.
The last hidden partition without a letter, the volume is 20.37 GB, it is on it that the factory image of Windows 8.1 is located. We need to enter this partition and copy the factory WIM image to a portable USB hard drive (I'll explain why later).
Disc 1. Bootable Live CD AOMEI PE Builder.
Disc 2. Portable hard drive USB, 1 TB capacity.

Before work, the disk (C:) must be formatted. Right click on it and select "Format"


"OK"

Drive (C:) is formatted.
Launching the command line

and assign a letterhidden partition, volume 20.37 GB.
We enter the commands:
diskpart
lis vol (list all hard disk partitions)
sel vol 5 (with this command we select hidden RECOVERY partition without letter, 20.37 GB, with factory image of Windows 8.1)
assign (the command assigns a letter to the hidden section).

Open the "My Computer" window and see that the letter (E:) has been assigned to the hidden section, go to this section.

First of all, we turn on the display of hidden files and folders, otherwise we will not see the factory WIM image with Windows 8.1, since it has the Hidden attribute. Click the left mouse on View (View) and put a tick on the item "Hidden" items (Hidden elements)

Next, look in the folders factory WIM image. On my laptop it is in the folder"Factory" is called install.wim. Regardless of the laptop manufacturer, the file containing the Windows factory image is called install.wim.

Sometimes given file divided into several files with the extension .swm what to do with these files, I will also explain to you later in the article.

So let's copy our file. install.wim to a portable USB hard drive. Right click on the file and select copy

We go to the section (H:) of the USB portable hard drive.

We click on an empty spot with the right mouse and select Paste (Insert).
File install.wim is copied to the (H:) partition.


File install.wim has been copied to the (H:) partition.

Friends, now we just need to deploy the contents of the file using the command line install.wim(factory image of Windows 8.1) to the drive (C :), for this you need to enter only one command, but you need to enter it correctly, the file index must be specified in the commandinstall.wim and is easy to identify.
Any install.wim file must have a so-called image index and in the next command we must specify it. To determine the index of the install.wim file image, open a command prompt and enter the command:
Dism /Get-WimInfo /WimFile:H:\install.wim
Where H:, letter of the drive where the file is located install.wim.
As you can see, the image index 1 .

Accordingly, enter the following command:
imagex /apply /check H:\install.wim 1 C:\
where image /apply /check H:\install.wim 1 C:\ means unpack the file install.wim from disk (H:) with checking the image for errors, to disk (C :), and 1 is the image index.
The unpacking of the Windows 8.1 image from the file begins install.wim to disk (C:). In other words, we did it with the help of the command line and the utility ImageX did what the factory reset program was supposed to do - deployed the factory image from the hidden partition to the (C:) drive.
Progress 100%. Unpacking completed successfully. Factory Windows 8.1 deployed to disk (C:)!

We reboot the laptop and get into the final phase Windows installation 8.1.
Language and regional settings do not change.

We accept the terms of the license agreement.

The laptop manufacturer may offer you to create your own ID and register the system. You can opt out by unchecking the appropriate boxes.

Enter the computer name.

You can immediately set up an Internet connection via WI-FI or refuse.
"Skip this step".

You can manually adjust the settings, I told how to do it.
Or you can "Use default settings"

Enter the username and click "Finish"

Windows 8.1 is loading.

When connected to the Internet, the operating system is automatically activated.

I anticipate your questions:
1. Hello admin! You have learned the index of the image install.wim using the utilityDism, why didn't they expand the image further with it?
Yes, you are right, you can use the Dism utility, the command will look like this:
Dism /apply-image /imagefile:H:\install.wim /index:1 /ApplyDir:C:\

but I've been used to the ImageX utility since Windows 7, Dism does the same, but the commands are 2 times longer, which means that the probability of errors (especially for an inexperienced user) increases.
2. Why move the install.wim file from a hidden partition of a laptop hard drive to a portable USB hard drive?
Basically, no matter where the file is install.wim, and on the command line you can specify the full path to the file, for example, in my case, the command would look like this:
imagex /apply /check E:\OKRBackup\Factory\install.wim 1 C:\
3. What should I do if on my laptop, in hidden section no file install.wim, and there is a group of files:
install4.swm...?
In this case, you need to add the key ref and the command will look like this:
imagex /apply /check /ref H:\install*.swm H:\install.swm 1 C:\

If you use Dism, then the command will look like this:
Dism /apply-image /imagefile:H:\Install.Swm /SWMFile:H:\install*.swm /index:1 /ApplyDir:C:\

4. After expanding the file install.wim Windows bootloader 8.1 gave an error. What to do?
It is better to restore the bootloader in the recovery environment. Live CD AOMEI PE Builder has a shortcut to go to the environment on the desktop WIN recovery 8.1 - Windows Recovery Environment.

5. I have a 32-bit operating system and your image Live CD AOMEI PE Builder 64 bit, not suitable for me.


 OTA update on Android?")

