A network adapter (also called a network card) is a device without which it is impossible to establish a connection to world wide web. In some cases, turning it off and on again helps solve communication problems. Many network cards can be connected to a computer, with different network connections. However, this is often not necessary for the average user. This article is designed for owners of Windows 7, but will be useful for almost everyone operating system Win lines.
To enable the network adapter in Win 7, click the "Start" button, find the "Computer" item on the right, click on it right click mice, causing context menu. In it, select the line "Properties" by clicking on it once. In the "System" window of the control panel that appears, find the "Device Manager" tab on the left and go to it. A list similar to the screenshot below will open. We look for the item "Network adapters" in it, click once, getting a drop-down list. If there are no sub-items in the list, or you cannot find an item called “Network adapters” at all, the network card may not be physically included or is defective. What to do in this case? Below we will give some tips and solutions (see point 6). We continue the setup. The screenshot attached above illustrates what the included and working ones look like. network adapters. If one of them shows an arrow (the icon is circled in red), then the card just needs to be turned on. To do this, right-click on the image and select "Activate" from the context menu. The arrow should disappear and the network adapter should work.


There can be many reasons for not connecting to the network, they are not limited to a malfunction of the network card. If after reading this guide you still have questions, ask them in the comments or contact technical support your internet provider.
A network card or network adapter is needed to create a local area network, with which you can connect several computers to each other, as well as to connect a computer to the Internet. Sometimes the card starts to work incorrectly, but you can restore it yourself using standard Windows 7 tools.
You need to update the drivers or change the card settings if you have problems with raising the local network or connecting to the Internet. Please note that the appearance similar problems not always caused by the network adapter, but sometimes it is because of it that errors occur that block access to the network.
The first thing to do is to check if the card is connected to the computer and whether it is recognized by it. The adapter is included with all laptops and computers by default, so if you did not assemble your device in parts yourself, you should not think about its absence. But there are times when the wires leading to it are disconnected or depart.
A network card (or network adapter) is a device that allows a computer to communicate with other devices. On modern PCs and laptops, the components of this device are integrated into motherboard.
You will need to open the computer case and check this only if the network card is not displayed in the Device Manager:
If the network card is connected but not enabled, it must be enabled manually. This can be done in several ways. If the card is not damaged, then turning it on will not cause errors.
In the previous section, it was described how to view the card model through the "Device Manager". Find correct adapter and by clicking on it with the right mouse button, select the "Enable" function. If the card is successfully enabled, the down arrow from its icon will disappear.
 Click on the "Activate" button in the "Device Manager"
  Opening the "Control Panel"
 Go to "Network and Sharing Center"
 Click on the sub-item "Change adapter settings"
 Click on the "Enable" button to activate the adapter
If the card cannot be activated in the previous two ways, then perhaps this can be done through the BIOS settings.
 Enter the BIOS by pressing the Delete key
 Open the "Advanced" tab
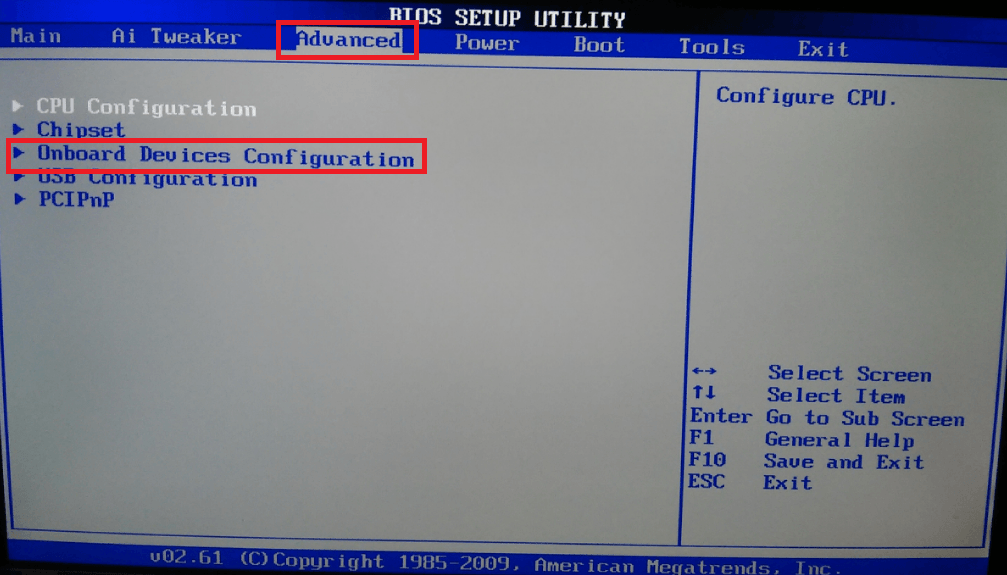 Open the subsection "Onboard Devices Configuration"
 Set the parameter "Enabled" for the line "Onboard Lan"
You can disable an extra card in the same ways that allowed you to enable it: through the "Device Manager", "Control Panel" and BIOS. Only in the last step of the method through the "Device Manager" you need to click the "Disable" or "Delete" button, in the "Control Panel" the "Disable" button, and in the BIOS change the value from "Enabled" to "Disabled".
 Disabling the card through the "Control Panel"
 Drivers are necessary so that the card does not conflict with other components and fully performs all its functions. Usually they are installed automatically when you first connect the computer adapter, but sometimes the drivers crash or become outdated. In both cases, you need to reinstall them yourself. This is done through the "Device Manager".
The positive side of this method is that you will not need to look for drivers manually, the negative side is that you will need an Internet connection, which may not be available if the network card is not working. But if you have the ability to connect to the network, then you can update the drivers in the following way:

The advantage of this method is that you can manually download the card drivers from another computer that has Internet access, and then transfer them to your own and install them. It is recommended to download card drivers strictly from the official website of the company that created it.

If at any of the stages errors occur that prevent the drivers from being installed, then you must remove the adapter from the Device Manager and restart the computer.
 Remove the card from the "Task Manager"
 After the reboot, open the list of connected devices again, and in it the sub-item "Other devices". It will contain the "Network Controller", which is your card. Install drivers on it using one of the methods described above.
 The network controller is located in the sub-item "Other devices"
 If you want to know the physical address, IPv4 settings, gateway address, and other possible information about the adapter, then follow these steps:

You can also find out the parameters of the card through " command line" using the "ipconfig /all" command. "Command Prompt" can be found by going to "Start" - "Accessories" - "Command Prompt". Running this command brings up information about all physical and virtual adapters recognized by the computer.
 We execute the command "ipconfig / all" to obtain information
 The previous paragraph described how to view network adapter information. But you can not only see it, but also change it by doing the following:

The only way to update the network card is to install more recent drivers on it, in which the developers have corrected some of the mistakes made earlier. Installing new drivers is done directly on top of the already installed ones. If you can’t install over it, then you should remove the device, restart the computer and repeat the procedure. How to do this is described in the paragraph "Updating and installing drivers".
Two network cards can work simultaneously and offload each other, if one of them is designed to work with Internet traffic, and the second - to work with a local network. To do this, you need to correctly set the IP, DNS and router settings for both adapters.
You can reset the adapter settings, namely TCP / IP and DNS, using standard Windows tools or using third party program from Microsoft. Conditions under which a reset must be performed:
Launch "Command Prompt" by going to "Start" - "Accessories" - "Command Prompt" and enter the commands "netsh int ip reset c:\resetlog.txt", "netsh int tcp reset" and "netsh winsock reset" which will perform a factory reset. Done, registry branches and system files see the changes, you may need to restart your computer.
 We execute the commands "netsh int ip reset c:\resetlog.txt", "netsh int tcp reset" and "netsh winsock reset" in the "Command line"
 You can download the NetShell program from Microsoft, which does not require installation, from their official website. After launching it, follow the instructions that appear on the screen to reset all changed settings.
 Download the program to automatically reset the card settings
 When setting up or using the adapter, the following errors may occur, which will prevent you from using the Internet or local network. Most of them can be eliminated without replacing the card.
You may encounter a similar error while setting IP parameters or scanning a network module using standard means Windows designed to automatically fix errors.
If you have not changed the adapter parameters, that is, it receives an IP address automatically, then manually requesting an IP address can fix the problem:

Resetting settings to default is the most in a reliable way. How to do this in several ways is described in the "Reset adapter settings" paragraph.
If the previous methods did not help, you should try setting the settings yourself:

This error occurs in the "Device Manager" not only with the adapter, but also with other connected devices, and has code 10. To fix it, you need to update the card drivers. How to do this is described in the section "Updating and installing drivers".
If the adapter does not work, does not install, or does not appear, then the reasons may be the following:

If after you close the window with the changed settings or restart the computer, all the changes you made flies off as if you didn’t make them, then there are two ways to solve this problem: set the settings through the execution of commands and change the wrong values in the registry.
Run "Command Prompt" with administrator rights and execute the following two commands in sequence: "route delete 10.0.0.0" and "route -p add 0.0.0.0 mask 0.0.0.0 X", in the second command "X" is the IP of your router, which usually looks like "192.168.0.1" but may have a different meaning in your case.

A network adapter is needed to connect to the Internet and other computers. If it does not work or does not appear, check its wired connection to the computer, and then the status of its drivers and settings. Remember to make sure that the use of the network card is enabled in the BIOS.
If you have already encountered a reinstallation of the Windows operating system, then you probably could observe a situation where, after installing it, there are no drivers for the network adapter. That is, you can’t go to the Internet, and accordingly, you can’t download the necessary driver. There may be another situation: after failed update drivers for the network card, they simply did not go, and the backup copy was not created. Again, there is no access to the Internet, therefore, you will not be able to download drivers. What to do in such cases? Today I will tell you how to solve this problem.
Unfortunately, we will need the Internet in any case. However, imagine either downloading a 10-12 GB volume of a complete collection of drivers from Driver Pack Solution, or downloading a small very useful utility even through Mobile Internet, which takes up little memory and can help out in such a situation. I think the second option is preferable.
So, we will talk about the 3DP Net program. In general, it is able to solve the existing problem when there is no driver for the network card. Although it takes up little space, it has a large database of drivers for network adapters (100-160 MB, such a volume can be downloaded using even mobile Internet). The authors specially created this software for such cases when there is no network when reinstalling the operating system. The program is completely in Russian and works perfectly on all popular Windows operating systems.
I advise you to download this utility from the official source at this link
To go to the download, just click on "Latest 3DP Net Download"

After starting the 3DP Net program, your network adapter will be automatically detected using a huge database of drivers. By the way, if the driver is not found on your card, the utility will offer to install universal driver for adapter model. In this case, most likely, the Internet should appear, however, some functions may not work correctly (for example, the speed of the network adapter will be limited).

As you can see on the screenshot, the utility easily identified my network card and now you can easily install the driver on the problem device. After the program has completed all the necessary actions, you will see a similar window,


In addition to installing the driver for the network adapter, the 3DP Net utility has a very useful feature - creating a backup already installed drivers. This is useful, for example, in the process of reinstalling the operating system. First, carried out backup drivers, after the OS is installed, and only then the restoration of all previously saved drivers. These steps will save you a lot of time and nerves.
So to create backup necessary drivers, open the program window, select "Driver" and click on the "Backup" item.

Let's wait a bit while the utility scans the entire computer for drivers. After that, a list of devices on which drivers are installed will appear. Here we need to tick off the necessary drivers for backup (if you don’t want to rack your brains, select all devices).
As you can see, everything is very easy and simple. I think the article turned out to be useful to you and helped to solve the problem of restoring the system's network. To prevent such situations, I recommend that you: make backups of drivers when reinstalling the system or when updating a driver for any device; copy a proven set of drivers (3DP Net, Driver Pack Solution or the like) to external media.
That's all, friends! See you soon!
Hello dear reader of my blog! The stable operation of the Windows operating system depends on how correctly you have installed the driver for the device.
In this article, I will tell you how to install a driver for a device in the Windows operating system in several ways.
A driver is a program with which the operating system Windows system gets access to specific device computer (video card, network card, printer, etc.).
Well, now you know how to install a driver for a device in several ways, including a driver updater. The stable operation of your operating system and your overall mood depend on the correct installation of the driver. You can ask all questions about how to install the driver below in the comments.
Finally, you can watch a video on how to install drivers using DriverPack Solution
Well, in the next article I will tell you a free program.
P.S. In order not to miss new and interesting articles on computer programs and everything connected with them, .4.8 /5 23
In order to install an “internal” network adapter connected to the ISA or PCI bus on your computer, you need to follow the sequence of actions suggested below.
1. Power off your computer.
2. Open the computer case by unscrewing the fixing screws on the side wall system block and removing its cover.
3. Select a free slot in which you will install the network adapter. If there are several free slots of the same type (for example, there are 3 unoccupied PCI slots on the board), the slot is selected based on your convenience: later, you can easily remove the network adapter from one slot and insert it into the next one, and the device settings will not change from this . Determining which type of slot is right for your model of network card is also not difficult: ISA connectors are longer than PCI connectors, and they are usually made of black plastic (Fig. 4.6). Do not be afraid to mistakenly place the network adapter in the wrong slot, since the contact part of the board of all such devices has a special cutout or “key”, which, firstly, allows you to more securely fix the device in the port, and secondly, eliminates its incorrect installation. It should be borne in mind that most modern motherboards do not have ISA connectors; instead, they have an additional, even shorter than PCI, AGP connector, designed to connect a number of specific devices, such as video adapters.
Rice. 4.6. Location of ISA and PCI slots on the computer motherboard
4. If the hole located on the rear wall of the system unit, which houses the interface panel of peripheral devices, is covered with a plug, remove it. There are two types of plugs: removable - they are attached to the fixing shelf with screws and repeat the profile of the back wall of the system unit in their shape, and cut out, that is, pressed through with a special stamping press in the manufacture of the computer case. The removable plug must be unscrewed. Don't forget to save the screw that secures the plug, as you'll need it to secure the AC adapter to the case. The cut-out plug should be carefully bent with a screwdriver and carefully broken out, trying not to damage the motherboard. Remove only the plug that corresponds to the slot you have chosen to install the card - you can determine the desired hole in the rear wall of the case by attaching the network adapter to the corresponding connector on the motherboard.
Gently insert the adapter into the socket. Make sure that during the installation of the board there are no distortions, and that the contacts of the network card fit snugly against the corresponding contacts of the slot.
It is recommended to first lay the computer system unit on its side, since it is much more convenient to insert the board by pressing on it from above (Fig. 4.7). In order to improve the connection of the board with the connector, it should be installed in two stages. To do this, place the fingers of one hand on upper part cards closer to the metal face plate, and the fingers of the other hand closer to the back of the adapter. Attach the adapter to the connector and lightly press on its back until the contact pad enters the slot halfway, then press on the front part - the board should fully enter the connector. If you failed to install the adapter the first time, do not press on it with force to avoid possible damage to other devices, pull out the adapter and try to insert it again. After placing the card in the slot, fix it with the fixing screw.

Rice. 4.7. Installing the network adapter in the socket on the motherboard
6. Close the system unit cover and secure it with the appropriate screws.
7. Power on the computer.
If you are using a network USB adapter, it should be connected to the corresponding port located on the back of the computer system unit using a special cord. The adapter, in turn, connects network cable 10BaseT/100BaseT. After completing these operations, you can proceed to install the drivers. Integrated network adapters also do not require additional configuration and installation. In order to prepare them for work, it is enough to install the appropriate drivers, which are usually included in the package. software motherboard.


