Report a bug
Your computer may malfunction from time to time. The cause can be viral activity, power outage and much more. As a result, it disappears HDD, that is, the system cannot recognize it. Worst of all, the data on the hard drive can also be lost.

If a similar situation occurs, you need to use specialized software for recovering disks and data. One such application is TestDisk. It should be noted that this software is distributed free of charge.
Before using the program, it is recommended to get to know it better. It is also recommended to restore using the instructions. If done right, work hard drive will be restored within half an hour.
The TestDisk utility is a program that can find and recover hard drives, boot sectors and data. The program accesses the BIOS in order to find the device connected to the PC. In the same way, the utility determines the CHS geometry and LBA disk size.
The program checks the hard drive for errors. If errors are found in a hard disk partition, the application repairs bad sectors. The application is able to create a new partition table if necessary, or if the old table is not found or is empty. In addition, the utility is able to create a new MBR.
It should be noted that everyone can download the TestDisk program for free. At the same time, it is worth knowing that the application has open source. The utility copes with the tasks set no worse than paid analogues. If you wish, you can use additional software that is included in the TestDisk package.
On the network you can find more than a dozen programs that restore the work of hard drives and data, but most of them are paid. As for TestDisk, the program has more features than some paid products. Before you figure out how to use the program, you should consider its capabilities. The program is capable of:
Data recovery will be faster if beginners study the TestDisk instruction. Specialists can also use this application. It is important that users pay attention to the contextual hint. All commands are located at the bottom of the terminal.
The TestDisk application can be downloaded for free from the official website located at: "www.cgsecurity.org". On the page that opens, click on the link "TestDisk".

After 1-3 seconds, the product description page will load. You need to scroll down to the "Operating systems" section and then click on the "Download" hyperlink.

Immediately after that, another page will open where you can download the latest stable, as well as beta version of the product. Downloading software by clicking on the graphic link "TestDisk 7.0 Free Download".

After the utility is downloaded, you need to unzip the downloaded archive to any convenient place. If desired, the program can be moved to removable media, as it is completely portable. This means that the software does not need to be installed and it does not need to be unpacked into system folder such as Windows or System32.
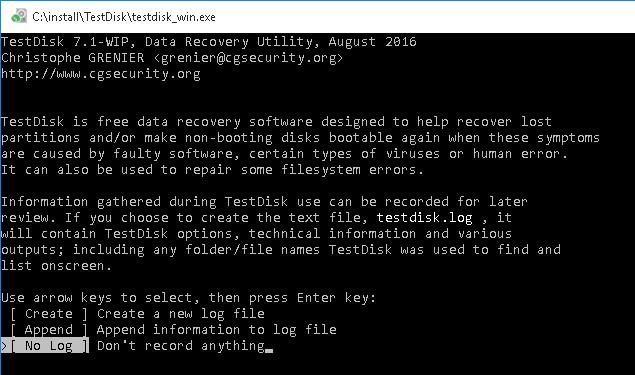
Now it remains to run testdisk_win.exe and you can get to work. It should be noted that the program is not distributed in Russian, so do everything according to the instructions. Users not familiar with English are advised to use a translator.
After starting the program, a terminal window will appear. The application first asks if a progress report should be generated. To create a report, select "Create". To control the program, just use the "Up", "Down" and "Enter" buttons. 
In order to select "Yes", you need to press the "Y" button. If you need to refuse the action, the "N" button is pressed. To exit the menu, just press the "Q" button. Note that the ESC key does not work. To copy files, just press the "C" button.
Now you need to select the hard drive on which the files were lost. It should be noted that the list displays not only local drives but also removable media. After selecting the hard drive, click the "Enter" button.

When a list of available Partition Tables appears, you must select the one that matches your computer. For example, Intel. Most often, the utility automatically detects the partition table and places it in the first place in the displayed list.

To test the partition structure of the selected storage medium, as well as search for missing files, select the "Analyse" item. When the result appears, you will see information about the disk. Now you need to select Quick Search from the menu located at the bottom of the screen. Immediately after that, the program will ask if you want to search for partitions created under Vista. It is best to agree and press the "Y" button, which means "Yes".

In a few minutes, all disk partitions will be displayed on the screen, even those that need to be restored. To view the list of files, select a section and press the "P" button. Directories and files with Russian names will not be displayed correctly (short names are displayed normally). If necessary, files can be copied by specifying the destination folder and pressing the "C" button. The copy process may take some time.

To exit this section, press the "Q" button. For a thorough search of files, the "Deep Search" command is selected. If you need to write these structures to the MBR partition, you need to press the "Write" command.
After you manage to restore the partition, you must restart the computer. When the PC turns on, you can see the appearance of all the missing files. It should be noted that the hard drive may not appear immediately, since it does not have a letter. To do this, you must enter the administration section, and then assign a letter.
An application such as TestDisk has a number of advantages that are worth paying attention to. The main advantage is that it can be used completely free of charge. At the same time, the program is open source.
Users will like the fact that the program is able not only to find a missing hard drive, but also to recover information. Data can be copied to another hard drive. It should be noted that the application copes with such serious situations that even paid products cannot handle.
In addition to restoring information and connecting a hard drive, the utility is able to find errors. After testing, all found errors are automatically corrected by the program. Similar work can be done with any file systems.
Another advantage is the ability to restore the boot sector. Most of the programs are not able to reanimate the disk with the operating system. It does not matter which OS was installed on the computer.
Despite all its advantages, the application has several significant drawbacks. First of all, it should be noted that there is no GUI. The user will have to work through the terminal, and this can confuse many beginners.
The second drawback, arising from the first, is the lack of a Russian-language interface. All commands are written in English language. The same goes for hints. If you have difficulty with the language, you will have to use a translator.
Users who are faced with the loss of a hard drive or information from it should use the TestDisk program. Of course, the utility is controlled through the terminal, but there is nothing complicated about it. It is enough to carefully study all the commands and read the questions asked by the application, and the recovery will take place without problems. It is best to follow the instructions, then it will be much easier to work with the program. Use the program only if you really need it.
Video review of TestDisk
If the partition table is damaged, data can usually be salvaged Your drive can easily be left without a working partition table - if you turn it off too early external drive from power if the virus tries to nest on a protected area of the hard disk, or if the sectors in which the table is written have simply become unreadable.
After that, you will definitely receive a message from Windows: “Before using the disk in drive X:, it must be formatted. Format?".
Rescuing data and cleaning the hard drive Of course, in the vast majority of cases, you do not want to format the drive at all, because your data is on it. But without a partition table, the system will not be able to access the hard drive. You need to find a way to somehow extract information from the corrupted media.
First of all, you need enough disk space to store the rescued data. To restore the disk partition table, you can use the free TestDisk utility. It can be downloaded from the manufacturer's website cgsecurity.org.
You will also need the DiskPart tool. Starting with the Vista version, this the program is underway bundled with Windows, but XP users will have to download it from microsoft.ru.
The TestDisk utility is needed to detect data without a partition table and copy it.
After that, DiskPart will clean up the hard drive, so that in the end you can create working partitions using your own Windows tools"Disk Management", which is available in the "Computer Management" section.
Don't be afraid command line Of course, the TestDisk and DiskPart programs are powerful tools that can be difficult to use. But do not be afraid: carefully read each message, view each screen and try to follow our instructions as much as possible.
If your computer uses multiple HDDs and/or solid state drives, it is especially important to follow the drive letters and symbols. There is nothing more offensive than deleting partitions of a completely uncomplicated healthy medium. By the way, after the procedure, you can safely use a hard drive with a once corrupted partition table. Even if bad sectors on the HDD became the source of the problem, you should not be afraid that this will happen again.
The disk's own sector management tool marks them as bad so that they are not used in the future. Even if on this moment problems with hard drive no, save this manual and when an emergency arises, you will be fully prepared.
NOTE: we we are not responsible for damage to your hardware or loss of data that may occur when you follow the recommendations in the article.
How to do it?
1. RECOGNIZING THE PROBLEM If Windows warns that your hard drive is not formatted, this is not necessarily true. You can check if this is the case by running the built-in Windows Disk Management tool.
2. CHECK THE HARD DISK If there are no problems in the Disk Management tool (Control Panel | Administration | Computer Management"), the disk will be labeled as "RAW" or have the status "Healthy".
3. FIRST RECOVERY ATTEMPT Use your own Windows utility chkdsk in command editor cmd lines, which must be called on behalf of administrator . Run the command "chkdsk x: /f", where instead of "x" substitute the letter of your drive.
4. RUN THE PROGRAM FOR ANALYSIS If the previous procedure did not bring success, run TestDisk. Use the "Enter" key to confirm the "Create" setting. In the next step, select your hard drive and run the test with the “Proceed | Intel | analyze | Quicksearch.
5. OVERWRITE THE PARTITION TABLE Select your partition, click "Continue" and create a new partition table using the "Write" function. If the section does not appear, repeat the process using "Deeper search".
6. SAVE THE DISAPPEARED FILES If the process was not successful, repeat the steps of step 4, but after "Continue" select "List files". Follow the instructions at the bottom of the window to copy files.
7. RETURNING THE HARD DISK TO WORKING STATE After successful copying, run the DiskPart program on behalf of administrator . Using the "List disk" function, display all hard drives, select the one you need with the "Select disk x" command and clean it ("Clean").
8. FORMAT AND PARTITION In Disk Management, initialize and, if necessary, partition this disc, and then return data to it.
I recently ran into a situation where my old external USB the disk is unreadable in Windows, defined as RAW. This indicates that Windows cannot determine the structure of the file system on the disk. The reason a partition is defined is how RAW can be different: the disk may not be partitioned, the partition table header may be erased/corrupted/missing, the disk may have bad sectors, or physical problems with the drive itself or its controller.
From the user's point of view, such a RAW disk appears in Explorer, but its size is defined as 0 (zero). When trying to open or read data from a RAW partition, various errors appear:
To use a drive in drive E:, first format it. Do you want to format it?
You need to format the disk in Drive E: before you can use it. Do you want to format it?
No access to E:\. File system volume is not recognized.
Cannot Access Disk. The volume does not contain a recognized file system.
Note. We deliberately do not consider the option of physical disk damage, because software tools it is not curable. General recommendation: it is advisable to first check the disk using any S.M.A.R.T status viewer utility.
As a rule, the easiest way to restore the disk to working capacity is to delete the current RAW partition and re-create it with formatting. But the data will, of course, be lost, which may be categorically unacceptable. Let's try to run a disk check with standard utility CHKDSK check:
The utility returned that CHKDSK cannot be performed on RAW discs.
The type of the file system is RAW.
CHKDSK is not available for RAW drives.
 To restore the original file system on a RAW disk without formatting, we will use a free console utility Test Disk.


Advice. Enough useful functions file browsing mode on the file system - the ability to restore individual folders / files to another disk. To do this, in view mode, press the key C.

Advice. Keep in mind that if you restore in this way system disk, in addition to the partition with Windows itself, depending on the version of the OS, there may be other partitions, a partition with a bootloader, a partition with a recovery environment, etc. To understand the structure Windows partitions I recommend to get acquainted with the articles,. In the event that the boot sector of the disk is damaged, the TestDisk utility will offer to try to restore it using the option RebuildBS.

Test Disk Maybe:
TestDisk can find and reconstruct lost partitions for multiple file systems:
So let's look at an example of recovering a lost hard disk partition.
Run Test Disk possible as in the operating system itself windows, so with under
DOS with USB drive or LiveUSB in case the partition on which the operating system was installed crashed.
For example, let's take the recovery of an accidentally deleted NTFS logical partition.
Recovery of a FAT32 partition (instead of the NTFS partition shown in this guide) can be achieved by following the same steps.
You need to run the program with the privileges / rights of "administrator", if we are working with under the OS, for this you need to click right click mice by testdisk_win.exe previously unpacked from the archive to the computer.
A program window will appear, the program interface is in English, but pretty much everything costs by pressing a few keys:


TestDisk will display the Partition Table types.

TestDisk displays the following menu Partition Table Status
 Select the "Analyse" menu item to check the partition structure of the current disk and search for "lost" partitions.
Press Enter again to continue the procedure.

Next, the current partition structure will be displayed. Examine it for missing sections or errors.
Here we can already see if we found the lost partitions of the hard disk
Choose Quick Search
(Quick Search) and press Enter to continue.
The program then prompts Should TestDisk search for partition created under Vista?
(Search for partitions created under Vista OS?).
Be sure to click Y (YES) if we recover data from under OS Windows Vista& Seven , yes, if you just press yes, nothing bad will happen.
TestDisk should find hard disk partitions, including lost ones.

To exit, press the key Q, also to view data about the disk at the very bottom, its size and file system data are indicated.
Click Input(Enter) to continue.
The following window will appear:

If you have any comments or additions, I'd love to hear from you.
There is almost everything that is required for daily work. Start to gradually abandon pirated versions in favor of more convenient and functional free counterparts. If you still do not use our chat, we strongly advise you to get acquainted with it. You will find many new friends there. Moreover, it is the fastest and effective way contact project administrators. The Antivirus updates - always up-to-date section continues to work free updates for Dr Web and NOD. Didn't have time to read something? The full content of the ticker can be found at this link.
This example of a problematic situation (recovery example) is step by step actions when working with TestDisk, allowing you to restore and fix damaged / th partition / s.
We have a 36GB hard drive containing 3 partitions. Unfortunately:
This recovery example will show step by step using TestDisk to recover those "lost" partitions:
One of the conditions for working in the program is:Important points for using TestDisk:
- The program must be launched with "administrator" privileges/rights.
- To go to TestDisk, use the arrow keys Up down And PageUp/PageDown .
- To continue, confirm your choice by pressing the key Enter .
- To return to the previous display or exit TestDisk, use the key Q (exit ).
- To save the changes made while running TestDisk, you must confirm them with the key Y (yes) and/or Enter
- To write data to the MBR partition, you need to select "Write" by selecting from the keyboard and press the key Enter .
1. If the primary partition on the hard disk contains operating system, then, most likely, which is no longer loaded; due to the primary boot sector partition.
2. If the hard disk contains secondary partitions that cannot be accessed or you can connect your disk to a second channel in another computer (usually a CD / DVD drive is connected there), and the following symptoms are observed, the following symptoms would be noted as follows:
If TestDisk has not been installed yet, you can download it from here: TestDisk Download . Extract all contents of the archive.
To recover data from a hard drive, USB flash drive, Smart card, CD or DVD, or other media, you need to have full access to it.
To restore data from a device image:
To recover data from any other device, run testdisk device , i.e.
Whenever possible, choose raw (raw) /dev/rdisk* devices instead of logical /dev/disk* devices to improve data transfer speed.
TestDisk displays the Partition Table types.
All folders and files are displayed normally. (The utility does not understand the Russian language, so files with Russian names will not be displayed correctly)
 |
Deeper Search (deep search will look for FAT32 boot sector backup, NTFS boot superblock backup, ext2/ext3 superblock backup to find all partitions,
the program will scan each cylinder:
After a deep search, the results are displayed as follows:
First section "Partition 1"
which was found using the boot sector backup. On the last line of the screen, you can read the message "NTFS found using backup sector!" (NTFS found using sector backup)
and the size of your partition. "Partition 2" (partition 2) is displayed twice with different sizes.
Both sections are listed with status D
as remote because they overlap each other.
 |
Everything works because you found the right section!
Note:
The listing of the FAT directory is limited to 10 clusters, some files may not appear in the lists of detected ones, but this does not affect the recovery.
Use the left/right arrow keys to change the status of the selected partition to L(ogical)
 |
Tip: read How to recognize primary and logical partitions?
Note: If a partition in the list is defined as *(bootable - bootable) but you cannot boot from this partition, you can change its status to P
rimary partition (Main partition).
Now you can write the restored partition structure.
Note:
extended partition is installed automatically. TestDisk determines this by analyzing the different partition structure.
More information about repairing your boot sector can be found in TestDisk Menu Items . The following message is displayed:
 |


