VirtualBox is an operating system emulator based on the host machine, but simply on our computer. Installing a program usually does not take much time and does not require any skills, and today we will look at this procedure in detail.
First you need to visit the official website and download the installer. You can do this using the link below. Next, we will take a closer look at the installation process and analyze the main nuances of setting up the program.

So, we have installed the application, now let's look at its configuration. Usually, after installation, it starts automatically, unless the user himself canceled this function, in which case you will have to start it yourself. When this happens for the first time, a welcome window is displayed. As virtual machines are created, they will be displayed on start screen along with the settings.

Before creating the first virtual machine, you must configure the application. You can open the settings window by following the path "File" - "Settings". More fast way- pressing a combination ctrl+g.

Tab "Are common" allows you to specify a folder for storing virtual machine images. They are quite voluminous, which should be taken into account when determining their location. The folder must be located on a drive that has enough free space. In any case, the specified folder can be changed when creating the VM, so if you have not decided on the location yet, you can leave the default directory at this stage. Paragraph "VDRP Authentication Library" remains by default.

On the tab "Input" you can set keyboard shortcuts to control the application and the virtual machine. The settings will be displayed in the lower right corner of the VM window. It is recommended to remember the key Host(This ctrl on the right), but there is no urgent need for this.

The user is given the opportunity to set the desired language of the application interface.

You can also enable or disable the check for updates option.

Display settings must be configured separately for each virtual machine. Therefore, in this case in the settings window, you can leave the default value.

The same goes for network settings.

Installation of add-ons to the application is carried out on the tab "Plugins". If you remember, add-ons were loaded during the installation of the program. To install them, press the button "Add Plugin" and choose the desired extension. Please note that the versions of the plug-in and the application must match. This procedure is discussed in more detail in the articles below.
Since we all love to experiment, dig into the system settings, run something own production, then you need to think about a safe place for experiments. Such a place for us will be the VirtualBox virtual machine with installed Windows 7.
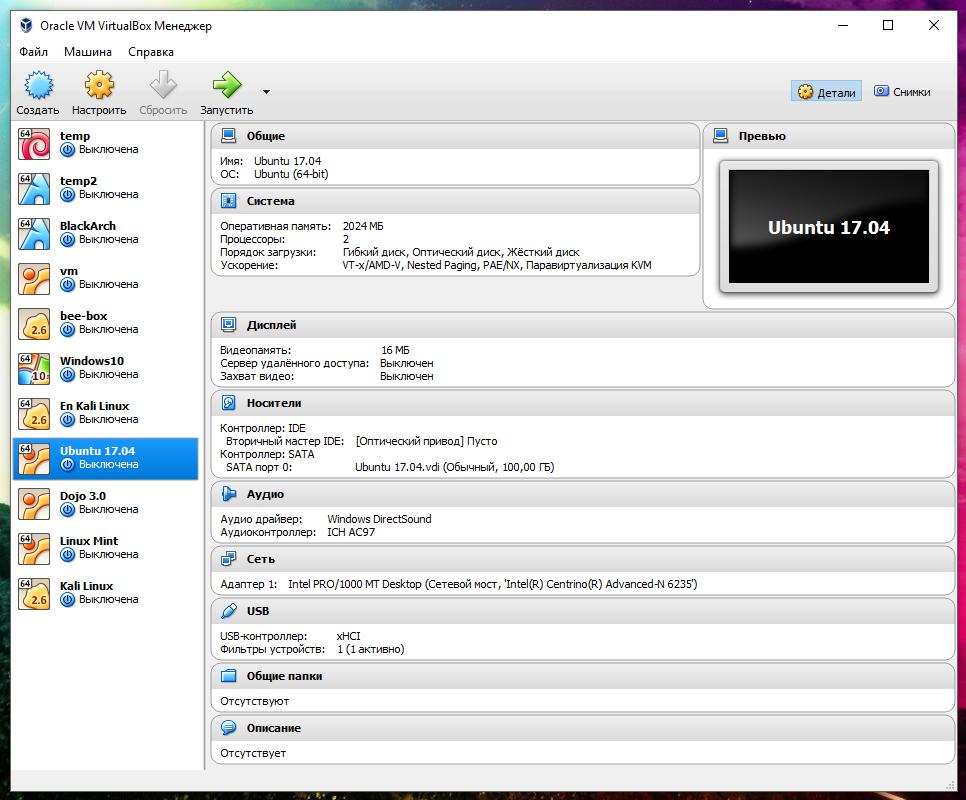
When starting the VirtualBox virtual machine (hereinafter referred to as VB), the user sees a window with a completely Russian-language interface.
Recall that when you install the application, the shortcut is automatically placed on the desktop. If this is your first time creating virtual machine, in this article you will find detailed instructions which may be useful at this stage.
So, in a new window, click "Create", after which you can select the OS name and other attributes. You can choose from all available operating systems.

Go to the next step by clicking Next. Now you need to specify how much RAM to allocate to the VM. For its normal functioning, 512 MB is enough, but you can choose more.

After that we create virtual hard disk. If you have previously created discs, you can use them. However, in the same article, we will focus on how they are created.
We mark the item "Create new HDD» and move on to the next steps.


In a new window, you need to specify where the new disk image should be located and how large it is. If you are creating a boot disk containing Windows 7, then 25 GB is enough (this figure is set by default).

As far as accommodation is concerned, best solution will place the disk outside system partition. Failure to do so may result in overload boot disk.
If everything suits, click "Create".
When the disk is created, the parameters of the created VM will be displayed in a new window.

Now you need to configure the hardware of the virtual machine.

In the "General" section, the 1st tab displays key information about the created machine.
Let's open a tab "Additionally". Here we will see the option "Picture Folder". It is recommended to place the specified folder outside the system partition, since the snapshots are large.
"Shared Clipboard" implies the operation of the clipboard when interacting with your host OS and VM. The buffer can work in 4 modes. In the first mode, the exchange is made only from the guest operating system to the main one, in the second - to reverse order; the third option allows both directions, and the fourth disables communication. We choose the bidirectional option as the most convenient.
"Mini toolbar" is a small panel that allows you to manage the VM. This console is recommended to be activated in full screen mode, since the main menu of the working window of the VM repeats it entirely. The best place for her top part window, since there is no risk of accidentally pressing one of its buttons.

Let's go to the section "System". The first tab offers to make certain settings, which we will discuss below.
1. If necessary, adjust the volume random access memory VM. At the same time, only after its launch it will become completely clear whether the volume is chosen correctly.
When choosing, you should start from what size physical memory installed on the computer. If it is equal to 4 GB, then it is recommended to allocate 1 GB for the VM - it will function without "brakes".
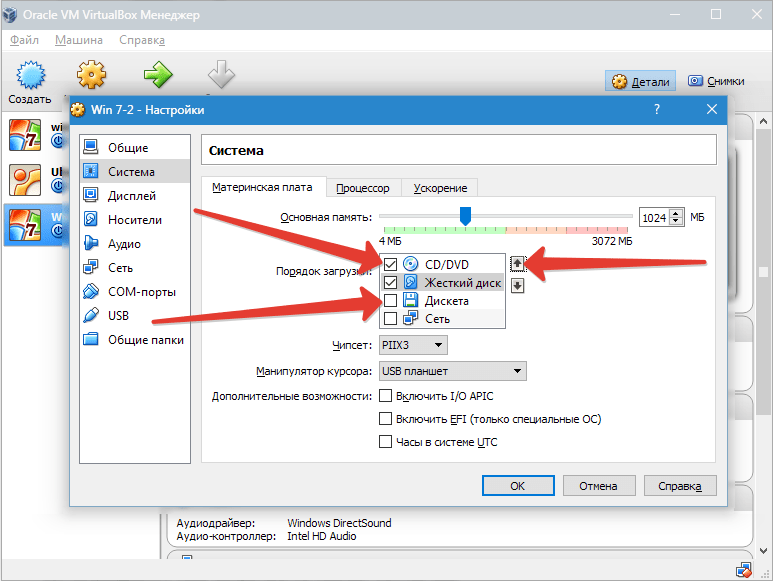
2. Let's determine the order of loading. A floppy disk (floppy) player is not needed, turn it off. The first in the list should be assigned a CD / DVD drive in order to be able to install the OS from a disk. Note that this can be either a physical disk or a virtual image.
See the reference section for other settings. They are closely related to the hardware configuration of your computer. If you set settings that are not consistent with it, the VM will not start.
Bookmark "CPU" the user specifies how many cores are on the virtual motherboard. This option will be available if hardware virtualization is supported. AMD-V or VT-x.

Regarding hardware virtualization options AMD-V or VT-x, then before activating them, you need to find out if these functions are supported by the processor and whether they are originally included in BIOS– it often happens that they are disabled.

Now consider the section "Display". Bookmark "Video" indicates the amount of memory of the virtual video card. Activation of two-dimensional and three-dimensional acceleration is also available here. The first of them is desirable to include, and the second parameter is optional.

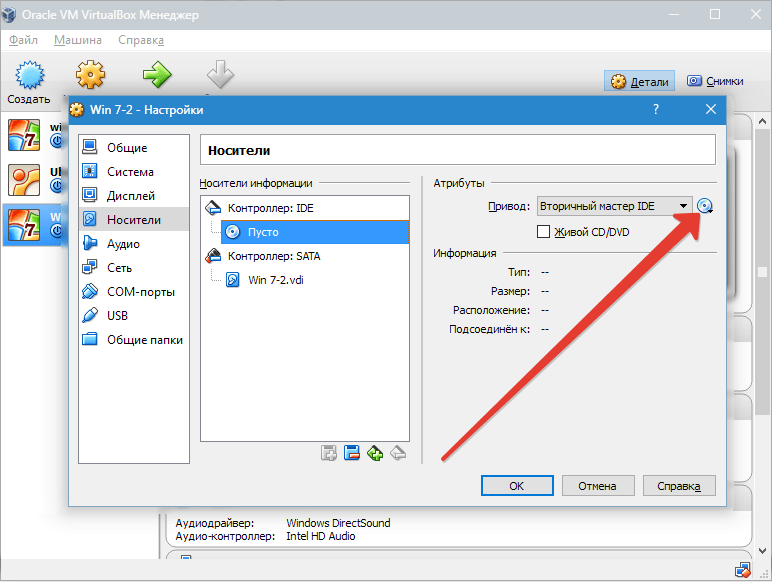
In chapter "Carriers" all disks of the new virtual machine are displayed. Also here you can see virtual drive with an inscription "Empty". We will mount the installation image into it. Windows disk 7.

The virtual drive is configured as follows: click on the icon located on the right. A menu opens in which we click "Choose an image optical disc» . The next step is to add the operating system boot disk image.

We will not cover network issues here. Note that network adapter is initially active, which is a prerequisite for the VM to access the Internet.
On the section COM there is no point in dwelling in detail, since nothing is connected to such ports today.
In chapter USB check both available options.
Let's go to « Shared folders» and select the directories to which the VM is planned to provide access.
The entire setup process is now complete. Now you can start installing the OS.
Select the created machine in the list and click "Run". The installation of Windows 7 on VirtualBox itself is very similar to a regular Windows installation.
After downloading the installation files, a window with a choice of language will open.


We accept the terms of the license.

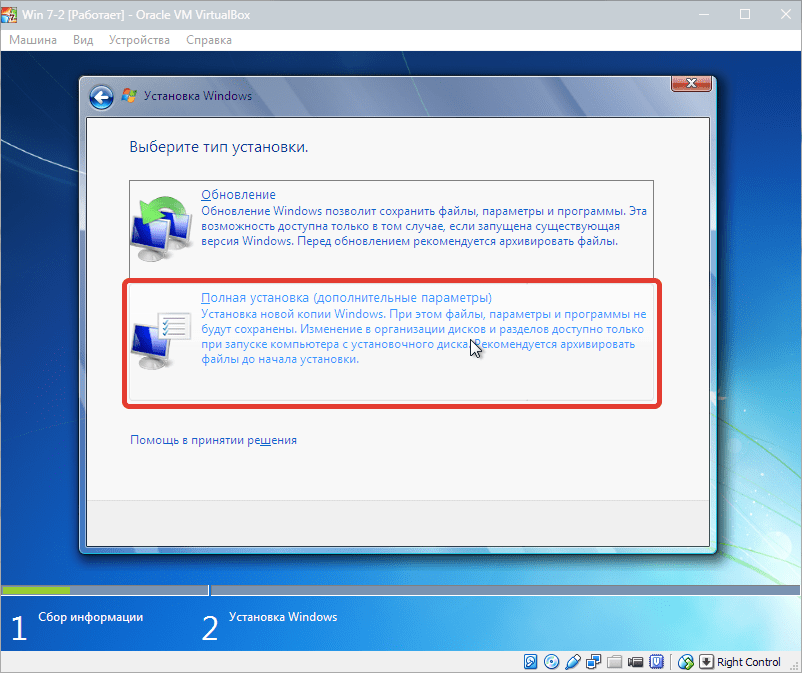
Then choose "Full installation".
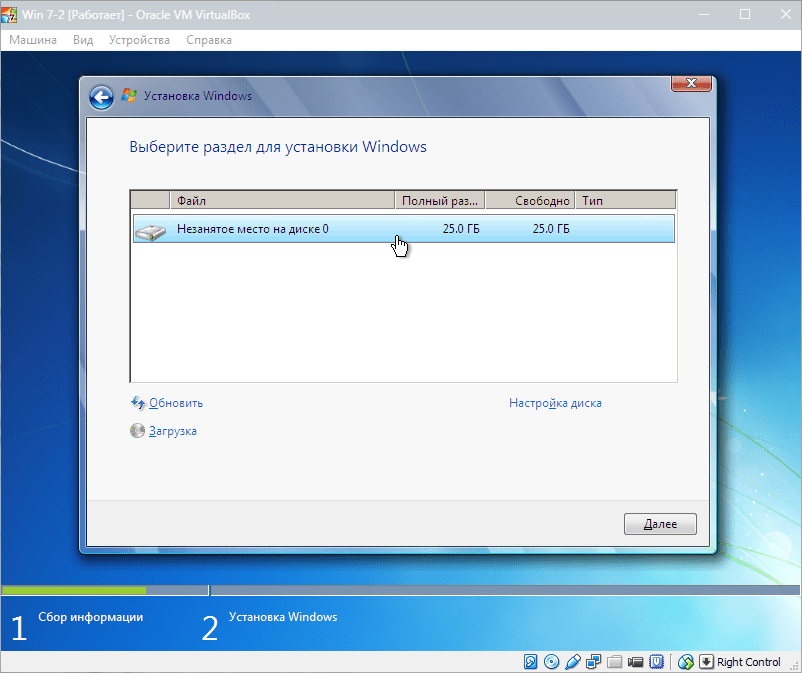
In the next window, you need to select a disk partition for installing the operating system. We have only one section, so we select it.

During installation, the machine will automatically restart several times. After all reboots, enter the desired username and computer.


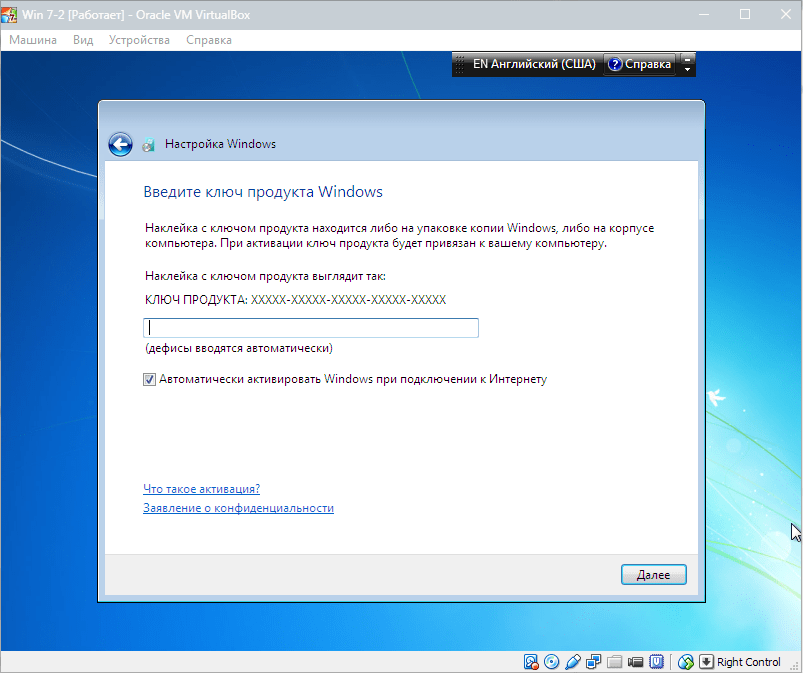
Here we enter the product key, if any. If not, then just click "Further".

Set the timezone and date.

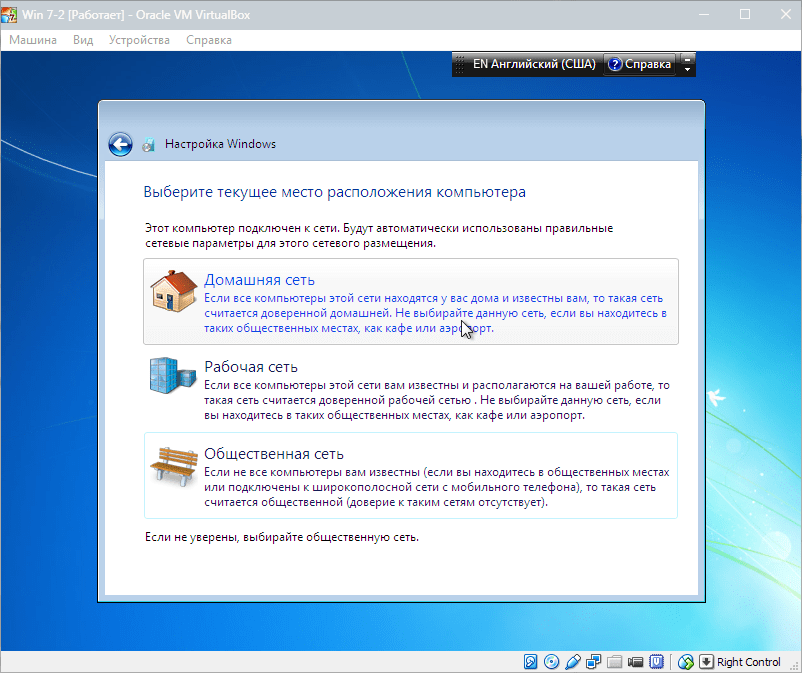
Then we choose which network to attribute our new virtual machine to. Click "Home".
After these steps, the virtual machine will automatically reboot and we will get to the desktop of a freshly installed Windows 7.

Thus, we installed Windows 7 on the VirtualBox virtual machine. Then it will need to be activated, but this is a topic for another article ...
How to install a virtual machine on your computer and most importantly, which virtual machine to choose? Before asking you this question, I wandered around the Internet and realized that the easiest to install and configure are VirtualBox and Virtual PC, but there are also Hyper-V and VMWare. I understand that now you will ask me: “Why do I need a virtual machine?” My answer: "I want to install different operating systems and experiment with them, I'm very interested: Windows XP, Windows 7, but especially Windows 8!" The Windows 7 I have installed works fine with all the applications installed in it, but the hype around new Windows 8 is only growing and I don’t want to stand aside, so you have already written two dozen articles about the eight on your site and continue to write. I’m thinking of installing a virtual machine (but I won’t choose which one) to install Windows 8 into it and slowly study it like that, and then you look in October, when it comes out Final version Windows 8.1, I will install it as a second operating system. Mark.
Hello admin! on the Microsoft website and wanted to install it on my VirtualBox virtual machine, but the installation fails with the error “ VT-x/AMD-V hardware virtualization features enabled but not functional". What to do?
Friends, if you have never dealt with a virtual machine, then I will explain to you in a nutshell what it is. A virtual machine is a real computer created inside your main operating system and in this computer you can install other operating systems (several!) and not only Windows. You can, as you wish, experiment with the operating system installed in the virtual machine, go out to the Internet, install various software without fear of infecting your computer with a virus, in short, connect your imagination and you will find a use for it.
For example, one of my friends learned to reinstall operating system and divide the hard disk into several partitions only using a virtual machine.
As for the choice of a virtual machine, an article will be written on our website about each of the existing ones. Recommend to you install virtual machine VirtualBox, its capabilities are enough not only for a beginner, but also experienced user Plus, it's free. Start with her. Simple and intuitive settings, stable operation, made it one of the most popular.
What are the virtual machines?
Virtual PC is free, very easy to install in Windows 7, follow the link to the Microsoft website, download and install.
The installer of the virtual machine is downloaded, we must run it as an administrator, otherwise in the future you will be plagued by various errors when working with the virtual machine. Right click on the installer and select "Run as administrator"

The program is very easy to install on our computer.


We start the virtual machine as an administrator.

Click on the "Create" button.

First of all, I will draw your attention to the fact that if you decide to install on a virtual Windows machine 7 64-bit, choose from Windows list 7 64-bit. If you decide to install another operating system, for example Windows 8.1 64-bit, then be sure to select Windows 8.1 64-bit in the drop-down list and enter a fictional name for the virtual machine, for example Windows 8.1, then click Next.


In this window, you need to specify the amount of memory that you can allocate to the virtual machine. Friends, you must understand that the RAM allocated to a virtual machine will not be available to the operating system installed on your computer. If you have only 2 GB of your own RAM, then you cannot allocate more than 1024 MB to a virtual machine, your operating system, when working with a virtual machine, will slow down a lot. If you are installing Windows 8, then the optimal size for it is just 1024 MB. As you can see, my computer has 8 GB of RAM installed, which means I can allocate more than 1 GB, for example 2 GB.

Create a new virtual hard disk.

File type select VDI

At this point, we need to specify the format of the virtual hard drive. If you check "Dynamic virtual hard disk" This means that the space on your hard disk allocated for the needs of the virtual machine will not be taken immediately, but as files accumulate in your virtual machine. I recommend that you use this option.

Specify the size of the virtual hard disk. If you are creating a virtual machine for the first time, specify 50 GB, this is for Windows installation 8 is enough. But I personally indicate for myself a larger volume. Why? In the process of working with a virtual machine, I will install many operating systems, so I will indicate the amount of 240 GB.
can create virtual disk different from system drive, it's very simple, click on the yellow folder and the explorer will open, in it specify any partition on your hard drive to place the virtual hard disk.

We see the outcome. So, we have created a virtual machine, now we need to configure it and finally install Windows 8 into it.
Select our virtual machine and click "Configure".

System. Remove the checkmark from the "Diskette" item. We leave the CD / DVD-ROM as the first boot device, since we will boot the virtual machine from installation disk or an image of Windows 8, we leave the Hard disk as the second device.

The "Processor" parameter is left as is.

"Acceleration" Hardware virtualization must be enabled, for sure you will install a 64-bit operating system.

Display. Video. "Enable 3D Acceleration" and "Enable 2D Acceleration"
Video memory 128 MB

Media. A little of your attention!
Your physical disk drive will be available in the virtual machine, in my case Drive "I" and if you have a Windows disk you can use it to install the operating system, check the Live CD/DVD box.
There is also a virtual drive here, let's connect an image with the Windows 8 operating system, which we downloaded in yesterday's article, to it. In the "Media" option, select "Drive" and "Select optical disc image"

Explorer will open, in which you can select the downloaded Windows image 8, then click "Open".

The Windows 8 image will attach to the virtual drive.


What is a USB filter? Imagine such a situation, all USB devices connected to your computer will be detected in the operating system that is installed on your virtual machine. Naturally, you don't need this. USB filters will determine which USB device should be defined in the virtual machine, and which one in your main system. To see how it all works in practice, we must first install an operating system into our virtual machine. Windows system 8.1, and then everything will become clear to you, read on.

In order for all connected USB-2.0 flash drives to work properly in your virtual machine, install the VirtualBox 4.2.16 Oracle VM VirtualBox Extension Pack plugin, download it at the office. website https://www.virtualbox.org/
Before moving on to the question of how to install Windows on Virtualbox, you need to find out what Virtualbox really is and what it is for. Everything is very simple - Virtualbox (meaning one of the varieties of VM) is nothing more than software with which you can make one or more virtual computers on a real PC that simulate the work of real personal computers. On a VM, you can “fill in” an operating system that is not the same as on a real PC.
Virtualbox is Oracle's free software, ideal for use on a computer at home. Naturally, in order to install Windows 7 on a computer, you first need to install a VM (virtual machine).
This is how it looks

So, the virtual machine called Windows 7 VM (or any other that you like) is already ready and you can go to the settings (respectively, use the Configure button).

This is how the menu will look like
There are a lot of proposed settings, we focus on those that are necessary for installing Windows 7.

Pay attention to the icon in the upper right corner with the image of a folder. It will be necessary to click on it to carry out this operation.
After that, we calmly leave the settings window and select the Run button to carry out the installation of Windows 7 itself. What is most interesting is that installation on Windows 7 on a real and virtual computer is no different.
That's all you need to know about how to install windows 7 on Virtualbox.
VirtualBox is an intuitive program to use. If you are not interested in theory and want to start practicing right away, then refer to the instructions for using VirtualBox to install and run operating systems in virtual computer:
In this series of articles, the features of VirtualBox are discussed in detail, and a detailed description of its options is also given. This material is recommended to you if you want to thoroughly understand VirtualBox, and also if you have any problems or questions that you cannot solve on your own.
VirtualBox is a program that allows you to run multiple operating systems on the same computer at the same time. Among these operating systems can be Linux, Windows, Mac and others. VirtualBox itself also works on various systems(is cross-platform).
This means that with using VirtualBox being, for example, in Windows, you can boot into Linux, work with any Linux applications as if you have an operating system installed Linux system. You can, for example, run other Windows versions to check settings and programs that you don't want to run on your main operating system.
Virtualization (running operating systems inside virtual computers using VirtualBox) has a number of useful features:
When we are talking about virtualization (as well as to understand further information), it is useful to get acquainted with the terminology, especially often we will encounter the following terms:
Host operating system (host system).
This is the operating system of the physical computer on which VirtualBox was installed. There are versions of VirtualBox for Windows, Mac OS X, Linux, and Solaris.
Guest operating system (guest OS).
It is an operating system that runs inside a virtual machine. Theoretically, VirtualBox can run any x86 operating system (DOS, Windows, OS/2, FreeBSD, OpenBSD).
Virtual machine (VM).
This is a special environment that VirtualBox creates for your guest operating system while it is running. In other words, you are running a guest operating system "in" a virtual machine. Normally the VM will appear as a window on your computer's desktop, but depending on which of the various VirtualBox interfaces you're using, it may be displayed full screen or remotely on another computer.
In a more abstract way, internally VirtualBox thinks of a VM as a set of parameters that define its behavior. These include hardware settings (how much memory the virtual machine should have, which hard drives VirtualBox should virtualize, through which container files, which drives are mounted, etc.) as well as state information (these may include: the virtual machine in currently running, saved, its snapshots, etc.). These settings are reflected in the VirtualBox Manager window as well as in the VBoxManage command line tool. In other words, the virtual machine is also what you can see in the settings dialog.
Guest Additions.
This refers to special software packages that come with VirtualBox, but are meant to be installed inside a virtual machine to improve guest OS performance and add extra features.
To download VirtualBox go to the official website https://www.virtualbox.org/wiki/Downloads . Click the link " Windows hosts» to start downloading setup file. Run the file with a double click - the installation process is similar to any other program in Windows.
You can choose which components to install, it is recommended to install all VirtualBox components for full support of all options:
You may receive messages about installing unsigned drivers - agree to install them. For the program to work correctly, agree to all installer requests.
The following warning says that on a short time will be dropped network connections, i.e. you will be temporarily disconnected from the network. We agree that the Internet connection will resume automatically in just a second.

On Linux, VirtualBox can be installed in several ways:
For Debian and derivatives (Ubuntu, Linux Mint, Kali Linux) you can install VirtualBox from the standard repositories:
sudo apt install virtualbox virtualbox-qt linux-headers-"$(uname -r)" dkms vde2 virtualbox-guest-additions-iso vde2-cryptcab
For in Arch Linux and derivatives (BlackArch and others) you can install VirtualBox from the standard repositories:
Sudo pacman -S virtualbox linux-headers virtualbox-host-dkms virtualbox-guest-iso
For information on installing on other distributions, as well as additional details, please visit the corresponding page: https://www.virtualbox.org/wiki/Linux_Downloads
To extend the functionality of the base package VirtualBox can be downloaded additional packages extensions. Oracle currently provides one extension pack.
The VirtualBox Extension Pack adds the following features
VirtualBox extension packages have the extension .vbox-extpack. To install an extension, simply double-click on the package file and an assistant will appear to guide you through the installation steps.
To view currently installed extension packs, open main VirtualBox Manager(main window of the program), in the menu " File» select « Settings". In the window that opens, go to the " Plugins”, there you will see the currently installed extensions and you can remove the package or add a new one:

You can find the extension pack for the latest version on the download page.
If you are not using the latest version of VirtualBox, then you can find the extension package at - select the folder with your version number and download, then double-click the file with the extension .vbox-extpack.
On Windows, VirtualBox can be launched from the menu or from a desktop shortcut.

On Linux, you will also find VirtualBox in the menu,
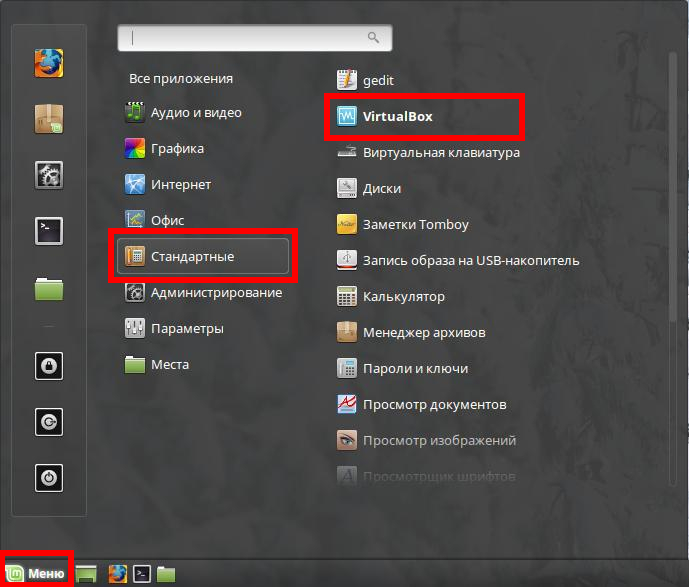
or you can type the command in the terminal:
virtual box
A window similar to the following will open:

Or, if you have already created virtual machines: