One day it may turn out that a PC or laptop refused to start the Windows operating system or “frozen” during responsible and urgent work. Hard drive errors while running Windows are not the last cause of computer failure. However, any problem can be corrected if you know what is causing it.
Whether it's a traditional "hard drive" or a newfangled SSD drive, a critical error appears anywhere on it. Disk error - physically or software damaged sectors, system infection Windows viruses, failures in PC components (from parts of the drive itself to components motherboard computer). The task of the user is to figure out what caused the errors on the disk.
Hard disk problems are unspecified errors on it, not signed by a numerical code (for example, error 11). First of all, the media from which it is proposed to copy valuable data is indicated.
Windows warns you that your data may be seriously affected
Action plan:
The last two points will not be considered - this is the task of specialists in computer service centers.
Do the following.
 Click on the first suggested option - this is the backup wizard
 Start setting up your backup
 Choose another, healthy and working disk
 If you give the system a choice, Windows will copy the contents of all user folders by default
 Select everything you want to copy except the destination drive
 After that, the system will ask you to double-check the parameters and start copying
To recover files from backup do the following:

The process will start. After the backup is completed, check if everything has been restored.
 Click the link that appears to view a list of files and folders from the previous copy
 Checking the disk identifies logically or physically problematic sectors of the hard drive or SSD drive, which is the main drive in the computer. Do the following:

If you still don't trust standard means disk check - use the program Victoria. The version of Victoria for Windows is almost the same as the version for DOS - except for one thing: after downloading it, you can immediately run it to check the disk that is still running Windows systems, without resorting to other disks, including removable ones.
Also get a new drive - in case the old one still outlived its usefulness.
Boot viruses corrupt the boot record and the NTFS(5) file table that Windows 7 works with. Because of this, valuable data is "flying" that is not easy to recover special utilities as well as the system itself.
As an example, the Dr. Web CureIt, which allows you to quickly check your hard drive for malicious code.

The application takes up more than 100 MB - due to the extensive anti-virus database of all time. After two days of work, this database is considered outdated - viruses appear almost hourly.
The computer refuses to boot from the hard drive, reporting an error reading system Windows files.
 To try to resolve the hard disk read error, press Ctrl+Alt+Del to restart
 A professional way to fix such an error is third party utility disk check with bootable media Windows or other operating system(if there is a version of this utility for it).
Checking the disk with built-in tools hides some details, although its use is not useless.
What does not make sense to do:
Change the BIOS boot priority of the PC from different disks. Do the following (using the Award BIOS version as an example).
 Press the key indicated at the end of the list of devices checked when turning on the PC
 To enter the management of the operation of components, select Integrated Peripherals
 The inscription USB Controller Enabled means that the USB controller is enabled
 Go to advanced BIOS settings to manage PC boot from different types carriers
 To configure the system, the boot order from media must be changed
 In the first place in the download priority should be a flash drive
 Set the First Boot Device section to USB-HDD (First boot from USB drive)
 When a message appears asking the BIOS to save the settings, press Y and Enter
Now, when restarting the PC, it will first of all poll the ports for the presence of a flash drive or a removable hard disk (HDD / SSD) - and only then try to start Windows from the built-in disk.
For example, a ready-made flash drive with Victoria under DOS and a laptop with a failed drive. Do the following.
 In the window that appears, select Victoria
 In the Victoria for Notebook section, select the second item
 To get started, check how to run different functions of the Victoria program by pressing F1
 To exit help, press X and go to check disk
 In the window that appears, select Ext. PCI ATA/SATA and press the Enter key
 Busy channels in the program are immediately visible - enter the channel number of your disk and press Enter
 A message about the successful identification of the channel will be displayed at the bottom
 Select the mode with the cursor keys and confirm the selection with the Enter key
 The channel port number is attached to the disk data
 After the disk is fully initialized, you can start checking it.
 Check that the disk size does not exceed 1 TB
 Enter the last gigabyte, which will end the scanned area of the disk
 Select the linear mode of disk scanning by the program
 Select the BB Advanced Remap option - it uses sectors from the spare area
Everything, the process has begun, the Victoria application will inform you about the end with the sound of a “tweeter” in the computer. When bad sectors are found, "remapping" (sector reassignment) will be automatically performed.
 Replacing bad sectors with Victoria is one of the most effective ways to temporarily fix a hard drive
 The forecast of further work of the disk can be estimated according to the SMART monitoring data. Press F9. The status will be shown at the top. If it is “Good”, there is still a reserve for replacing bad sectors. The status has changed - the replacement of the disk with a new one is coming. If it is not possible to replace the disk, try to crop it programmatically, excluding bad sectors with the cropped area (often they are close to each other, many of them are in a row), but this is for those who love difficulties.
 The Good status indicates that the disk is in good condition.
 There are several options:
"Error 11" has nothing to do with bad sectors on the disk. 90% is a software problem. It occurs when installing unverified programs that have source codes for installation, which the developers have collected with some omissions. The message is generated by the unarc.dll system library, which is responsible for unpacking content for any installed program and is one of the components of the Windows Installer service.
 Error code 11 can be replaced by any code from 1 to 10
 Some users, not understanding the problem with the source of the program being installed, update or replace this file (it "lies" in the C:\Windows\System32 directory) with any of its versions from the Internet. As a result, Windows may report that some files have been replaced by unknown versions and require you to insert installation DVD or flash drive to restore them.
The solutions to the problem are as follows:
They may be:
Restoring a PC or laptop to disk failure is not a problem if you act wisely and consistently. May you be lucky!
Of all the various problems that can arise with your computer, one that few people worry about is hard disk drive (HDD) errors. Our hard drives can contain precious memories such as photos and videos, important documents and a music collection built up over the years. Our files can be synced to the cloud or online backup, making it more secure due to hard drive issues.
However, it's still a good idea to keep your HDD in first-class condition to avoid the chance of losing anything before it is hidden in the cloud. The first sign that a hard drive is having problems is when there are logical errors on the drive. When a drive has logical errors they are unreadable or cannot be written to. When a disk has a bad sector, it does not mean that there is something physically wrong with the disk, which also means that it can be repaired.
The best way to keep your hard drive in good condition is to use the . As the name suggests, this program can check your drive and fix hard drive errors. When it's running, CHKDSK scans the hard drive, fixes logical sector errors, marks bad sectors that can't be fixed, and moves data to safe and healthy locations on the hard drive. This handy tool, but this utility does not work automatically. Instead, users must manually start it.
However, CHKDSK is not for everyone. The utility is intended primarily for PCs with hard drives. If you have a computer with solid state drive(SSD), CHKDSK is not needed. It shouldn't hurt anything if you run it, but some people have reported that the utility caused them problems. Regardless, SSDs come with their own built-in troubleshooting system and don't require CHKDSK.
There are actually two ways to check your disk for errors on a Windows 10 PC. The first one is to use the disk error check utility.

It may say that Windows didn't find any errors, but you can still check your drive. If so, click "Scan Disk" and the scan will begin.
Another way
The old school CHKDSK can also be run from command line. Unlike older versions of CHKDSK, you do not need to restart your computer to run the utility. To get started on Windows 10:
To run the check disk utility on a single disk PC, you only need to enter chkdsk And press Enter on keyboard; however, this will only check your drive for errors, and it won't actually do anything to fix any issues it finds.
To solve the problem, you must add so-called switches. This additional commands that tell the command line utility to take an extra step. In our case, the switches have the value "/f" (fix) and "/r" (restore readable information). So the complete command would be " chkdsk /f /r' - Pay attention to spaces as they are critical with command line utilities.
chkdsk /f /rIf you want to run CHKDSK on a system with multiple drives like C: and D: drive, you should run a command like this " chkdsk /f /r D:", but, again, don't forget the spaces.
Now that you know how to use the disk check utility, don't forget to run a scan every quarter to keep an eye on the health of your hard drive.
If the HDD is making strange noises or there are problems writing and reading information, you should use one of the programs to check the hard disk for errors. Depending on the task (checking the disk surface for damage, searching for bad sectors, fixing errors, etc.), different software may come in handy.
You can quickly check the disk for errors using standard system tools, but to restore the hard drive you will need special third party programs. By learning how to check the health of a hard drive using various utilities, a user of any level will be able to cope with the problems that have arisen.
The CheckDisk system service is the simplest hard drive diagnostic program that is not able to find complex errors and fix bad sectors, but is useful for fixing basic problems. It is available on all versions of Windows and can be used to check drives of any type. All users need to know how to check hard drive for errors with this tool.
The GUI version of the utility is the most convenient for novice users. You can start it through the disk management menu, which can be accessed in two ways:
In the window that opens, select the device that needs analysis, click on it right click mouse and select "Properties" from the drop-down menu. Going to the "Service" tab, you need to run the hard drive diagnostic program.
The system will check and automatically correct errors if the disk is in this moment not busy with read or write processes. Otherwise, the program will offer to test after restarting the PC. If necessary, you can see detailed information about the state of the HDD in the test results window.
The GUI version does not always save, since sometimes it is required to check the status of the hard drive from safe mode or without starting the operating system at all. In such cases, the console comes to the rescue, which can be started before the system starts using the boot disk.
After opening the recovery console, you need to run the chkdsk / f command, which will check all connected drives. In some cases, this will help fix the error. However, in most situations, if the failure of the HDD has led to the inability to start the system, a deeper check of the condition of the hard drive will be required.
To take advantage console command from inside the system:
Checking the HDD via the command line will be a little faster than using the GUI version of the program, the results will be shown right here in the console.
The Linux system also has standard tools - hdparm and smartctl, launched from the console.
If standard utilities are not suitable, hard drive diagnostics can be carried out using simple third-party programs. They allow you to get more information about the health of the HDD, but in case of serious problems they will not work, since you cannot fix the breakdowns with their help.
HDDScan is a free program that performs analysis in two modes:
The tool evaluates the speed of reading and writing in various sectors, marking "slow" cells. In the course of the analysis, the program makes sure that the tested hard drives do not overheat; at the end of processing, the user is presented with a complete report.
HDDScan good versatility. The utility allows you to check disks for errors regardless of the type of device: it can both check an external hard drive and analyze a RAID array, SSD drive or memory card.
Crystal Disk Mark has only one function - it evaluates the speed of reading and writing. Despite this, it is often used, since it is still possible to check the hard drive for serviceability with just two indicators.
For the test, different algorithms are used, one of which is the sequential recording mode. The program gradually fills all the space on the drive with blocks of the size specified by the user, after which it cleans the HDD. The same technique is used by hard drive manufacturers to check product quality. Its disadvantage is that it accelerates the wear of SSD drives.
CrystalDiskInfo And DiskCheckup similar in function set, differ only in interface. They check the state of the hard drive using S.M.A.R.T. algorithms and compile a history of checks, which allows you to track the dynamics of changes. CrystalDiskInfo has more options for visualizing history. For example, you can build a graph, not just get a written report.
Another feature of these programs is convenient system notifications. Hard drive deep tests usually take a long time. If the user needs to move away from the computer, he can turn on notifications of critical HDD errors by E-Mail.
Some HDD manufacturers have developed their own utilities for analyzing the state of the hard drive. They are intended for use with devices of the same name, it is possible to diagnose a hard drive from another company with their help, but this must be done carefully. Unlike more simple programs, these utilities have versions in different languages, including Russian. What program is better to analyze the state of the HDD?
Seagate's proprietary program exists in two versions: a standard version for running under Windows and a DOS version in iso-image format, from which you can make bootable flash drive. It is recommended to use the second option, since the check in this case will be more accurate and efficient.
SeaTools uses part of the S.M.A.R.T. to test the hard drive without giving details about each item. Three tests can be done:
During the check, the program automatically corrects the errors it finds.
Owners of WD hard drives should be aware of how to check the performance hard drives using proprietary software from this manufacturer. Its set of features is similar to that of the program from Seagate, but somewhat expanded and allows for deeper work with the affected device.
There are two additional functions:
Unlike SeaTools, this program for HDD diagnostics can be freely used with devices from any manufacturer to check the hard drive for errors - no problems have been identified with this.
If you need not only to check the hard disk for errors, but also to fix bad sectors, you cannot do without a complex software, which performs the most in-depth analysis of the HDD status.
According to many users, Victoria HDD is the best hard drive troubleshooting software. The program has received such a reputation due to its wide range of functions.
Victoria exists in two versions:
It is better to use the second version. Diagnosing the HDD outside the system allows you to achieve the best results, so it is always recommended to follow the principle - "if possible, test the disk from the boot disk." As a last resort, you can use a LiveCD of another OS, for example, Linux distribution like Ubuntu.
Victoria HDD has a variety of functions:
When checking, you need to pay attention to the access time to sectors. It should not exceed 200-600 ms. You can also see the temperature of the disk during operation, but this is not so important.
HDD Regenerator is a software for professional hard recovery disk. She not only marks bad sectors as unused, but also tries to reanimate them. For this, it is not used standard method deep formatting, but its own algorithm based on the transmission of signals of different levels to the sector. Despite the professional level, inexperienced users can also use this software, since it is not difficult to test a hard drive with its help thanks to a convenient Russian-language interface.
Program features:
The program is not suitable for everyone, since you can check the hard drive for operability with it for free, but you will have to pay $90 for the sector recovery function.
If you do not want to pay, you can use TestDisk - free program, which can restore the partition table, boot sectors and MFT. It also detects bad sectors, can recover deleted information and fix file system errors. The only drawback is the lack of a graphical interface, you have to work from the console.
If after checking the HDD and fixing all the problems, the computer does not stop working incorrectly, it is worth checking the registry. Perhaps the failures are not caused by hardware failure, but by internal system errors.
Each user knows and will definitely get into such situations when something breaks down in the computer, works incorrectly or does not work well. There is nothing more annoying than badly thinking technology, which now and then freezes or, for unknown reasons, controls itself. Of course, all parts can break, but the mechanical parts that are still preserved in modern computers are especially susceptible to destruction. One of them is the hard drive.
In this review, not only theory will be considered. The authors had a failed disk at hand, the operating system of which loaded for about 20 minutes. It was decided to fix this and quite successfully!
In order to prevent damage and repair the hard drive in time, or at least save the necessary information, you need to regularly monitor the status. To do this, it is recommended to carefully monitor the "health" of your computer. Here are the points to pay close attention to:
It is not necessary to sit at the computer all the time system block and listen to how the problematic detail “does” there. It is enough just to periodically listen and carefully monitor the state of the entire computer, then everything will be in order.
In general, if your hard drive is fine and doesn't need emergency help, you can run a proactive error check. This will speed up your computer and save your nerves. Let's look at the algorithm of this useful procedure under the Windows 7 operating system.
Another little tip. If you decide to “treat” a disk that is a system drive for a computer, do it immediately before turning it off.
In order for any technique to work well, and it was easy for you to manage it, you need to monitor and care for it. Especially when it comes to a device that is much more complicated than a stove and it is sometimes quite difficult to figure it out on your own. Carry out preventive work, and if necessary, call the wizard and then with your computer, and, therefore, everything will be fine with your data.
This program is best downloaded from the portal (softportal.com). We launch the installer.
If you leave a check mark in the last window, the program will start immediately. Let's not delay and let's get started.

And what is that Full Version menu? It turns out that the program is paid, and our compatriot requires $ 90 for a key. In addition, when removed, it behaves worse than a virus. Requires a restart of the operating system and takes a long time to think.


If the selected partition is not a system partition, a disk error check will start immediately. If you want to check the C: drive, the OS will display a notification that the operation cannot be performed at this time. Do not consider this behavior of the OS as a failure. Since all system data resides on the partition, it cannot be disabled while Windows is running.
Just click on the "schedule check" button and restart your computer. After turning on the PC, checking the disk for errors will begin even before the operating system loads.

To run the chkdsk utility from the command line, follow these steps.
As well as when starting from graphic shell, checking the disk for errors will notify you that the program cannot be executed if you specify system partition. At the same time, the question will appear on the screen: "Do you want to execute the task after restarting the PC?" Press the Y key to say yes, or N if you don't want to check the HDD.
If Windows refuses to start due to a file system problem, a hard drive error check can be run from the Recovery Console. Open the BIOS by pressing the DEL key on home screen computer boot. Set as the boot device (First Boot Device) the laser disc drive. Insert the Windows installer disc.

After booting from the DVD, a language selection window will open. At the bottom of it will be located the item "System Restore". Remember that if errors occur on the HDD, it makes no sense to roll back to earlier restore points, overwriting data can lead to even more problems.
In a window that offers a choice of recovery options, click on the "Command Prompt" button. The syntax of the command remains unchanged - chkdsk [drive letter]: /f /r. In this case, the disk check will start immediately without rebooting.
If chkdsk does not work, and critical errors because HDDs continue to occur, you should perform a more thorough check with . Hard drive manufacturers themselves produce special tools for testing their equipment. In addition to this software, you can use the Victoria and MHDD applications.
Be prudent! Checking the disk for errors by a third-party application should be performed only after creating backups of all important data. Moreover, you need to save copies of the data in external storage.
Let's make an explanation. "Bad sectors" are areas of the disk from which data cannot be read. Their very appearance is a bad sign, but acceptable, but a constant increase in their number indicates that the disk is most likely no longer a “tenant”. It is necessary to think about replacing it, and not to delay the decision for a long time.
So, the chkdsk program will check the disk, the check time depends on the size of the disk and the number of files on it. The system drive will only be checked after a reboot. You will have to be patient and wait for the work to be completed. When finished, a report will be displayed.
If you cannot log in, you will need to use the recovery tools and run the program from there.
Another way to check a disk is to use the check built into the OS. For this you need:


If the selected hard drive is used by any program, then to check it is necessary to stop its work. Click the "Disable" button and the test will continue. The scan time depends on the size of the disk and its fullness.
To check the system partition in this way, the system will display a message that testing will continue after the reboot. Agree with this, after restarting the computer, wait for the scan to finish.
With all due respect to Microsoft, only third-party programs can provide detailed information about disk health. If you need laptop repair, in Lyubertsy there is a good workshop where they can check your hard drive as well. Moreover, they will do this using third-party programs, which we will discuss later.
This program is paid, but a free trial period will give you the opportunity to check the drive. The program is multifunctional, with its help you can perform many actions with the disk, including defragmentation, disk cleaning, etc. Now we are interested in the "Test" and surface check modes.
To start the check you need:

To determine the state of the disk surface, you need to go to the "Control" tab and click on the "Surface Test" section.

The progress of testing can be observed in the window that opens. To indicate the state of the disk surface, color marking is used:
If the disk is large, the check may take a long time.
A popular program for getting information about a disk, checking it and fixing errors. To start testing you need:

To view the status of the disk, go to the "Map" tab, where all information about the surface of the disk will be located. Sectors are marked with squares of different colors. They mean:

Perhaps the most popular utility for determining the health of a hard drive. It can be run both from Windows and from bootable media, if it is not possible to start the operating system. Consider working with a program launched from Windows.
After launching, in the main program window you will see several tabs, the most important of them are:

In order to start the test, you must click the "Start" button and wait for the end of the work. First of all, you need to pay attention to the column of multi-colored rectangles with numbers next to them. Color-coded information about the speed of reading from disk sectors is displayed. Ideally, the values should be near rectangles with different shades of gray.

The numbers next to the green or orange rectangles show the number of sectors for which you have to spend more time reading. The red rectangle shows that there are sectors on the disk, information from which can be read, but this requires a lot of time.
Most likely, these "red" sectors are candidates for bad ones. You should remember their number, and after some time re-scan. An increase in their number indicates degradation of the disk surface. Moreover, areas that are marked in blue may soon appear.
You can try to restore these "broken" sectors. To do this, you need to set the "Remap" mode and start the scan again. If possible, the program will restore these areas of the disk. If the "blue" blocks remain, you should think about replacing the hard drive.
Each user knows and will definitely get into such situations when something breaks down in the computer, works incorrectly or does not work well. There is nothing more annoying than a bad-thinking...
computer using standard program"check disk (chkdsk)", which is part of operating systems from Microsoft.
I don’t know how it is at work or at home, but for our IT department, work is added immediately after a sudden power outage on one of the floors of our organization. I remember one time the electrician changed the outlet and, without embarrassing at all, turned off all the automation in the stairwell, and this is about fifty computers in one wing of the floor, two 50-port switches and a wireless wifi hotspot access in the wiring closet :)
And closer to winter, such things, alas, happen more often (people begin to abuse all kinds of heaters and power). Operating systems really do not like such manipulations with power supply, and far from all user computers are equipped.
What usually happens is the following. After another similar mass blackout, there is always one or two computers on which, after the resumption of power supply. At an arbitrary stage of loading, the operating system goes into a cyclic "reboot" (reboots) and here our intervention is urgently required :)
IN similar cases, as a rule, you need to scan the computer's hard drive with the check disk program, which checks the integrity of the OS file system and tries to eliminate the errors and inconsistencies found.
Let's first see how you can check a hard drive using the Windows GUI?
To do this, right-click on the icon of the desired disk and select "properties" from the menu that opens. In the window that appears, go to the "Service" tab.
And there we press the button "Perform verification".
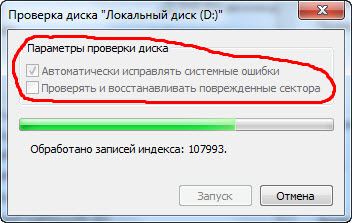
Under "Check Disk Options" we have two checkboxes:
We can select any of them (or both) and click the "Start" button.
This graphical interface runs standard utility"check disk", to check the hard drive using the "chkdsk" command. Moreover, if there is only the first check mark, the program checks the hard drive in three stages, and if there is a second one, it adds two more levels of verification to these.
After completing all (three or five) verification steps, the program will inform us about the successful completion of the procedure and (for Windows 7) offer to familiarize ourselves with its results. By clicking the arrow next to "Show Details", we can see a list of all the checks that the utility has made.

Graphics, windows, buttons... all of these are great, but let's dive a little deeper with you and see how you can check your hard drive using the command line " cmd»?
Note: we discussed working with the cmd command interpreter in one of the .
There is a task - to check the hard drive of a computer that has stopped loading (as a rule, after a sudden power outage) and restore the operating system to working order.
What do I do in such cases? I remove the drive from the "victim" and connect it, as an additional one, to my computer. I press the "Start" button (for Windows XP - run) and in the field that appears I enter cmd.
Note: a similar procedure can be carried out on the same (affected) computer by booting from some type of recovery disk of the “Live CD” type, but for me personally it’s more convenient. I, to the heap, carry out general preventive maintenance of the "patient" and test the drive for the presence of . They also like to appear after such "surprises".
Now I suggest typing the following in the command interpreter line: chkdsk /?
Construction " /? ' will allow us to view all the available arguments (switches) that we can apply along with the main command chkdsk.
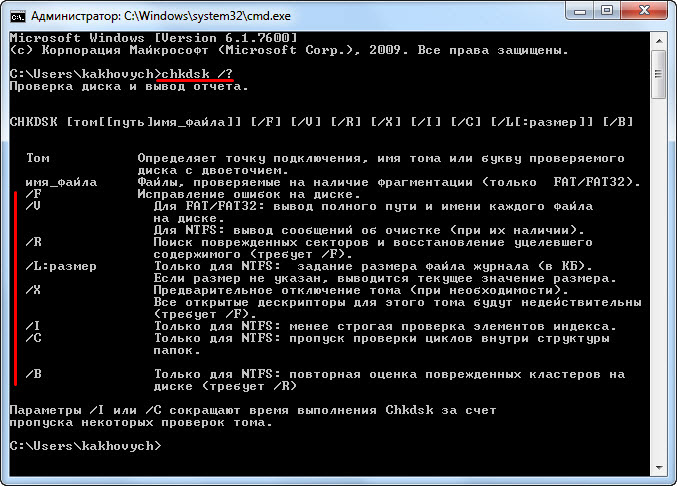
As you can see, the explanation for each "key" is given in Russian, so it will not be difficult to figure it out. Additional arguments are entered through the sign " / " (right slash). But let's now try to check the hard drive with the chkdsk command.
Take a close look at the screenshot below:

Circled in red at the top is the design " chkdsk d: /f/r» What does it mean? Check (chkdsk) drive d (d:) by applying the keys “ f" And " r” (what they do can be found in the previous screenshot). A little lower you can see the completed stages of this check and the number of remaining ones (stage 1 of 5, stage 2 of 5, etc.), as well as the percentage of completion of the current one.
Interestingly, executing the chkdsk command with the attribute /f launches a check in three stages, completely similar to the one that occurs after selecting the first checkmark in GUI:

Adding a "Key" /r identical to the second checkbox in the screenshot above (check and repair bad sectors). In fact, to check the hard drive, the same utility is launched. It's just that it's more convenient for someone to use graphic windows and a mouse, while someone manages the command line.
The check window at boot and before the start of the operating system is slightly different, but the essence remains the same:

At the top it is indicated which logical drive is currently being checked, what type of file system it contains, and below are the verification steps that are already familiar to us. For Windows 7, such information is presented on a black background.
So, back to our console. A complete program report might look like this:

The point marked in red is of paramount importance to us here: the number of kilobytes in bad sectors. If there is "0" here, then everything is fine :)
Let's take a quick look at what exactly does each of the hard drive test steps do?
The first pass checks the files. During this phase, CHKDSK checks the entry information for each file in the main table. MFT.
Note: MFT - Master File Table (main file table), which contains information about all files and their attributes located on the volume with the file NTFS system. Approximately 12% of disk space is reserved for it.
The first stage is checking each file for internal consistency (for example: the same data sector is marked as belonging to two different files)
During the second stage, the indexes are checked. What it is? These are the directories of the file system, it is checked whether the record segment for each directory and file is contained in the main file table, and also the date of the file modification time and their size. The CHKDSK command checks for files that are missing (blank) or have an incorrect record of their location in the MFT.
Further (at the third stage) of the hard disk check, security descriptors are analyzed. They contain information about the owner of files (directories), about the access rights to them at the file system level. Audit information for user datasets is verified.
If the fourth stage of the hard disk check is involved, then it includes the search for bad sectors (bad blocks). If one is found, the program automatically adds information about it to the MFT table and no more entries are made on it, and the sector is excluded from the file table.
The fifth step is to check the free disk space. Nothing much to comment here :)
Thus, we can check our hard drive for the correctness of all the metadata it contains.
The term "metadata" this case, means "data information." Metadata ensures the integrity of the file system, and also contains information about all its files and directories. It contains information about the clusters that make up each file, about which clusters are free and which are busy, contain bad sectors, etc.
And now - the harsh reality! :) Unfortunately, it happens that the metadata structure is so corrupted that the command chkdsk not only does not help, but can further complicate the situation of restoring the operating system.
On the other hand, there were cases when my inner instinct told me to still check the hard drive using this tool and I got the result I needed. So try it and decide for yourself whether to use this recovery tool or not?
The screenshot below is a photo of one of the longest verification cycles in my practice. The utility worked for more than two hours, while the following picture was constantly on the monitor:

But by the flashing of the hard drive LED on the front, it was clear that there was an active data exchange with the drive, so I waited stubbornly and waited for the complete completion of this process. After reboot Windows operation has been restored!
The CHKDSK command actually does a lot of checking and can fix a wide variety of errors found in the file system and in separate files. For example, you can see such "terrible" inscriptions during a disk scan:

Another example from practice:

And now the team is making corrections to the file itself hard disk.

In all cases, the final scan result is positive. Do not neglect this possibility of "repair" provided by the developer himself! Sometimes disks with a damaged file system (when you can’t even access the disk and in its properties file system displayed as RAW) miraculously come back to life only after using this command.


